
Delay Throws at the End of the Bar | RONE Throw Complete Guide · 7 min · Watch on YouTube
1Welcome to RONE Throw
RONE Throw is a delay built around a single move. Turn the big knob up and whatever is playing is thrown into a tempo-locked ping-pong delay - dotted 8th by default - whose repeats bloom into a reverb wash the further you go. The feedback loop is band-limited, so it can run almost infinitely without ever turning to mud: the tail cleans itself into a fixed midrange cloud that sits behind the mix. Turn the knob back down and the atmosphere keeps ringing: THROW opens a throw, it never closes one, and MIX is the fader that takes it down.
Producers do this with a send bus, a ping-pong delay, an EQ and a limiter on the return, and a sidechain compressor keyed from the source. Throw folds that whole chain into one knob so you can perform it, automate it with a single line, or map it to a controller.
Where it shines
- End of a build - automate THROW up over the last bar and the riser dissolves into the drop as atmosphere.
- Changing direction - KILL cuts the tail in 6 ms, so the next throw starts clean.
- Vocal throws - the last word of a phrase echoes away into space while the next line stays clear (DUCK does that for you).
- Psytrance leads and plucks - dotted-8th and 3:2 cross-rhythm delays that stay in the pocket at any feedback.
- Instant atmosphere - park the knob high on a pad or a chord and it becomes a bed.
The 10-second version
- Insert Throw on a lead, a vocal, a riser - anything with a shape.
- Play the track.
- Turn THROW up - repeats appear on the grid, then open into a wash.
- Turn it back down; the tail rings out by itself.
2Installation with the RONE Plugins Center
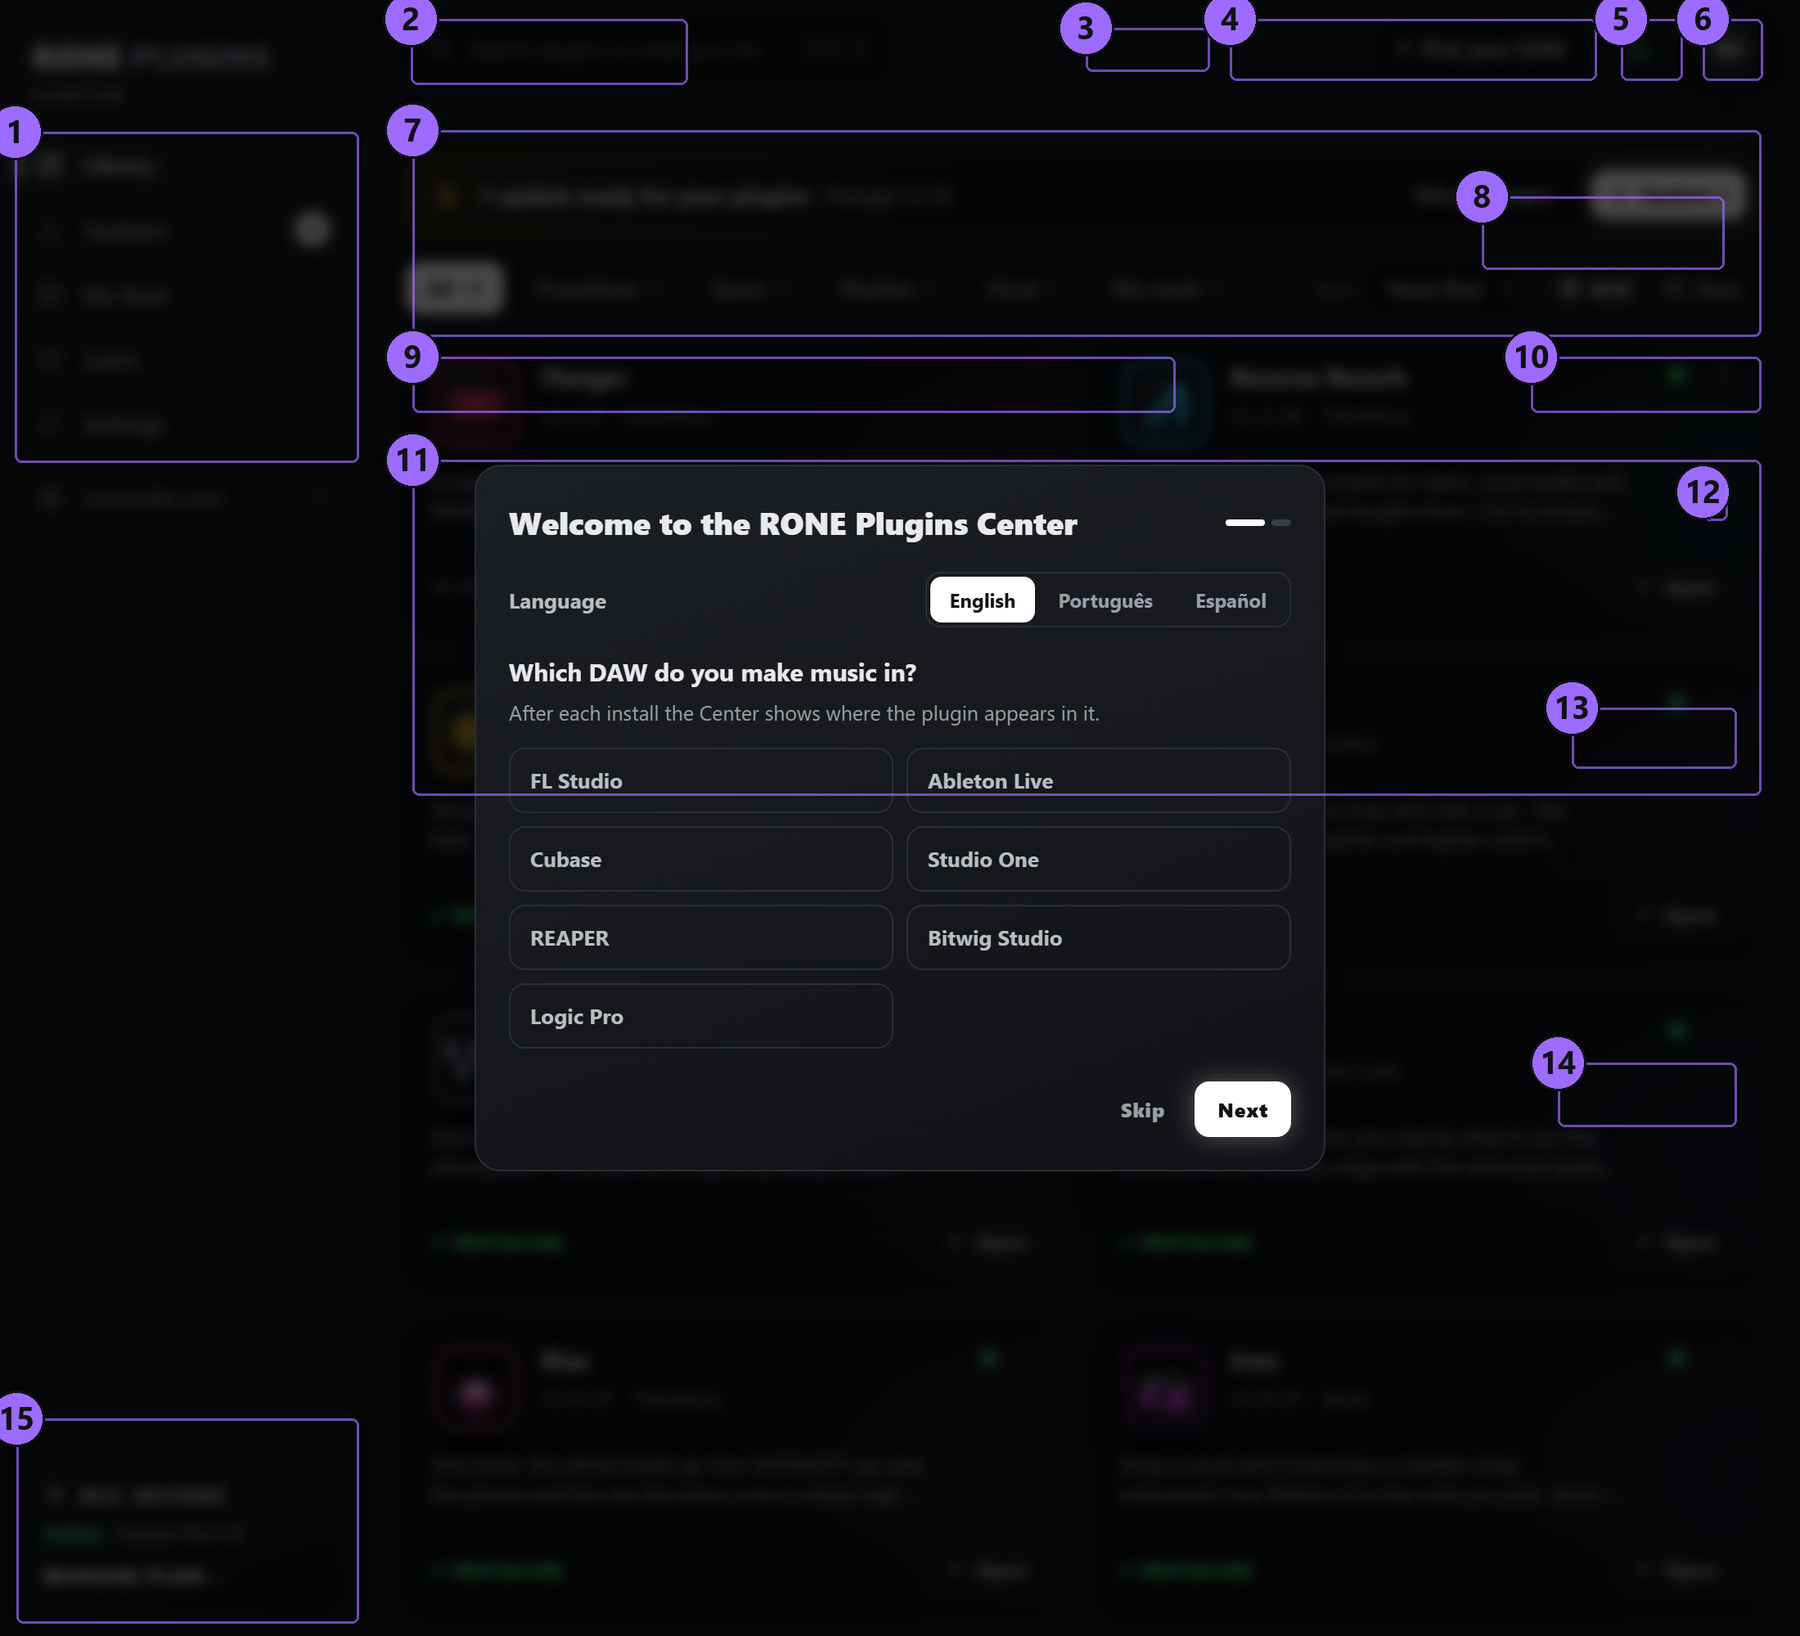
Every RONE product is installed, updated and licensed through one application: the RONE Plugins Center. You never download individual installers by hand, and you never enter serial numbers into the plugin itself.
Step by step
- Download the Center from roneaudio.com and run the installer (Windows:
RONE_Plugins_Center_Installer.exe, macOS:RONE_Plugins_Center.dmg). On Windows the installer also adds the Microsoft WebView2 runtime if your PC does not have it yet; it is required for the plugin interfaces. On macOS (10.15 Catalina or later, Intel and Apple Silicon) open the .dmg and drag the Center onto Applications. It is signed and notarized by Apple, so macOS only asks once whether you want to open an app downloaded from the internet: press Open. - Open the Center and sign in with your roneaudio.com account (the same e-mail and password you used on the website). Your licences and device slots are checked automatically: an active ALL ACCESS plan unlocks every plugin, and a lifetime licence unlocks the plugin it was bought for — so RONE Throw opens either way.
- Find RONE Throw in the list and press INSTALL. The Center downloads the signed installer, verifies its checksum, installs it silently and registers the version.
- When the card shows INSTALLED, start (or restart) your DAW and rescan plugins if it does not pick up new plugins automatically. All RONE plugins appear next to each other in your plugin list because every name starts with RONE.
- Updates appear on the same card. Press UPDATE on one plugin or UPDATE ALL at the top. Close the standalone version of a plugin before updating it.
Where the files go
Windows
| File | Location |
|---|---|
| VST3 | C:\Program Files\Common Files\VST3\RONE\RONE Throw.vst3 |
| Standalone app | C:\Program Files\RONE Plugins\RONE Throw.exe |
| This manual | C:\Program Files\RONE Plugins\Manuals\ |
macOS
| File | Location |
|---|---|
| VST3 | /Library/Audio/Plug-Ins/VST3/RONE Throw.vst3 |
| Audio Unit | /Library/Audio/Plug-Ins/Components/RONE Throw.component |
| Standalone app | /Applications/RONE Throw.app |
| This manual | /Users/Shared/RONE Plugins/Manuals/ |
Licence and activation
Licensing is tied to your account, not to a key. The plugin checks the licence file that the Center writes when you sign in. There are two ways to own it: an ALL ACCESS plan, which unlocks every RONE plugin for as long as it is active, or a lifetime licence for this plugin alone, which never expires. Either one opens RONE Throw, and buying the lifetime licence later does not disturb a plan you already have.
If a plugin ever shows a RONE Bundle License Required screen, open the Center, make sure you are signed in and the plugin shows as licensed, then reopen it. Two devices can be signed in at the same time on either kind of licence; sign out on an old machine from the Center's Account page to free a slot. A lifetime licence keeps working offline for far longer than a plan does — there is nothing for it to expire against — but the Center still needs to reach the internet occasionally to confirm it.
Uninstalling
Windows: Settings → Apps → RONE Throw (RONE). macOS: delete the bundles listed above. Presets and settings in your user folder are kept.
3Quick start
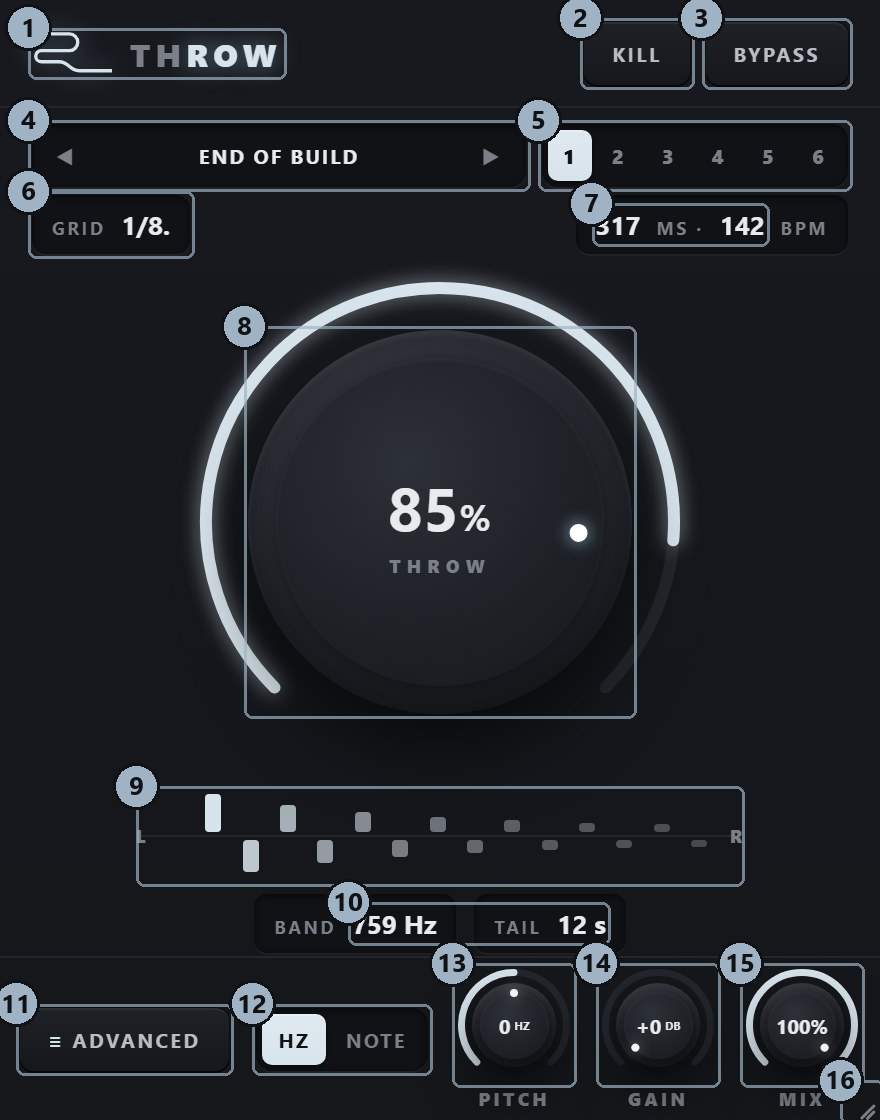
- Insert Throw on the channel you want to throw - a lead or a vocal is the classic choice. No send bus needed.
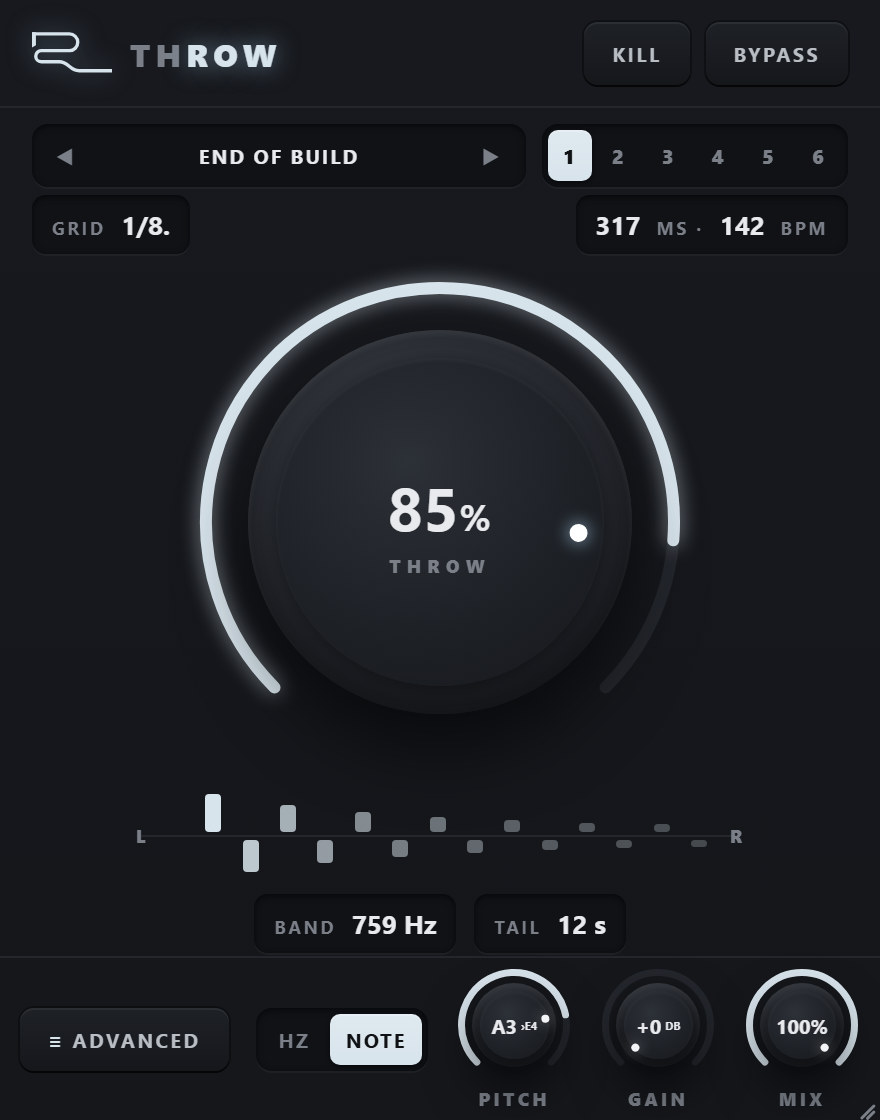
- Pick END OF BUILD. Click the preset name and choose it from the list - it is the sound the plugin was built for. Then hold macro slot 1 for about a second to store it there: the button lights white and stays lit, in every project, until you store over it.
- Play the track and turn THROW up slowly. Repeats appear on the dotted-8th grid, bouncing left and right; past the middle of the knob they open into a reverb wash.
- Keep turning. Near the top the tail runs for a long time (TAIL shows how long), but the band it settles into is fixed, so it never piles up.
- Turn it back down. Nothing is cut off - what is already in the loop rings out on its own.
- Automate it. Draw a ramp from 0 to 90-100 % over the last bar of a build, and let it fall back over the first bar of the drop.
4Interface tour
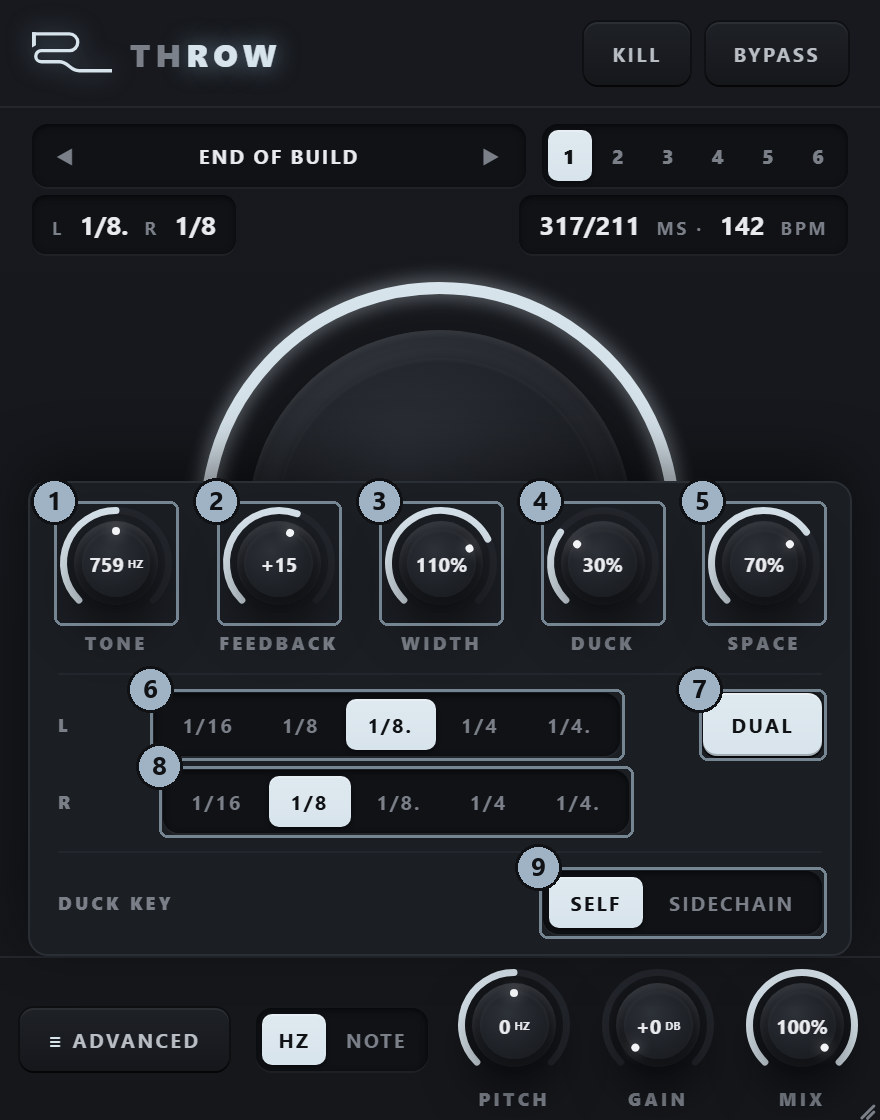
In the ADVANCED panel: 1 TONE 2 FEEDBACK 3 WIDTH 4 DUCK 5 SPACE 6 L / TIME 7 DUAL 8 R 9 DUCK KEY.
5Controls reference
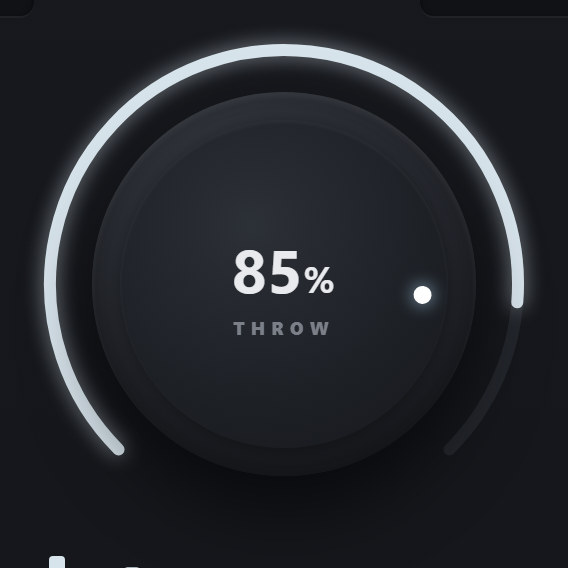
The one knob. It drives three things at once, each on its own curve: the send into the delay, the feedback of the loop (from 0.30 at the bottom to 0.98 at the top - a tail of well over a minute), and the amount of reverb on the repeats. Low values give a clean rhythmic delay; the middle thickens it; the top third is atmosphere.
Since 1.8.0 the knob opens a throw and never closes one: the send follows it, but the feedback, the reverb and the wet level hold at the throw's peak when it comes back down, so the tail keeps ringing - fade it with MIX or cut it with KILL. Raising the knob again from low is a new throw with its own character; KILL, stopping the song and loading a preset start fresh too.
The send is normalised against the feedback, so turning the knob up adds length and density rather than volume. And the dry signal is never touched - at 100 % the source is exactly as loud as at 0 %, with the atmosphere added on top.
Presets and macro slots

The arrows step through the presets; click the name to open the menu, grouped by use: INIT, THROWS, LEADS, DUAL, ATMOSPHERES, VOCALS, DRUMS and CREATIVE. Equinox - The Reference is the measured source material with SPACE at 0 - the delay exactly as the reference does it, with no reverb, for comparison.
LOCK THROW WHILE BROWSING (at the bottom of the menu) holds the big knob where you left it while you audition presets, so browsing never yanks the knob mid-performance.
Six one-tap sounds that are always at the top of the window. The slots start empty and dark. Hold a slot for about a second - the button fills, then flashes - to store the current settings into it, whatever they came from: a tweaked preset, something you dialled by hand, or a dual-time experiment you want back tomorrow. From then on that slot is lit white, and stays lit for as long as a macro is in it: a lit slot has something stored, a dark slot is empty. Tap a lit slot to recall it - it glows, and the preset bar shows what is in it.
The slots are yours, not the project's: they are saved per user and shared by every instance in every session, so "macro 6" is the same sound - and the same light - in every song. To overwrite a slot, hold it again; CLEAR ALL MACRO SLOTS in the preset menu empties all six.
Hard bypass for A/B comparison. The engine keeps running with the knob at zero, so the tail that is already in the loop rings out instead of being cut, and coming back is click-free.
Kill
Cuts the tail now. A 6 ms fade, then the delay lines, the loop filter and the reverb are emptied; the dry keeps playing through untouched and the next throw starts from silence. It is for changing direction mid-set: without it, a new throw lands on top of whatever the old one was still doing and the two pile up.
Shifts the whole delay up or down, in the footer. The HZ / NOTE chip beside the knob picks what it is.
HZ is a frequency shifter, not a pitch shifter: every partial of the repeats moves by the same number of Hz, so the harmonics no longer line up and the tail turns metallic and bell-like - an atmosphere rather than a second voice singing the line a few notes away. It acts on the finished delay, before SPACE, so the reverb smooths the shifted repeats instead of being smeared by them. The dry is never touched, and at 0 the plugin is exactly as it was.
NOTE is a musical shifter: the knob steps in whole semitones and every partial is multiplied, so the tail stays a note - a throw a fifth up is a harmony, an octave up is a shimmer. The readout shows the note the plugin hears in the throw and the note it will put out, A3 > E4, so you can raise the knob to exactly the interval you want; when there is no single clear note (a chord, noise, an empty tail) it shows the semitones alone. The tracker is monophonic - leads, vocals, basses and plucks read cleanly - and it also keeps the shifter's grains locked to the note, so a shifted tail stays a clean tone rather than a warble.
In the footer between PITCH and MIX: the whole effect louder - the repeats and the reverb together - on top of MIX. The big knob keeps the wet at a roughly constant level by design (the send is normalised against the feedback, so more feedback means a longer tail, not a louder one); when the atmosphere needs to sit in front rather than behind, this is the knob. The dry is never touched.
How much of the effect is added, in the bottom right corner. Throw is strictly additive, so this is a send level rather than a crossfade: the dry is never reduced. At 100 % you hear the plugin exactly as it was designed; at 0 % nothing is added at all.
Advanced panel
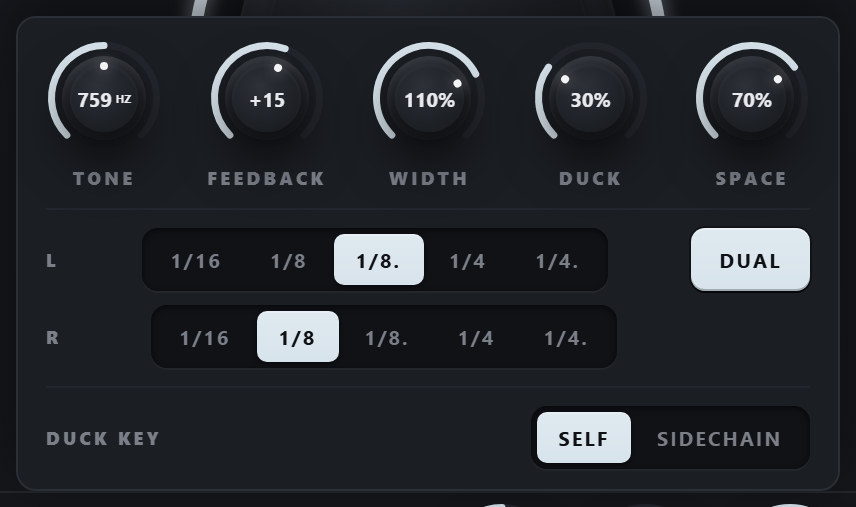
The tap division, always locked to the host tempo. The dotted 8th is the sound this plugin exists for - it is what the reference material uses - so it is the default. With DUAL off there is one division and the repeats bounce left, right, left, right one division apart. With DUAL on the right side gets its own row.
Two independent delays instead of one ping-pong. Each side is fed from the input and recirculates into itself, so the two divisions never interact and you hear a true cross-rhythm. The default pairing - dotted 8th left, straight 8th right - is the classic 3:2. The GRID readout shows both, and the tap trail draws each side at its own rate.
Where the tail settles. The feedback loop is a band-pass; each pass through it removes a little above and below the band, so after a few dozen repeats the tail has collapsed into a fixed midrange cloud. TONE slides that band up and down by two octaves in each direction. The BAND readout shows its centre.
A trim on the feedback the knob is already setting - not an absolute. Push it up for sparser material that needs a longer tail, or all the way for a tail that barely decays; pull it down when the track is dense. TAIL in the readout shows the result.
How far apart the left and right repeats sit. 0 % folds the repeats to mono in the centre, 100 % is the measured ping-pong, and above that the two sides are pushed wider than they arrived.
The atmosphere steps aside while the source is playing and blooms back the moment it stops. This is the sidechain compressor on a return bus, built in and keyed from the dry input - a fast attack and a musical release. Raise it on vocals so every word stays clear; lower it on pads that should sit in their own wash.
The reverb on the repeats. It opens with the big knob (there is none at the bottom of the knob, a lot at the top) and SPACE sets how far that goes. At 0 the plugin is the measured delay exactly - discrete repeats, no wash. At 100 the top of the knob is almost pure atmosphere.
What DUCK listens to. SELF is the plugin's own input - the classic vocal throw. SIDECHAIN keys the duck from the plugin's sidechain bus instead: route the kick there in the DAW and the atmosphere breathes with the kick, even on an FX bus where the input is the send. The row says NO SIDECHAIN ROUTED until the host connects something.
Readouts
The division in use (L and R separately with DUAL) and the resulting tap spacing in milliseconds at the current host tempo.
The centre of the band the tail collapses into. Follows TONE.
How long the atmosphere rings after the source stops, at the current knob position and FEEDBACK trim.
The repeats as they will play: left channel above the line, right below, spaced by the division and fading at the feedback rate. With DUAL on, each side steps at its own rate and you can see the cross-rhythm before you hear it.
6Step-by-step workflows
The end-of-build throw
- Insert Throw on the lead or the riser. Pick END OF BUILD from the preset menu, or tap the macro slot you stored it in.
- Over the last bar of the build, draw THROW automation rising from 0 to 95 %. An exponential curve (slow start, fast end) feels more urgent.
- Let it fall back to 0 over the first bar of the drop. Do not cut it - the tail carries the energy across the downbeat.
- If the atmosphere fights the drop's lead, lower TONE a little so the tail sits under it.
The vocal throw
- Pick VOCAL THROW from the preset menu, or set DUCK to about 65 %.
- Leave THROW at 60-70 % for the whole song. DUCK keeps the atmosphere almost silent while the vocal is singing and lets it bloom in the gaps.
- For a bigger throw on one word, automate THROW up to 100 % on that word only.
A 3:2 lead delay
- Open ADVANCED, switch DUAL on. Leave L at 1/8. and R at 1/8.
- THROW around 65-75 %, SPACE down to 30-40 % so the repeats stay rhythmic.
- Store it into a macro slot - hold the button until it lights - and it is one tap away in every session.
Hard stop into a drop
- Tap slot 4 (INFINITE CLOUD), or push FEEDBACK to +100, and automate THROW up through the last bar of the build.
- On the downbeat of the drop press KILL (or send MIDI D2): the cloud is gone in 6 ms and the drop lands on silence.
- For a softer landing skip KILL and let THROW fall back over the first bar instead - the tail carries the energy across.
Six macros for a live set
- Dial in six throws you actually use and hold each into a slot. They are saved per user, so the same six are there in every project.
- Map THROW to a physical knob or the mod wheel (right-click the knob in VST3 and use your DAW's controller link).
- During the set, tap a slot to change the character and ride the one knob.
7Recommendations
Do
- Use it as an insert. It only adds, so there is nothing to gain from a send bus - and DUCK needs to hear the dry.
- Store the six throws you use into the macro slots, once. Browsing is for finding sounds; slots are for performing them.
- Let the tail fall on its own when the knob comes down. Cutting it wastes the best part.
- Match TONE to the source: dark under bright leads, bright over dark pads.
- Use LOCK THROW WHILE BROWSING when auditioning presets during a session.
Avoid
- Fighting the level with THROW. The output is meant to be louder at the top; use MIX for gain staging.
- FEEDBACK at +100 on busy material without a plan to bring THROW down - that tail is longer than the song.
- WIDTH above 100 % on a mono-checked mix; the pushed sides partly cancel in mono.
Sound tips
- Why it never turns to mud: the feedback loop is a band-pass, so each repeat is a little narrower than the last. After a few dozen passes the tail is a fixed midrange cloud, whatever went in. That is what lets the feedback run this high.
- SPACE at 0 is the reference delay exactly, measured from real psytrance hook FX. Everything above 0 is the atmosphere Throw adds to it.
- Two instances - one at 1/8. and one in DUAL at 1/4 against 1/8. - on two stems give a build that thickens in stages.
8Interface conventions
All RONE plugins share the same graphite interface language, so once you know one, you know them all.
| Gesture | What it does |
|---|---|
| Drag a knob up/down | Changes the value. The lit arc shows where you are in the range; the value is printed inside the knob. |
| Hold Shift while dragging | Fine adjustment. |
| Double-click a knob | Resets it to the default value. |
| Right-click a control (VST3) | Opens your DAW's automation / parameter menu for that control (for example FL Studio's Create automation clip, Link to controller). RONE never shows a browser context menu. |
| Mouse wheel | Steps through segmented switches and lists where the plugin offers them. |
| Drag the triangle in the bottom-right corner | Resizes the window. The interface scales proportionally and keeps its aspect ratio. |
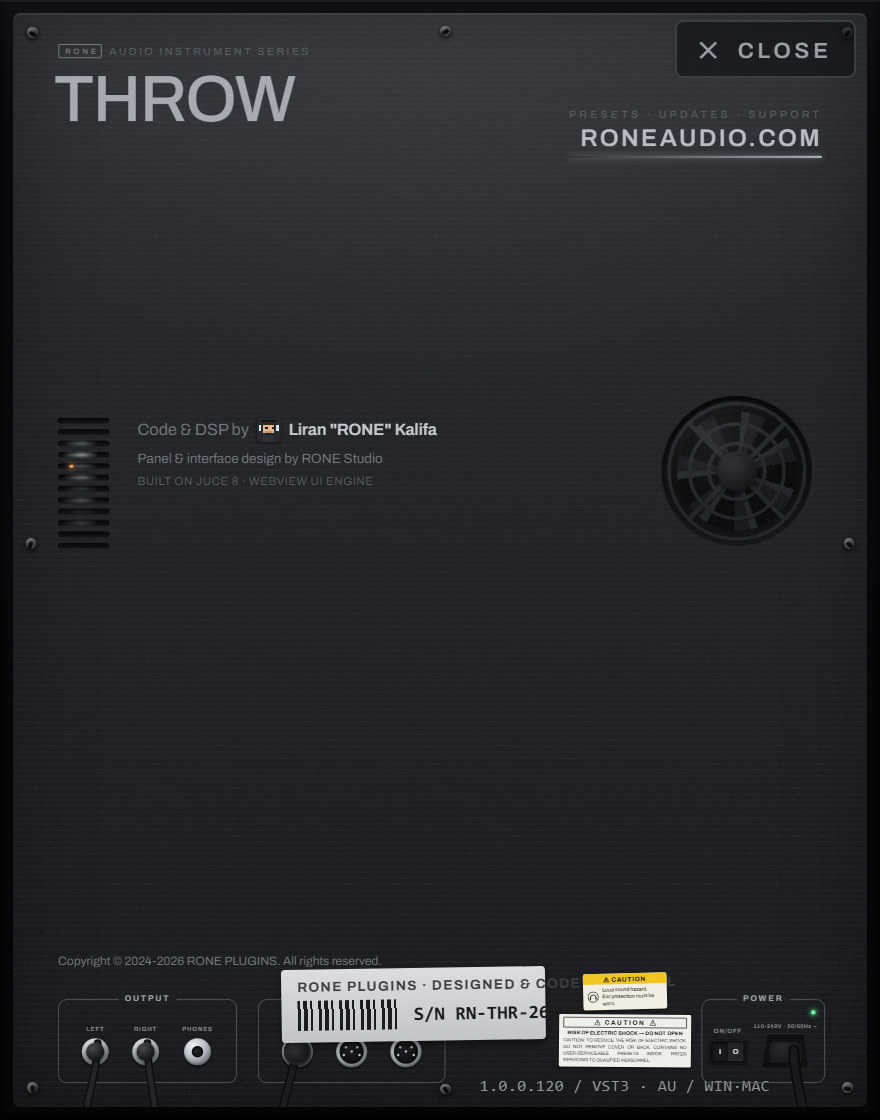
| Click the R logo / plugin name in the header | Flips the plugin over to its back panel: version, format, licence holder, a link to roneaudio.com and a DEACTIVATE button for this device. |
Automation
Every knob and switch is a host parameter. Automate it from the DAW's automation lane or by right-clicking the control inside the plugin (VST3). Values shown in the plugin always match the DAW's.
Presets and state
The plugin's full state is saved with your DAW project, so a project reopens exactly as you left it. Where the plugin has its own preset browser (the name field with ◀ ▶ arrows), factory presets are built in and your own presets are stored in your user folder.
Standalone version
The standalone app is the same plugin in its own window, useful for auditioning and exporting without a DAW. It uses your system's default audio device; when there is no DAW clock, tempo-synced controls follow the plugin's own BPM setting.
9Troubleshooting, specifications and support
Troubleshooting
| Symptom | What to do |
|---|---|
| Nothing is added when I turn the knob | Check MIX is not at 0 % and BYPASS is off. If the window shows a sign-in screen, the plugin is locked - sign in through the RONE Plugins Center. |
| The repeats are out of time | The divisions follow the host tempo. Make sure the DAW is playing and reports its tempo; in the standalone app the grid runs at 120 BPM. |
| A macro slot is dark and does nothing when tapped | A dark slot is empty - nothing has been stored in it yet. Hold the button for about a second to store the current settings; it lights white and stays lit in every project until you store over it or use CLEAR ALL MACRO SLOTS in the preset menu. |
| A macro slot is lit in a project where I never stored anything | By design: the six slots are saved per user, not per project, so a lit slot is the same sound in every session. Hold it to overwrite, or clear all six from the preset menu. |
| The tail is too bright or too dark | TONE moves the band the tail settles into by two octaves either way. The BAND readout shows the centre. |
| It gets loud at 100 % | That is the send adding on top of the untouched dry - the source itself is never reduced. Pull MIX down to taste. |
| NOTE shows only semitones, no note names | The tracker found no single clear note in the throw - a chord, noise or an empty tail. The shift still lands on the interval you set; the names appear the moment a lead or a vocal is thrown. |
| DUCK KEY says NO SIDECHAIN ROUTED | The host has not connected anything to the plugin's sidechain input. Route the kick (or any signal) to Throw's sidechain in the DAW's plugin routing; until then DUCK falls back to the input. |
| MIDI notes do nothing | Route a MIDI track (or a pad) to the plugin. C1-F1 recall macro slots 1-6, D2 kills the tail. In Logic: see MIDI in Logic Pro in Interface conventions. |
| The plugin does not appear in the DAW | Rescan plugins. On Windows the VST3 lives in C:\Program Files\Common Files\VST3\RONE; make sure that folder (or its parent) is in the DAW's VST3 search path. On macOS restart the DAW after installing; Logic and GarageBand may need a full AU rescan. |
| The window is blank or shows an error page (Windows) | The Microsoft WebView2 runtime is missing or damaged. Reinstall the RONE Plugins Center; it repairs WebView2. Also check that WebView2Loader.dll sits next to the standalone executable. |
| The window is white in Ableton Live but the standalone works (Windows) | Turn off Live's auto-scaling for this plugin: in Live's browser open Plug-Ins, right-click the plugin and untick Auto-Scale Plug-In Window, then delete the plugin from the track and insert it again. Seen with Windows display scaling at values such as 110 %. |
| A licence screen appears | Open the RONE Plugins Center, sign in, confirm your plan is active, then reopen the plugin. Check that you have not exceeded your device limit. |
| The plugin shows an older version than the Center | Close every DAW and standalone RONE app, then press UPDATE again. A running standalone keeps the old executable locked. |
| Crash | RONE plugins write a crash report to your user folder; the Center uploads it the next time it runs. Please also tell us what you did right before the crash. |
Specifications
| Product | RONE Throw |
| Version | 1.8 (manual revised November 2026) |
| Formats | VST3 · AU · Standalone (Windows: VST3 + Standalone; macOS: VST3 + AU + Standalone) |
| Systems | Windows 10 / 11 (64-bit) · macOS 11 or newer (Intel and Apple silicon, universal) |
| Channels | Stereo in / stereo out |
| Sample rates | 44.1 kHz to 192 kHz |
| Latency | None added by the plugin |
| Engine | JUCE 8, WebView interface (WebView2 on Windows, WebKit on macOS) |
Support
Website, presets, updates and support: roneaudio.com. When writing to us, include the plugin version (shown on the back panel), your DAW and operating system, and the steps to reproduce.