
Free Hard Clipper Plugin | RONE Clipper Complete Guide · 5 min · Watch on YouTube
1Welcome to RONE Clipper
RONE Clipper is a symmetric hard clipper: everything above the threshold is cut, everything below it passes untouched. What makes it a RONE plugin is that you see it. The graph shows the waveform after the clip stage, the peaks that were removed are painted blue, and the dashed line is the CLIP knob itself - turn it down and the history on screen recolours to show what that setting would have cut.
Two things clippers usually get wrong are handled for you. LOW CUT lets the band below a frequency you choose bypass the clipper completely, and filters out the low-frequency products the clipping itself creates, so a kick or a bass keeps its weight and the low end stays clean. And the oversampling was measured, not assumed: with nothing clipping the plugin nulls against its input at -100 dB.
Where it shines
- Drums and drum buses - shave the transient tops instead of turning a limiter into a pump.
- Before the limiter - 1-3 dB of clipping buys the limiter headroom without the smear.
- Kick + bass - LOW CUT keeps the fundamental out of the clipper; only the click and the harmonics get shaped.
- Loudness with a picture - SAVED tells you how much headroom you just freed.
The 10-second version
- Insert Clipper on a drum bus.
- Play the track and watch the waveform.
- Turn CLIP down until the blue caps appear on the loud hits.
- Press DELTA to hear only what is being removed, then release it.
2Installation with the RONE Plugins Center
Every RONE product is installed, updated and licensed through one application: the RONE Plugins Center. You never download individual installers by hand, and you never enter serial numbers into the plugin itself.
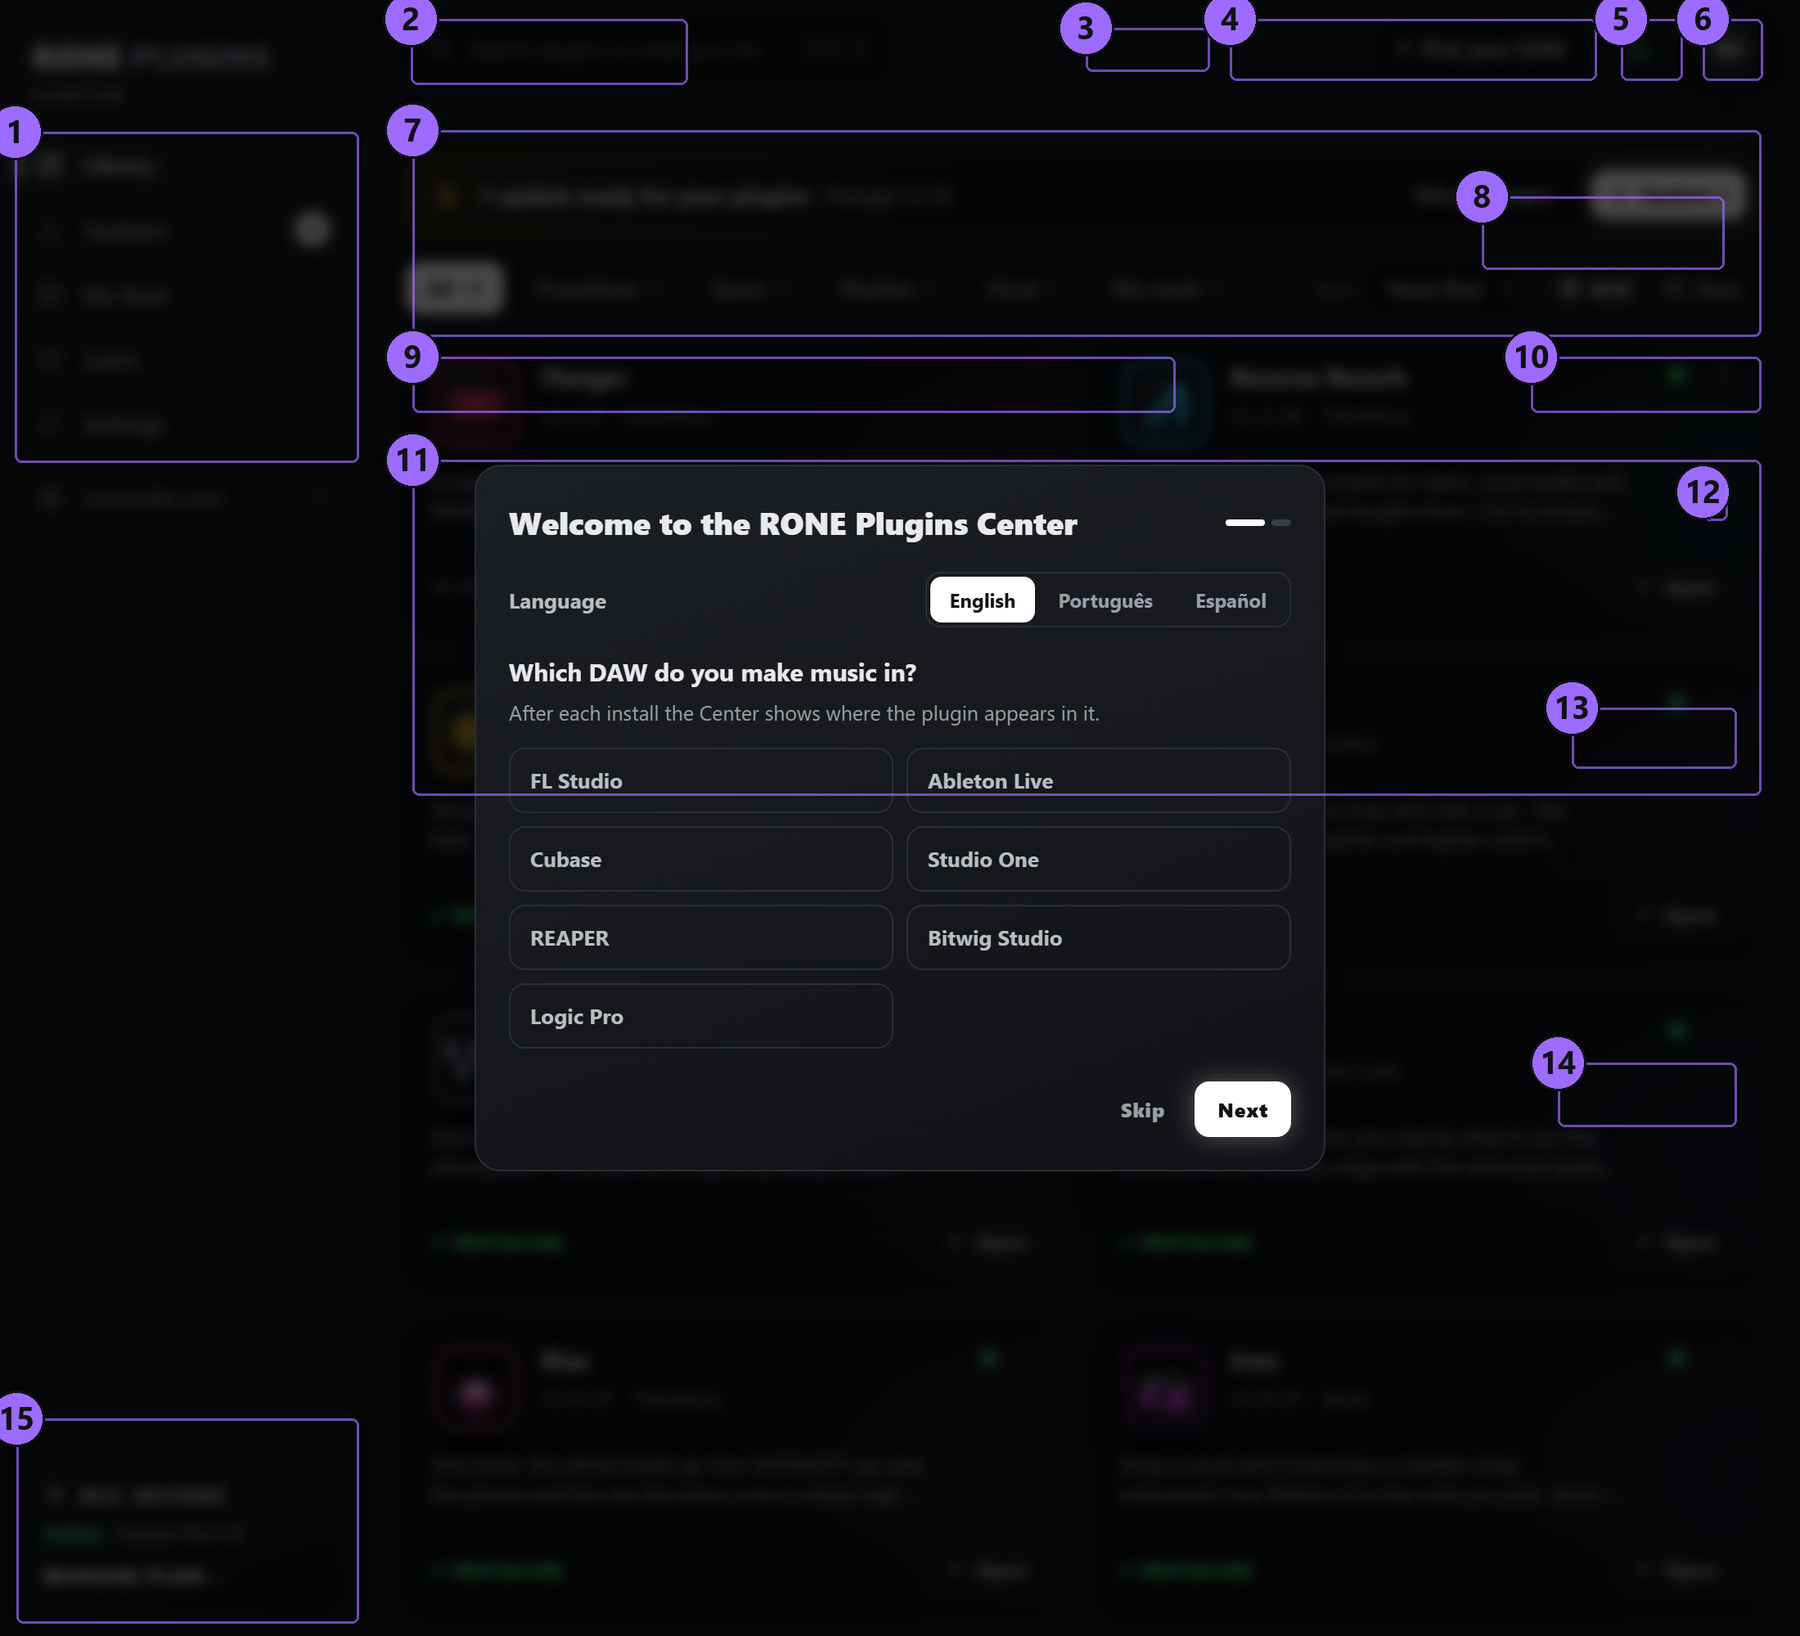
Step by step
- Download the Center from roneaudio.com and run the installer (Windows:
RONE_Plugins_Center_Installer.exe, macOS:RONE_Plugins_Center.dmg). On Windows the installer also adds the Microsoft WebView2 runtime if your PC does not have it yet; it is required for the plugin interfaces. On macOS (10.15 Catalina or later, Intel and Apple Silicon) open the .dmg and drag the Center onto Applications. It is signed and notarized by Apple, so macOS only asks once whether you want to open an app downloaded from the internet: press Open. - Open the Center and sign in with your roneaudio.com account (the same e-mail and password you used on the website). Your licences and device slots are checked automatically: an active ALL ACCESS plan unlocks every plugin, and a lifetime licence unlocks the plugin it was bought for — so RONE Clipper opens either way.
- Find RONE Clipper in the list and press INSTALL. The Center downloads the signed installer, verifies its checksum, installs it silently and registers the version.
- When the card shows INSTALLED, start (or restart) your DAW and rescan plugins if it does not pick up new plugins automatically. All RONE plugins appear next to each other in your plugin list because every name starts with RONE.
- Updates appear on the same card. Press UPDATE on one plugin or UPDATE ALL at the top. Close the standalone version of a plugin before updating it.
Where the files go
Windows
| File | Location |
|---|---|
| VST3 | C:\Program Files\Common Files\VST3\RONE\RONE Clipper.vst3 |
| Standalone app | C:\Program Files\RONE Plugins\RONE Clipper.exe |
| This manual | C:\Program Files\RONE Plugins\Manuals\ |
macOS
| File | Location |
|---|---|
| VST3 | /Library/Audio/Plug-Ins/VST3/RONE Clipper.vst3 |
| Audio Unit | /Library/Audio/Plug-Ins/Components/RONE Clipper.component |
| Standalone app | /Applications/RONE Clipper.app |
| This manual | /Users/Shared/RONE Plugins/Manuals/ |
Licence and activation
Licensing is tied to your account, not to a key. The plugin checks the licence file that the Center writes when you sign in. There are two ways to own it: an ALL ACCESS plan, which unlocks every RONE plugin for as long as it is active, or a lifetime licence for this plugin alone, which never expires. Either one opens RONE Clipper, and buying the lifetime licence later does not disturb a plan you already have.
If a plugin ever shows a RONE Bundle License Required screen, open the Center, make sure you are signed in and the plugin shows as licensed, then reopen it. Two devices can be signed in at the same time on either kind of licence; sign out on an old machine from the Center's Account page to free a slot. A lifetime licence keeps working offline for far longer than a plan does — there is nothing for it to expire against — but the Center still needs to reach the internet occasionally to confirm it.
Uninstalling
Windows: Settings → Apps → RONE Clipper (RONE). macOS: delete the bundles listed above. Presets and settings in your user folder are kept.
3Quick start
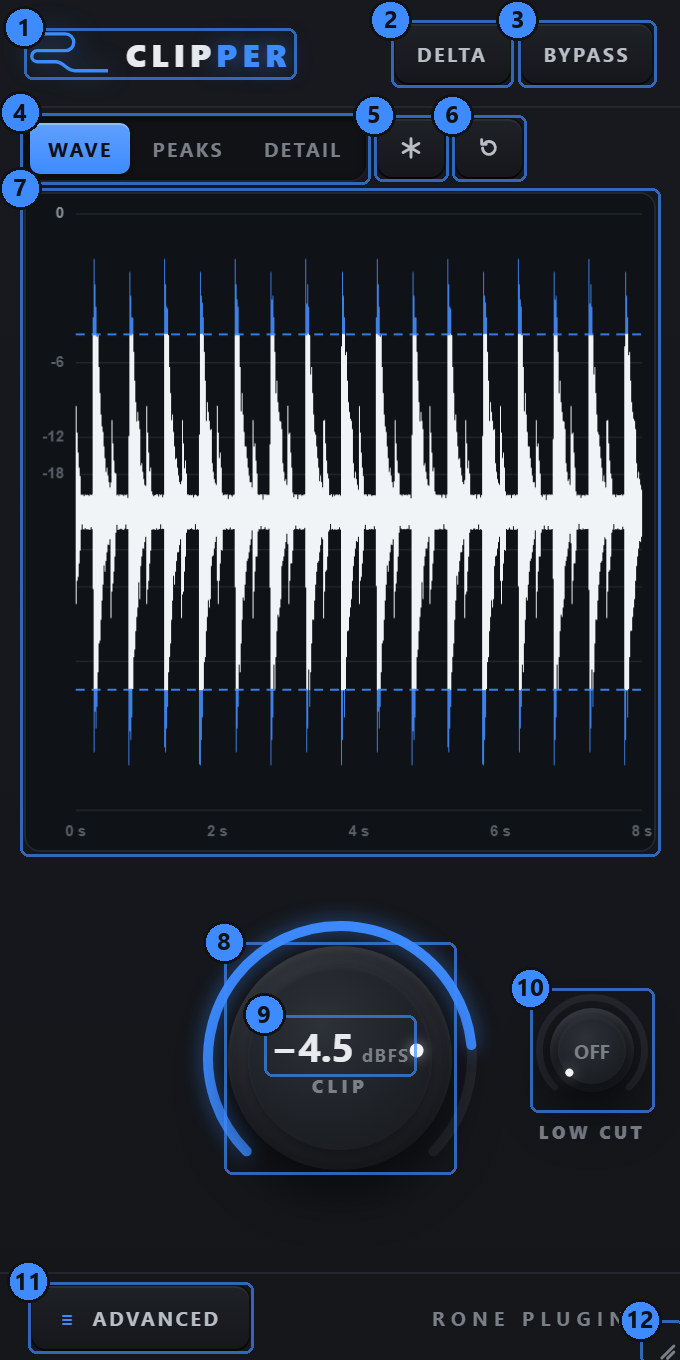
- Insert Clipper on a drum bus, a kick or the mix bus.
- Play the track. The graph scrolls the last 8 seconds; the dashed line is the threshold.
- Turn CLIP down. As the line drops below the loudest peaks, the parts above it turn blue - that is what the clipper removes. Start around 2-3 dB of blue on the biggest hits.
- Press DELTA to hear nothing but the removed part. If it sounds like clicks and transient tops, you are in the right place; if you hear tone, back off or raise LOW CUT.
- Turn LOW CUT up to about 100-200 Hz on anything with a kick or a bass. The band below it bypasses the clipper and comes back untouched.
- Open ADVANCED for the INPUT / OUTPUT faders, the oversampling choice and AUTO GAIN.
4Interface tour
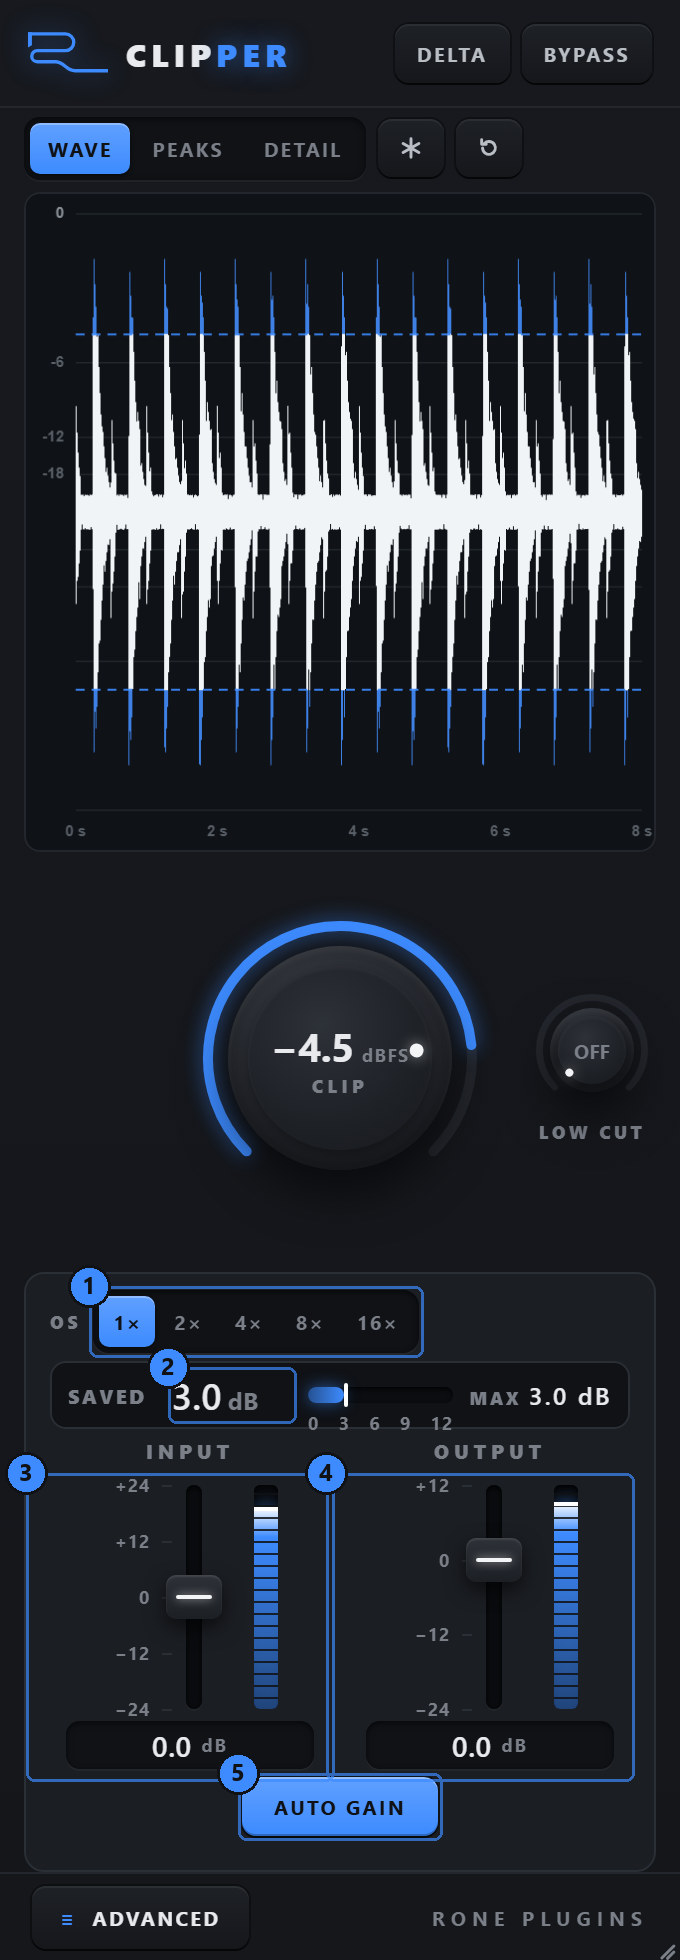
In ADVANCED: 1 OS 2 SAVED 3 INPUT 4 OUTPUT 5 AUTO GAIN.
5Controls reference
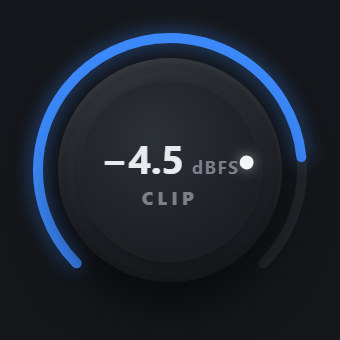
The threshold of the clamp, inside the oversampled stage. Everything above +CLIP or below -CLIP is cut flat; everything in between is untouched. It is drawn on the graph as the dashed line, so you set it by eye against the peaks as much as by ear.
It is not an output ceiling: after the reconstruction filter a clipped transient can overshoot the threshold by up to about a decibel (the Gibbs ringing every oversampled clipper has). The output peak in ADVANCED tells the truth.
Everything below this frequency bypasses the clipper and is added back untouched, through a Linkwitz-Riley crossover that keeps the sum exact when nothing clips. Only the band above it gets clipped.
Clipping the upper band also generates low-frequency products of its own (a clipped hat loop grows a bump between 20 and 400 Hz that was never in the source). Those are removed too, with a linear-phase filter, so the clipped peaks stay exactly where the threshold put them and nothing new appears below LOW CUT.
LOW CUT turns the clipper from a ceiling into a shaper. The lows are never clipped, so once they are added back the output can peak above CLIP by as much as the lows add at that moment, and the crossover shifts the phase around its frequency, which changes the shape of the peaks a little too. That is the point of it: use LOW CUT when you want the transient tops shaved for loudness and punch while the kick and the sub stay round, and let a limiter later in the chain hold the final peak. When the clipper itself has to be the last ceiling (the end of a master chain), keep LOW CUT OFF.
The output becomes only the part the clipper removed - the input minus the clipped signal. It is the quickest way to judge a setting: transient tops and clicks are what you want to be cutting; a tone or a pitched bass means the threshold is in the body of the sound.
Latency-matched dry signal with a 10 ms crossfade, so A/B comparison lands sample-accurately. The engine keeps running underneath.
The graph
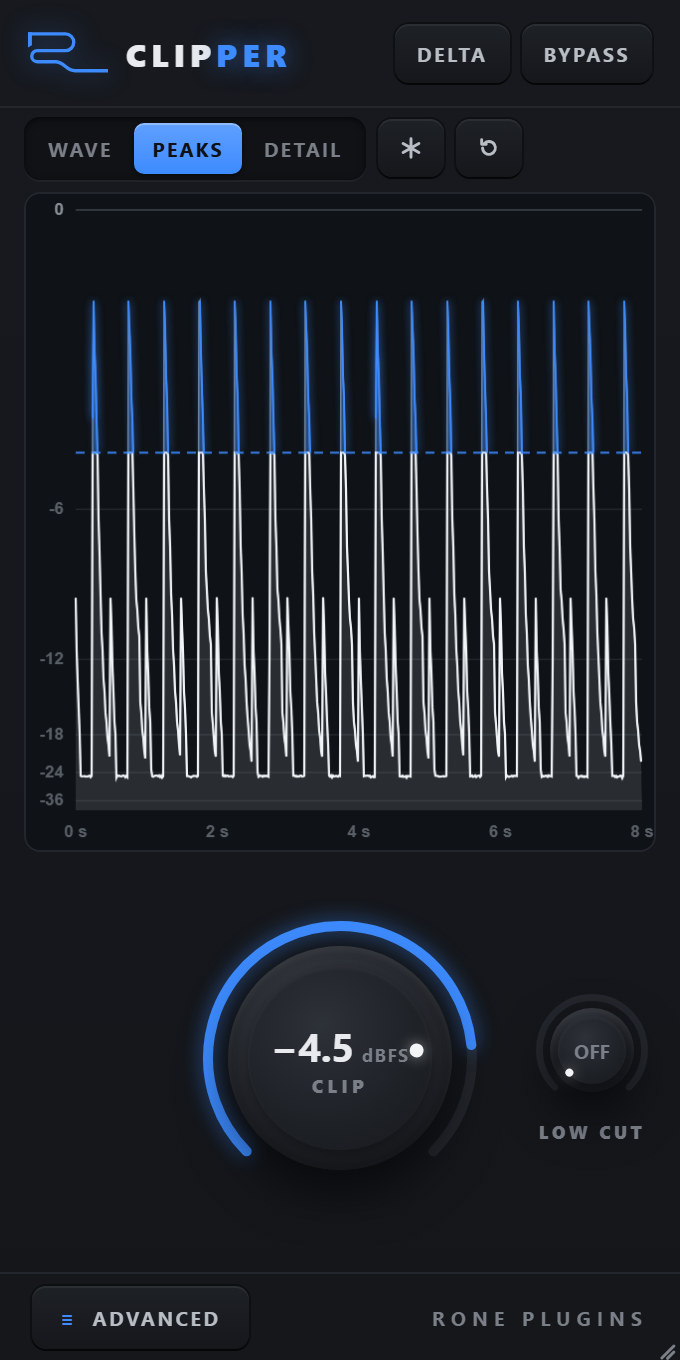
The signed waveform after the clip stage, like a scope, for the last 8 seconds. White is the signal after clipping, blue is what was removed beyond +/-CLIP, both polarities. Amplitude is linear, so quiet material sits near the centre line and the peaks own the height - exactly what you want to see in a clipper.
The same history as a rectified peak envelope on a linear scale: grey is the pre-clip envelope, white the clipped one, blue the excess above the line. Easier to read on dense material.
The strongest clipped event of the last half second as actual oversampled samples of one channel (L / R selector), threshold at +/-1. Hover a column for BEFORE / AFTER / CUT in dBFS. Drag up and down to zoom the window.
Press on the graph and drag up to see fewer seconds on screen (the display scrolls faster), drag down to see more, continuously between half a second and eight. The wheel does the same in steps; a double-click returns to 8 seconds. The vertical scale never changes: the top of the plot is 0 dBFS, or the INPUT gain when it is above 0.
FREEZE holds the graph and a snapshot of the raw samples for DETAIL; audio and the meters keep running and the badge says FROZEN. Reset clears the history and the held maximum.
ADVANCED
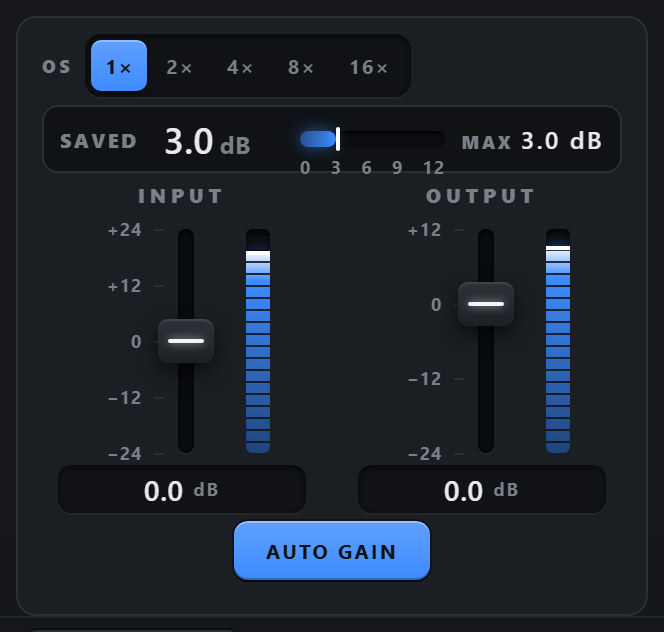
How many times the sample rate the clip stage runs at. A hard clip creates harmonics without end; oversampling keeps them from folding back into the audible band as aliasing. Measured on a clipped 9.7 kHz tone the aliased energy is -9 dB at 1x, -29 at 2x, -43 at 4x, -54 at 8x and -66 at 16x. The latency is the same at every setting and the same setting is used in playback and export.
How much the peaks came down through the clipper: the pre-clip peak against the peak after reconstruction, before OUTPUT gain. Raise OUTPUT by this much and the RMS goes up by the same amount. MAX is held since the last reset; click it to clear.
Gain before the clip stage - the drive. The bar beside the fader is the incoming host level before this gain. Double-click the well to type a value.
Gain after reconstruction; it never changes what gets clipped. The bar beside it is the actual final output level.
Make-up for the threshold: the OUTPUT is raised by exactly what CLIP took away, so the clipped peaks land back at 0 dBFS. OUTPUT still works as an offset on top.
6Step-by-step workflows
Drum bus, 2 dB of transient shaving
- Insert Clipper on the drum bus, OS at 4x.
- Play the loudest section and turn CLIP down until the biggest hits show 2-3 dB of blue (SAVED in ADVANCED reads 2-3 dB).
- Press DELTA: you should hear clicks and the tops of the snare, not the body of the kick. If the kick is in there, raise LOW CUT to about 120 Hz.
- Release DELTA, switch AUTO GAIN on, and compare with BYPASS at equal loudness.
Kick + bass, keep the low end whole
- Insert on the kick or the low-end group.
- Set LOW CUT to 150-200 Hz. The graph now shows only what enters the clipper - the click and the harmonics.
- Bring CLIP down until the click is trimmed. The sub passes through untouched and nothing new grows below LOW CUT.
- Check DETAIL on one hit: the white trace is the trimmed click, the blue is what went.
Before the limiter
- Insert Clipper before the mastering limiter, OS at 8x.
- Clip 1-2 dB off the peaks (watch SAVED).
- Lower the limiter's input by the same amount. The limiter now works less, and the transients keep their edge.
The last ceiling
- Keep LOW CUT OFF: every frequency goes through the clip stage, so the threshold holds for the whole signal.
- Set CLIP to the ceiling you need and OS to 8x or 16x.
- Watch the output peak in ADVANCED: the only overshoot left is the reconstruction ringing of about 1 dB at most. If you need an exact true-peak ceiling, a true-peak limiter after the clipper is still the tool.
7Tips, tricks and troubleshooting
Tips
- Set it with DELTA. Two seconds of listening to the removed part tells you more than any meter.
- The line is the knob. Turning CLIP recolours the whole history on screen, so you can find the right depth on material that already scrolled by.
- Drag on the graph to zoom time in or out; double-click resets. In DETAIL, hover for the numbers.
- SAVED = loudness. Whatever it reads, that is how far you can push OUTPUT (or how much less the limiter has to do).
Troubleshooting
| Symptom | Cause | Fix |
|---|---|---|
| The graph says WAITING FOR AUDIO | No signal has reached the plugin yet | Play the track; the graph starts on the first sample |
| The output peaks above CLIP | Reconstruction overshoot after the oversampling filter (up to about 1 dB on hard transients) | Expected. Use a limiter after the clipper if a hard ceiling is required |
| With LOW CUT on, the output peaks well above CLIP | The band below LOW CUT is not clipped and is added back after the clip stage - by design | For a hard ceiling set LOW CUT to OFF, or keep it and put a limiter after the clipper |
| LOW CUT makes the graph emptier | The band below LOW CUT bypasses the clipper and is not drawn | Intended - the graph shows what enters the clipper |
| Latency | 384 samples at 48 kHz (8 ms): the oversampling plus the linear-phase LOW CUT filter, constant in every setting | The host compensates it automatically |
| Aliasing on bright material at 1x | A hard clip at the base rate folds its harmonics back | Use 4x or 8x |
| The window is white in Ableton Live, the standalone works (Windows) | Live's Auto-Scale Plug-In Window (seen with Windows display scaling such as 110 %) | In Live's browser open Plug-Ins, right-click the plugin and untick Auto-Scale Plug-In Window, then delete the plugin from the track and insert it again |