
Fade-In Stutter Builds | RONE Stutter Complete Guide · 5 min · Watch on YouTube
1Welcome to RONE Stutter
RONE Stutter works in two ways, and a big EDIT / LIVE switch beside the logo chooses.
EDIT is a stutter renderer. You give it a sound, tell it which moment of that sound to grab and which note value to repeat it on, and it writes a finished, bar-exact stutter fill. The result is auditioned inside the plugin and then exported, or simply dragged into your DAW as an audio clip. In a production session that saves you automation clips, timing corrections and re-renders: a printed clip lands exactly on the grid, every time.
LIVE stutters whatever plays through the channel, in real time and with no latency, and it sounds exactly like the fill you built in EDIT. Most of this manual is about EDIT, because every control you learn there shapes LIVE too; the LIVE chapter covers the rest.
Where it shines
- Fills and edits - the classic "snare roll into the drop", a vocal syllable repeated 1/16 then 1/32.
- Glitch builds - repeat a tiny slice for two bars with a fade-in so it swells out of nothing.
- Transition FX - grab a cymbal or a word and turn it into a rhythmic riser.
- Sound design - repeat a slice at 1/32 with 100% STEREO for a buzzing, ping-ponging texture.
The 10-second version
- Drop an audio file on the waveform. It is rendered on the spot.
- Listen with ▶ RESULT.
- Not the right hit? NEXT ▶ re-rolls it from the next one.
- Change GRID or BARS and it re-renders by itself.
- Drag the clip out of the waveform into your DAW.
2Installation with the RONE Plugins Center
Every RONE product is installed, updated and licensed through one application: the RONE Plugins Center. You never download individual installers by hand, and you never enter serial numbers into the plugin itself.
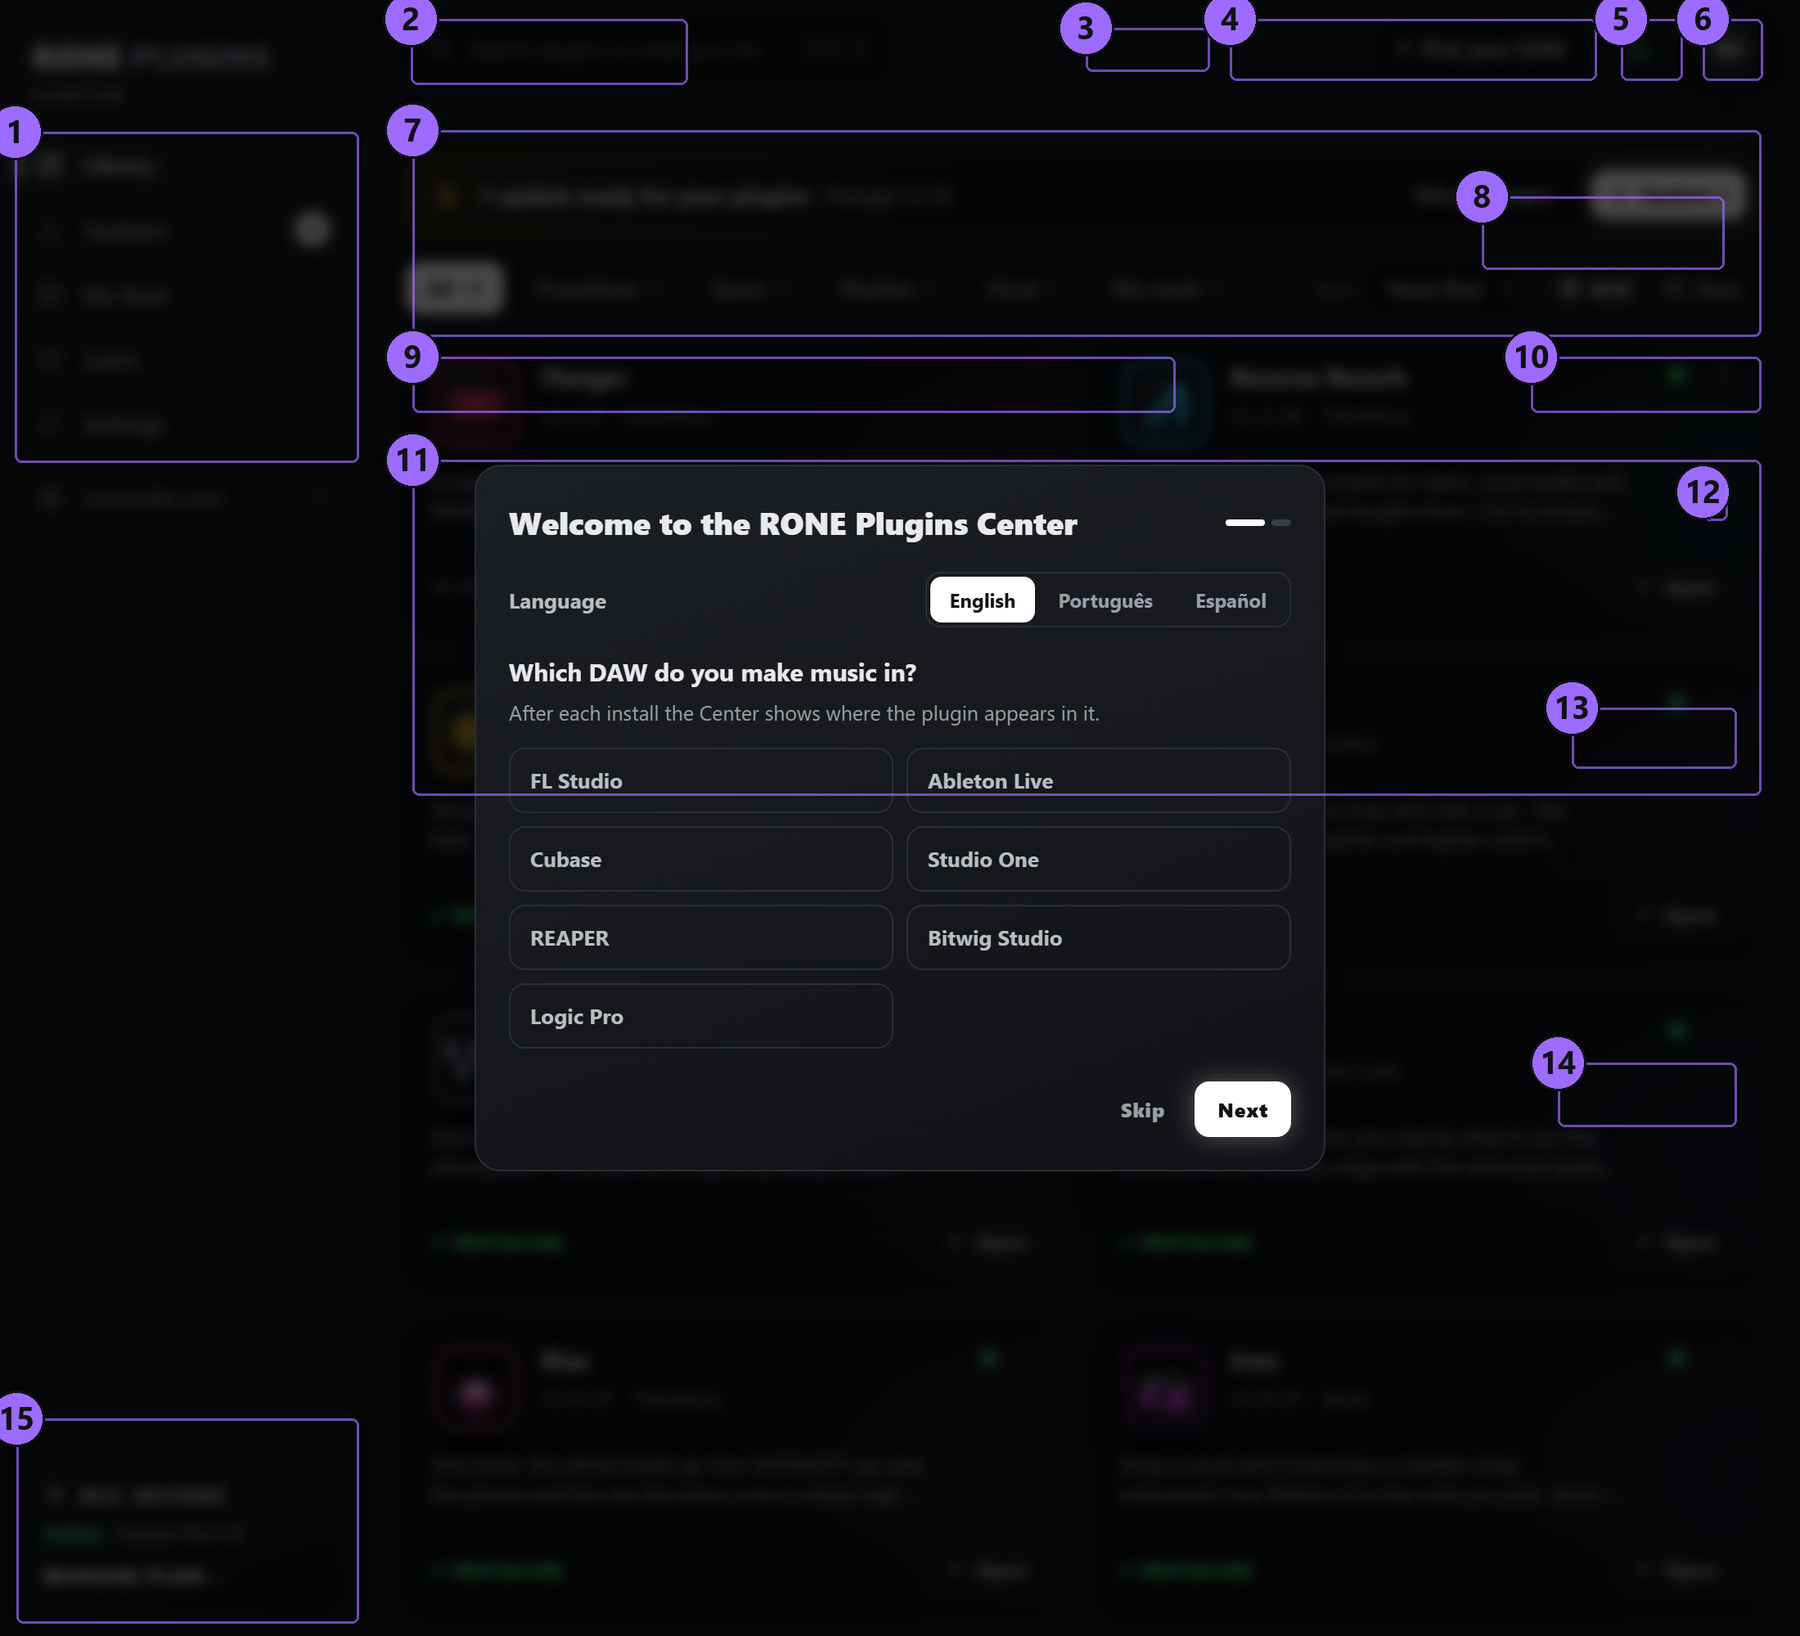
Step by step
- Download the Center from roneaudio.com and run the installer (Windows:
RONE_Plugins_Center_Installer.exe, macOS:RONE_Plugins_Center.dmg). On Windows the installer also adds the Microsoft WebView2 runtime if your PC does not have it yet; it is required for the plugin interfaces. On macOS (10.15 Catalina or later, Intel and Apple Silicon) open the .dmg and drag the Center onto Applications. It is signed and notarized by Apple, so macOS only asks once whether you want to open an app downloaded from the internet: press Open. - Open the Center and sign in with your roneaudio.com account (the same e-mail and password you used on the website). Your licences and device slots are checked automatically: an active ALL ACCESS plan unlocks every plugin, and a lifetime licence unlocks the plugin it was bought for — so RONE Stutter opens either way.
- Find RONE Stutter in the list and press INSTALL. The Center downloads the signed installer, verifies its checksum, installs it silently and registers the version.
- When the card shows INSTALLED, start (or restart) your DAW and rescan plugins if it does not pick up new plugins automatically. All RONE plugins appear next to each other in your plugin list because every name starts with RONE.
- Updates appear on the same card. Press UPDATE on one plugin or UPDATE ALL at the top. Close the standalone version of a plugin before updating it.
Where the files go
Windows
| File | Location |
|---|---|
| VST3 | C:\Program Files\Common Files\VST3\RONE\RONE Stutter.vst3 |
| Standalone app | C:\Program Files\RONE Plugins\RONE Stutter.exe |
| This manual | C:\Program Files\RONE Plugins\Manuals\ |
macOS
| File | Location |
|---|---|
| VST3 | /Library/Audio/Plug-Ins/VST3/RONE Stutter.vst3 |
| Audio Unit | /Library/Audio/Plug-Ins/Components/RONE Stutter.component |
| Standalone app | /Applications/RONE Stutter.app |
| This manual | /Users/Shared/RONE Plugins/Manuals/ |
Licence and activation
Licensing is tied to your account, not to a key. The plugin checks the licence file that the Center writes when you sign in. There are two ways to own it: an ALL ACCESS plan, which unlocks every RONE plugin for as long as it is active, or a lifetime licence for this plugin alone, which never expires. Either one opens RONE Stutter, and buying the lifetime licence later does not disturb a plan you already have.
If a plugin ever shows a RONE Bundle License Required screen, open the Center, make sure you are signed in and the plugin shows as licensed, then reopen it. Two devices can be signed in at the same time on either kind of licence; sign out on an old machine from the Center's Account page to free a slot. A lifetime licence keeps working offline for far longer than a plan does — there is nothing for it to expire against — but the Center still needs to reach the internet occasionally to confirm it.
Uninstalling
Windows: Settings → Apps → RONE Stutter (RONE). macOS: delete the bundles listed above. Presets and settings in your user folder are kept.
3Quick start
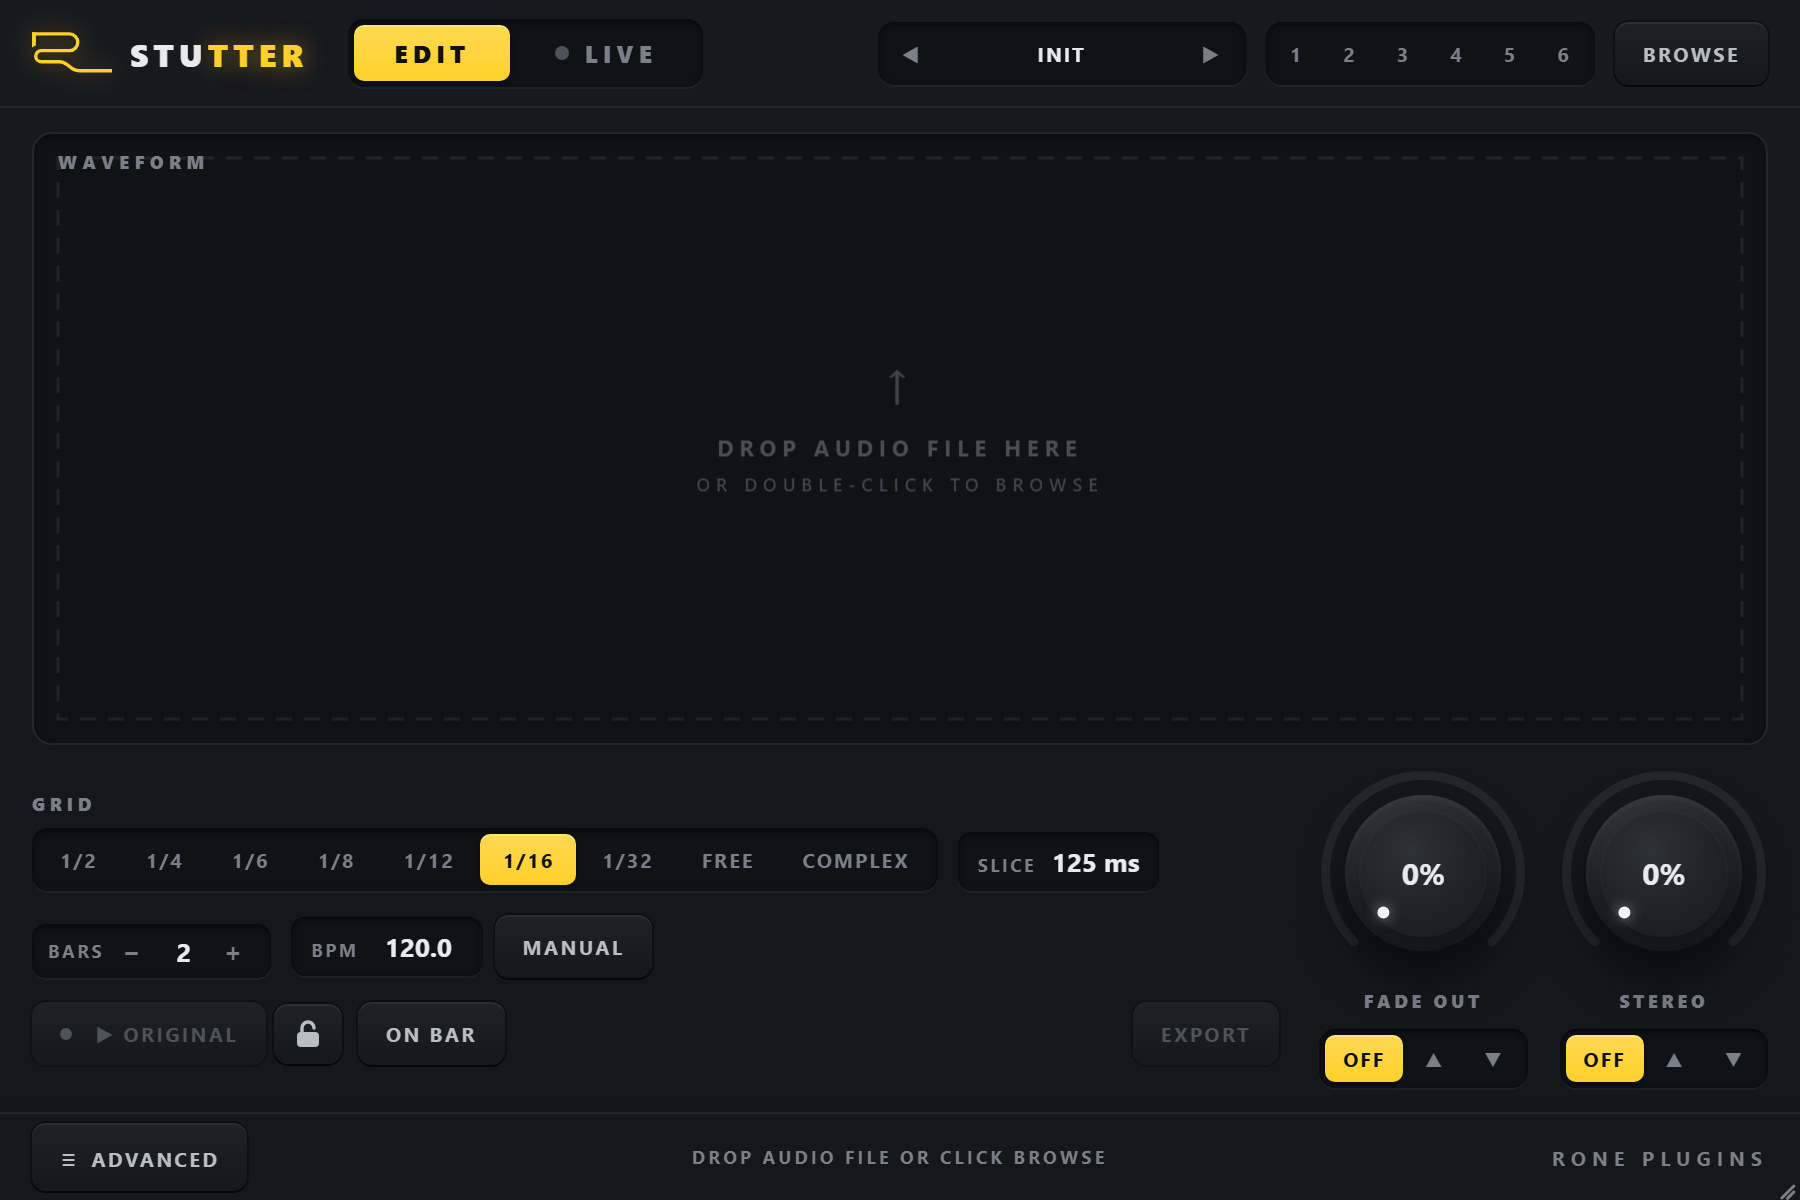
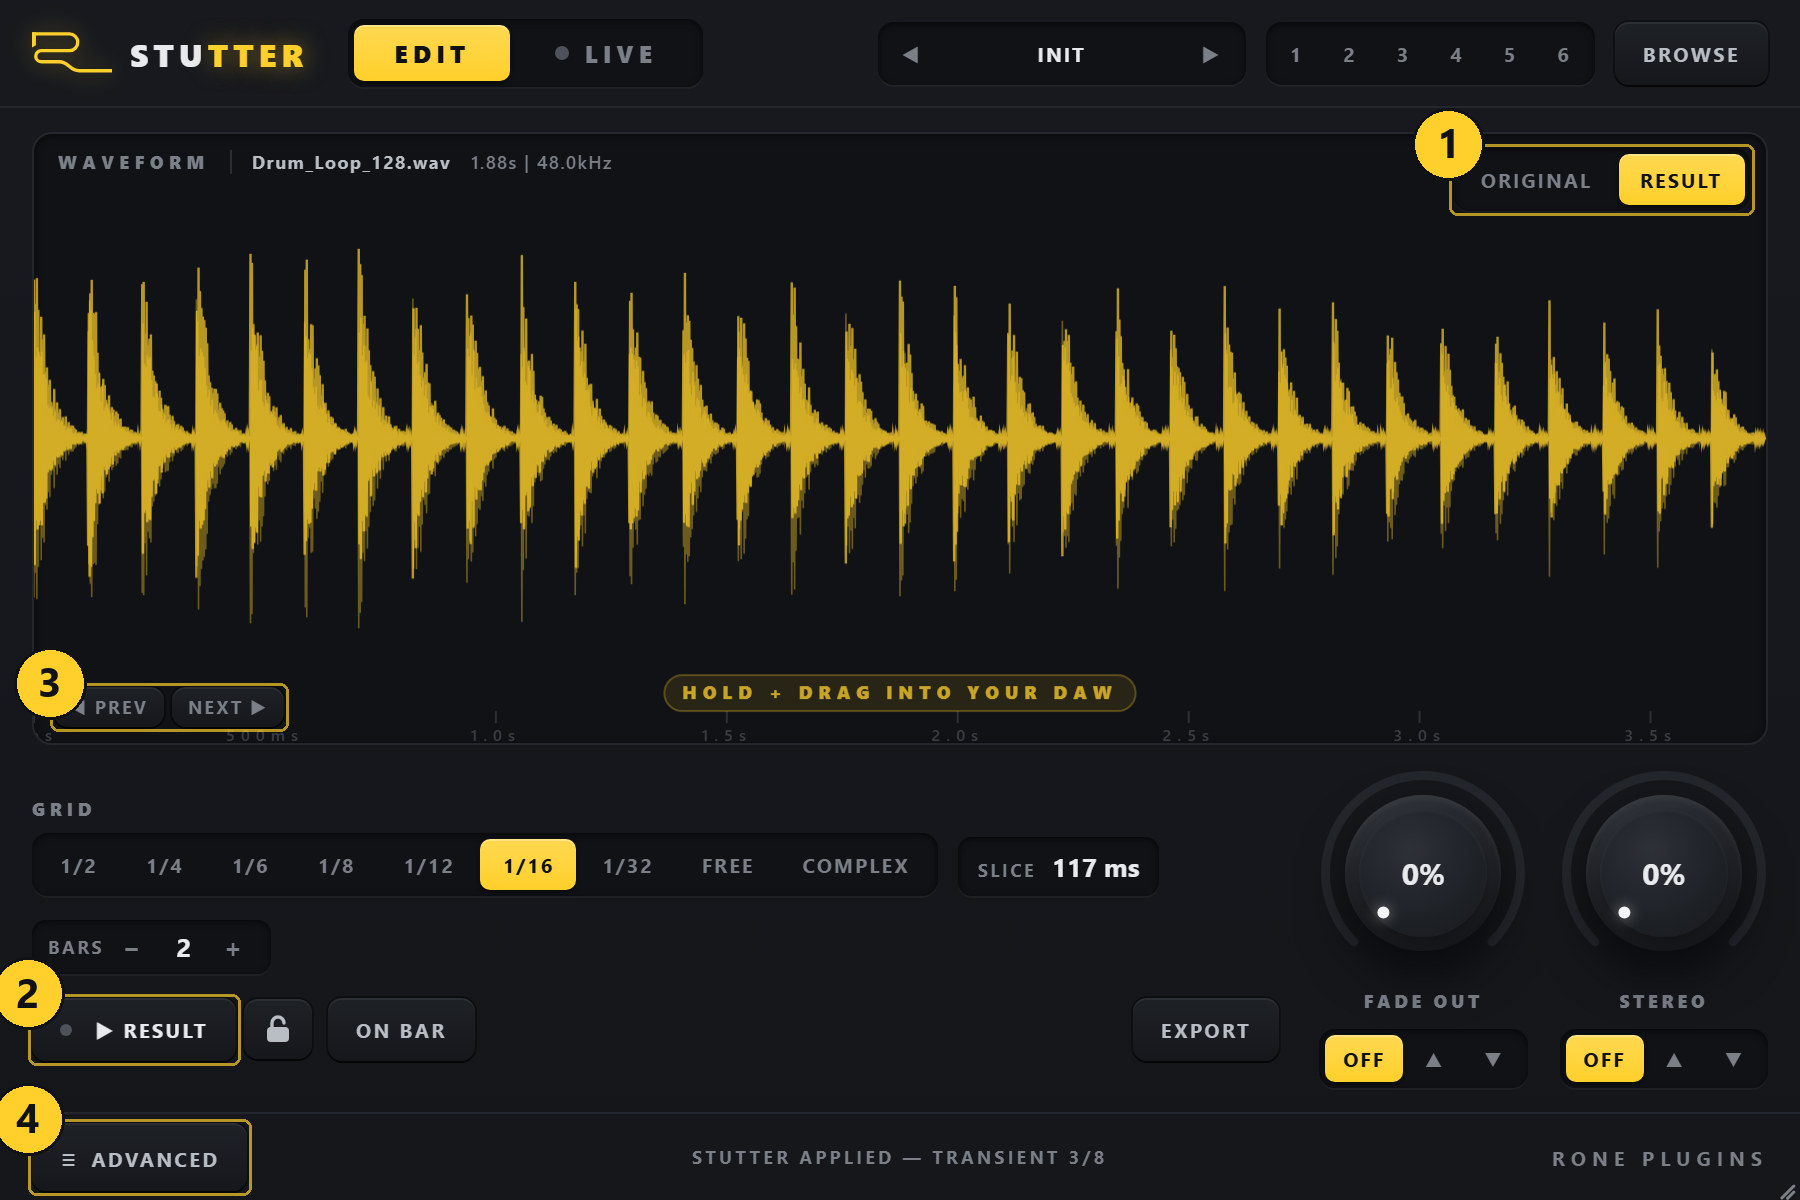
- Insert the plugin on any mixer channel. An empty channel is ideal, because the plugin plays its previews through that channel. In the standalone app just open it.
- Load a file. Drag a WAV, AIFF, FLAC or MP3 onto the waveform, double-click the waveform to browse, or press BROWSE. The header shows the file name, length and sample rate.
- Choose the moment - if the automatic one is not the one you wanted. Stutter starts on the first transient that actually sounds; ◀ PREV / NEXT ▶ re-roll the fill from the neighbouring hits, and clicking the ORIGINAL waveform sets the start by hand. Every one of those renders again immediately, and on ORIGINAL the hit you picked plays at once, up to the next transient, so you hear what you chose.
- Set the rhythm. GRID is the note value of one repeat (1/16 is the classic roll). The SLICE chip tells you how long one repeat is at the current BPM. BARS is the length of the finished clip.
- Check BPM. Inside a DAW the tempo is read from the host and the chip shows DAW. In the standalone app, or if the host reports no tempo, type the BPM into the box (the chip shows MANUAL).
- Shape it. FADE IN / FADE OUT soften each repeat; STEREO bounces alternating repeats left and right.
- Listen. One transport button plays whatever the waveform is showing - the toggle in the top-right corner of the waveform chooses. Every change above re-renders on its own; the STUTTER button in ADVANCED is only there when you want to force one.
- Get it into the song. Press the mouse anywhere on the lower part of the RESULT waveform and pull into your DAW's arrangement, or press EXPORT to save a WAV.
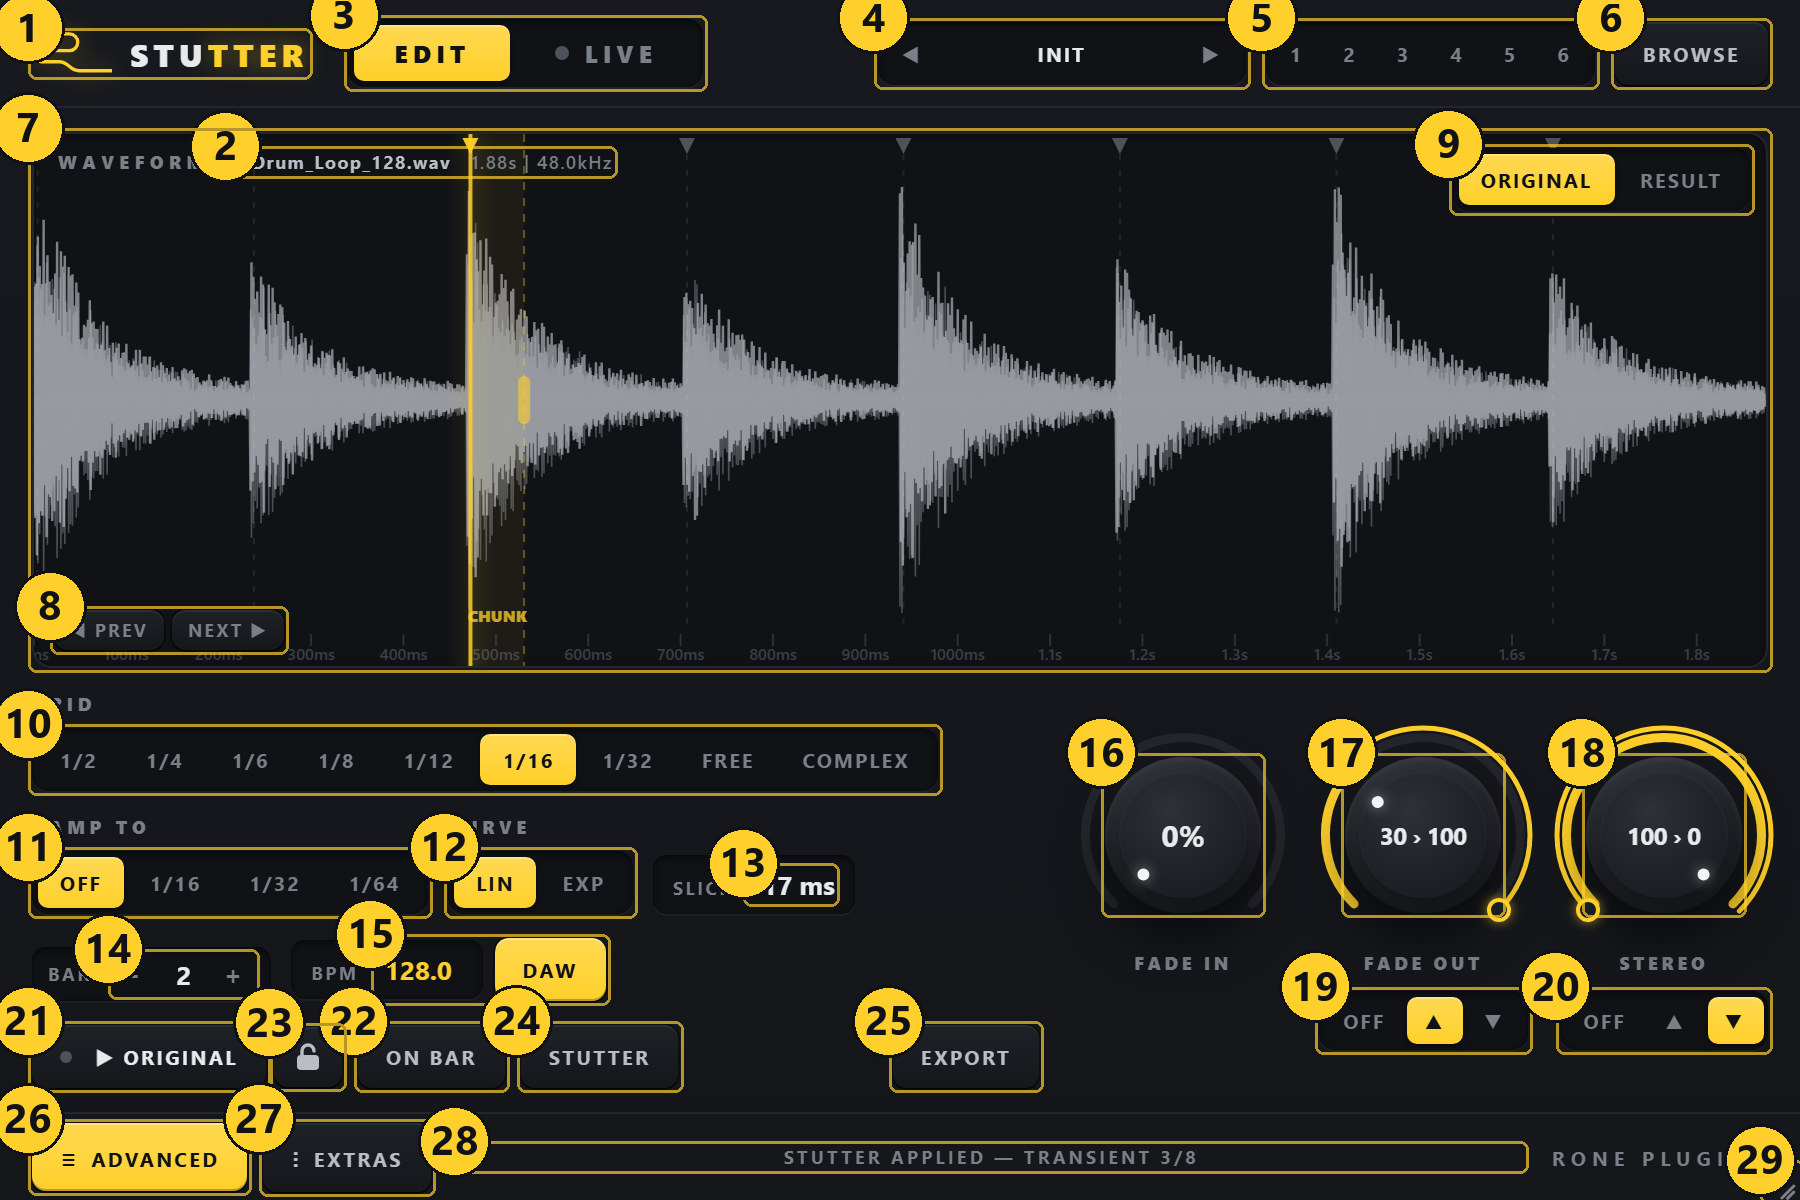
4Interface tour
The page opens minimal, in EDIT: the waveform, GRID, SLICE, BARS, FADE OUT, STEREO, one transport and EXPORT. That is the whole plugin for most fills. ADVANCED in the footer brings the rest of the controls bar and the STUTTER button back; EXTRAS, which appears beside it, opens the drawer. The picture shows everything unfolded.
5Presets
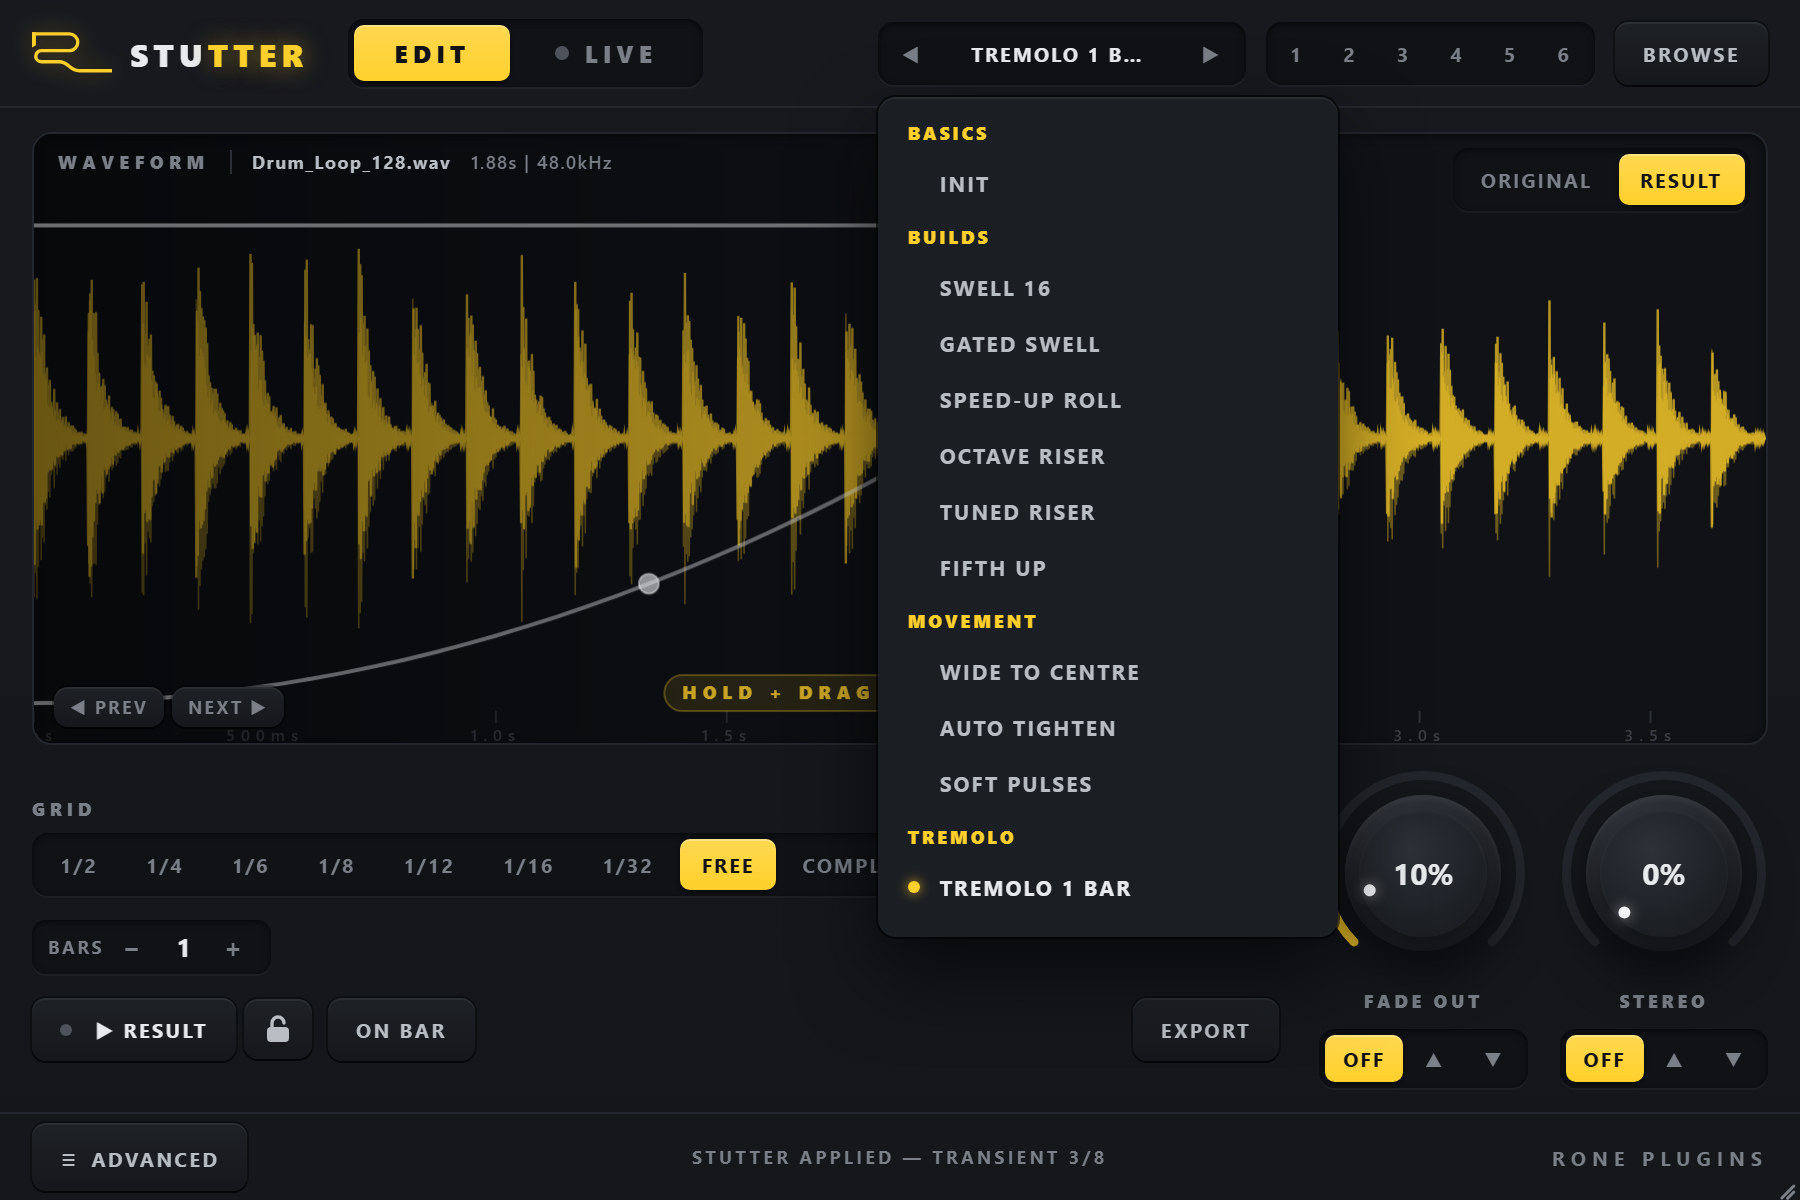
The preset bar in the header holds 54 factory presets. The fourteen in the table below are the fills the RONE Stutter tutorial builds, with the exact values heard in it. The other forty came with COMPLEX: TREMOLO GATES and PSYCHEDELIC, then COMPLEX CATCHES, COMPLEX TAPE, COMPLEX GLITCH, COMPLEX BUILDS and COMPLEX PSYCHEDELIC, which are ready rows of steps. ◀ and ▶ step through them; clicking the name opens the list, sorted by what the fill is for. A preset changes the stutter and nothing else, and the fill on the waveform re-renders the moment you pick one.
| Preset | What it is | Settings |
|---|---|---|
| Init | the plain roll | GRID 1/16, BARS 2, everything else off |
| Swell 16 | a 1/16 roll rising from silence | GLOBAL IN 71 % |
| Gated Swell | the same, every hit cut short | GLOBAL IN 71 %, FADE OUT 40 % |
| Speed-Up Roll | 8ths into 16ths into 32nds | GRID 1/8, RAMP TO 1/32 EXP, GLOBAL IN 71 %, FADE OUT 40 % |
| Octave Riser | the roll that climbs an octave | Speed-Up Roll + PITCH RAMP +12 |
| Tuned Riser | ends on a buzz in the key of the track | GRID 1/8, RAMP TO 1/64 EXP, PITCH RAMP +12, GLOBAL IN 71 %, FADE OUT 40 % |
| Fifth Up | the classic psytrance fill | PITCH +7, GLOBAL IN 71 %, FADE OUT 25 % |
| Wide To Centre | opens wide, lands in the middle | STEREO 100 % AUTO down, FADE OUT 10 % AUTO up, CURVE EXP, GLOBAL IN 71 % |
| Auto Tighten | starts loose, gets tighter and tighter | FADE OUT 10 % AUTO up, CURVE EXP, GLOBAL IN 71 % |
| Soft Pulses | hard hits turned into soft pulses | GRID 1/8, FADE IN 60 %, FADE OUT 40 %, GLOBAL IN 71 % |
| Tremolo 1 Bar | a tape stop in reverse, one bar | FREE 180 → 25 ms, TREMOLO, BARS 1, CURVE EXP, GLOBAL IN 71 %, FADE OUT 10 % |
| Tremolo 2 Bars | the same glide, slower and longer | FREE 250 → 20 ms, TREMOLO, BARS 2, CURVE EXP, GLOBAL IN 71 %, FADE OUT 10 % |
| Tape Slowdown | a buzz that slows down and fades - after the drop | FREE 25 → 180 ms, TREMOLO, BARS 1, GLOBAL OUT 60 %, FADE OUT 10 % |
| Downlifter | two octaves down and out | PITCH RAMP -24, GLOBAL OUT 60 %, FADE OUT 25 % |
Macro slots - your own presets
The six numbered buttons beside the name are yours. Hold one for a moment - it fills up - and the current settings are stored in it; tap it later to get them back. A slot that holds something is lit, and the one you are hearing glows. The slots are shared by every RONE Stutter in every project, so "my slot 3" is the same fill everywhere. Clear all macro slots at the bottom of the list empties them.
6Controls reference
Source and selection
Shows the source (grey) or the result (yellow). Clicking sets the start of the slice that will be repeated; the selection is shown as a bright line. Detected transients are marked with triangles above the waveform. The time ruler under the waveform follows zoom.
Moves the selection to the previous / next detected transient. The status line tells you how many transients were found. If the detector finds nothing (pads, noise), click the waveform to select manually.
The bright part of the source that gets repeated. Dragging its right edge sets its length: it snaps to the grid (1/2 to 1/32), or sets the milliseconds on FREE.
Loads WAV, AIFF, FLAC, MP3 or OGG. Stereo and mono files are both fine; a mono file still comes out in stereo, so STEREO works on one-shots too.
Rhythm
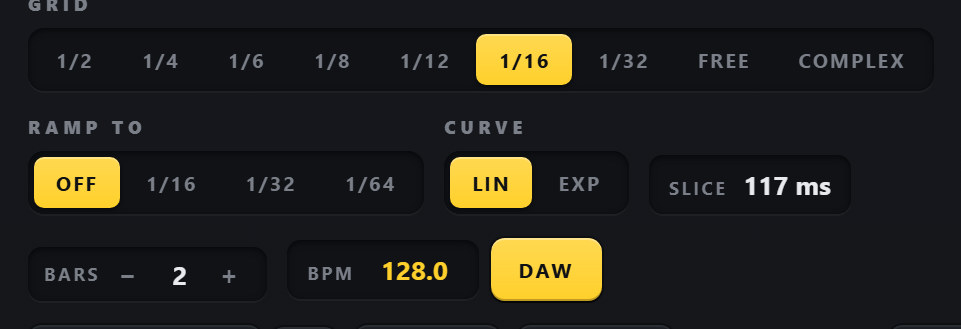
The note value of one repeat. 1/6 and 1/12 are triplet values. The repeat length is calculated from the BPM: at 120 BPM a 1/16 repeat is 125 ms, at 128 BPM it is 117 ms.
The accelerating roll in one render. From the GRID value the repeats double in rate, stage by stage, until they reach RAMP TO at the end of the clip: GRID 1/8 with RAMP TO 1/32 renders 8ths, then 16ths, then 32nds - the fill every producer arranges by hand from three separate renders. Every stage holds a whole number of repeats, so each stage change lands on the grid. LIN gives every stage the same share of the clip; EXP halves the share for each finer stage, so the roll spends most of the clip on the slow repeats and snaps into the fast ones at the end.
Triplet grids double too (1/6 to 1/12 to 1/24), and a target below the GRID simply renders the GRID.
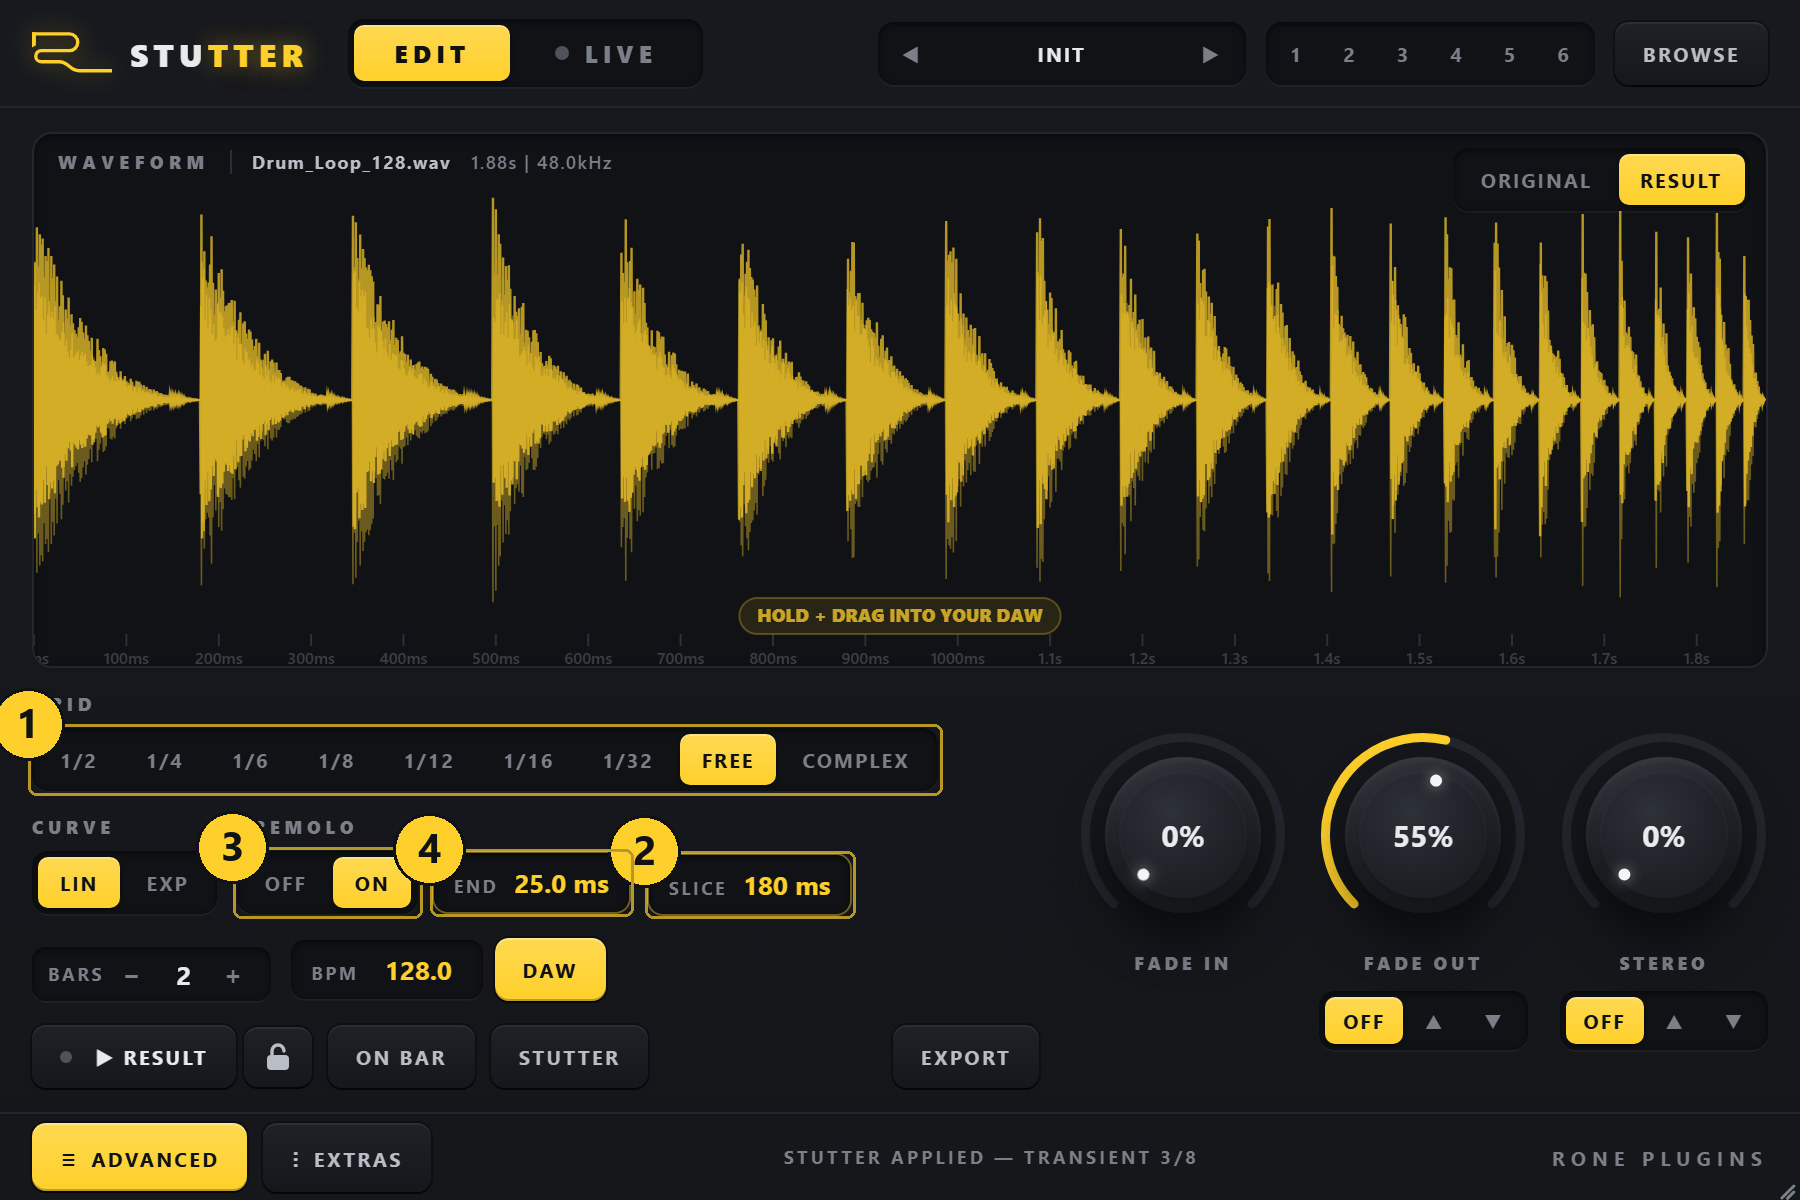
Takes the repeat length off the tempo grid. The SLICE chip turns yellow and becomes the control: drag it up or down, use the wheel, hold shift for fine steps. The scale is logarithmic, so the fast rolls and the slow ones get the same room.
Only the rate is free - the clip is still BARS long at the song tempo, so it still ends exactly on the next bar line. RAMP TO does not apply in FREE (it doubles grid values); TREMOLO takes its place.
Glides the repeat length continuously from SLICE to END across the clip. SLICE longer than END: wide pulses that tighten into a buzz. SLICE shorter than END: a buzz that opens up into slow pulses. CURVE sets the shape of the glide - LIN evenly, EXP holding back and rushing at the end.
Unlike RAMP TO, which jumps between grid values in stages, TREMOLO has no steps: every repeat is a little shorter (or longer) than the one before.
The length of one repeat in milliseconds. It changes when you change GRID or BPM. If the selected slice of audio is shorter than this, the repeat simply contains silence after the hit.
The length of the rendered clip. Repeats are placed until the clip is full; if the clip length is not an exact multiple of the grid, the last repeat is cut to fit.
Below half a bar, the minus button steps to 1/4 (one beat) and 1/8 (half a beat) for the short fills - a quick stab roll before a hit.
When the plugin runs inside a DAW that reports its tempo, the box is locked and shows the host tempo (chip reads DAW). Otherwise type a tempo; the chip reads MANUAL. The grid, the SLICE readout and the clip length all follow this value.
Shape
A fade at the start of every repeat. Small values (5-15 %) remove clicks when the slice does not start at a zero crossing; large values turn hard hits into soft pulses.
A fade at the end of every repeat. Use it to make each repeat decay before the next one, which gives the classic 'gated' roll.
Ping-pong: even repeats are attenuated in the right channel and odd repeats in the left, by the amount you set. 100 % alternates fully left / right; 30 % gives gentle movement that still sums to mono without holes.
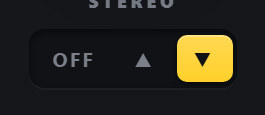
Moves the knob by itself across the clip. The knob is where the clip starts; up walks it to 100 % and down to 0 %, repeat by repeat, following CURVE (LIN: a straight line, EXP: slow first, fast at the end). The last repeat always gets the full value.
Two knobs have it because they are the two that tell a story over a fill. STEREO 100 % with AUTO down opens in full left / right ping-pong and closes in the centre, right into the drop. FADE OUT 0 % with AUTO up starts with repeats that ring into each other and ends with tight, gated hits.
A thin ring outside the knob's arc shows the stretch it will travel, and while the RESULT plays a dot rides that ring at the value the repeat under the playhead got - the same idea as an LFO display in a synth. On the RESULT waveform the stereo colouring (yellow / white repeats) fades along with it.
By default AUTO walks all the way to 100 % or 0 %. Drag the small handle at the end of the outer ring to set where it stops instead.
Pitch, key and filter (EXTRAS)
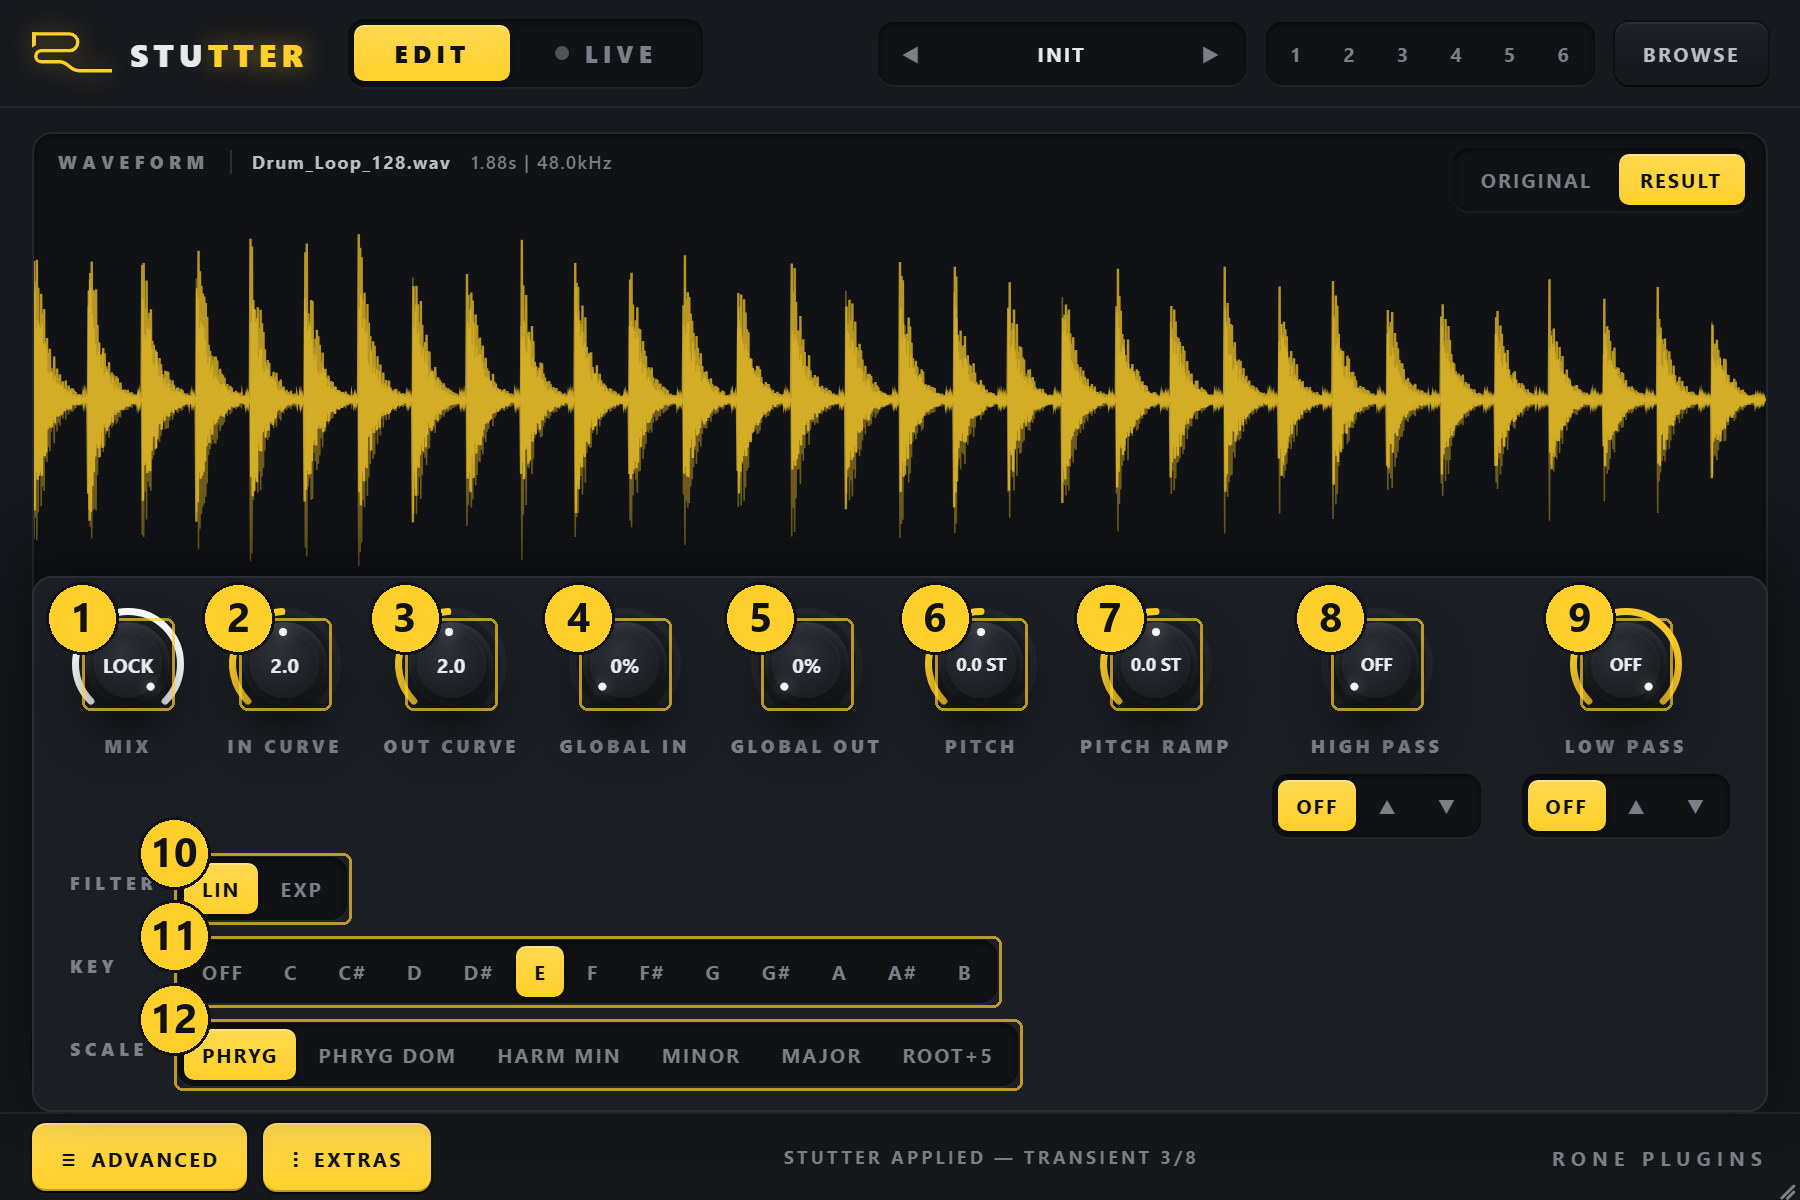
Every repeat is re-pitched by this amount - the content moves, the grid does not. The slice is read faster or slower from the transient, so a repeat pitched up contains more of the source and one pitched down contains less.
Added to PITCH across the clip, from nothing at the start to the full amount on the last repeat (following the CURVE). A rising roll that also rises in pitch is the build; a falling one is the drop.
At 1/64 and beyond, a roll repeats faster than 20 times a second and the ear hears it as a note - the note is the repeat rate, whatever the slice contains. With a KEY chosen, every stage fast enough to be a tone is nudged to the nearest note of the scale, so the buzz at the end of the fill is in key with the bass instead of a random pitch. Slower stages stay exactly on the grid.
Two filters baked into the rendered fill, saved with the project and the presets.
Each filter can sweep across the fill: the knob is where it starts, up and down sweep it over the bars. Drag the handle at the end of the ring to set where the sweep stops (the readout shows the range, for example 100 > 2.0k); double-click it for the full sweep. FILTER CURVE shapes the sweep: LIN evenly, EXP slow at first with most of the move at the end.
The preview level in the channel. At 100 % the result replaces the channel (LOCK); below that the channel stays at full level and the result is added on top - a send, not a crossfade. It never touches the export.
The shape of FADE IN and FADE OUT on every repeat: 1 is linear, 2 a gentle curve, 4 sharp.
A fade over the whole clip on top of the per-repeat fades. GLOBAL IN at 90 % is a two-bar swell from silence.
They are usually set on the waveform rather than here. In the top band of the RESULT view each fade is a full-height column you can grab at any height - hover and it lights up - and dragging it sideways sets the length. The dot on the curve below is the shape: pull it up or down (the cursor turns vertical) to go from a gentle curve to a sharp one. Clicking the bare left or right end of the band starts a fade that does not exist yet.
Transport and output

Plays whatever the waveform is showing, through the plugin's channel: the RESULT clip, or the source from the slice start when the view is on ORIGINAL. The label follows the view, the playback position is drawn on the waveform, and pressing it again stops. Switching the view while it plays stops playback rather than carrying on under the wrong name.
Forces a render with the current settings. You rarely need it: a file that lands is rendered immediately, and every later change - GRID, BARS, the fades, STEREO, a new transient - renders again on its own. The button is there for the times you want to re-roll deliberately, and it is hidden on the minimal page.
The preview keeps playing in a loop, so you can flip through presets and hear each one at once. Every change starts the loop again from the top, or on the next bar with ON BAR while the song plays. Press it again to unlock.
Off until you press it. When lit and the host is playing, ORIGINAL and RESULT do not start at the click but on the next bar line of the song. A fill previewed on the bar is heard exactly where it will sit in the arrangement. While it waits the play button pulses and reads NEXT BAR; press it again to call the preview off.
With the transport stopped - and in the standalone app - there is no bar to wait for, and playback starts at the click.
When the song stops, the preview stops with it, and a preview that was still waiting for the bar line is called off.
Saves the rendered clip into Documents\RONE Plugins\Exports\RONE Stutter\ as <source>_stutter_<grid>_<bars>_<date>_<time>.wav, at the session's sample rate. The status line shows the file name. Nothing is ever deleted from that folder by the plugin.
Press the mouse anywhere on the lower part of the result and pull: the plugin writes the clip and hands it to your DAW as an audio drop. A small DRAG TO EXPORT badge marks the area. The file is saved to Documents\RONE Plugins\Exports\RONE Stutter\ first - a permanent folder that is never cleaned up - so a project that references it always finds it again, even if your DAW does not copy dropped files into the project folder. It works into Explorer / Finder too.
The top of the waveform belongs to the fades, so a press there moves a fade instead of starting a drag. Nothing is ambiguous: the two areas do not overlap.
Host parameters
Everything above is a host parameter: visible in the DAW's parameter list, automatable, mappable to a controller and saved with the project. Since 1.2 a project that is reopened also shows its file and selection in the window straight away.
7COMPLEX
COMPLEX, the last button of the GRID row, turns the fill into a row of steps, each with its own job: roll, get stuck, play on, slow down, come back up. RAMP TO, CURVE and SLICE step aside for the row; BARS, the fades, STEREO, PITCH and the filters work as usual, and the row repeats until BARS is full. Each step's colour runs along the top of the waveform, so you see where it falls in the fill.
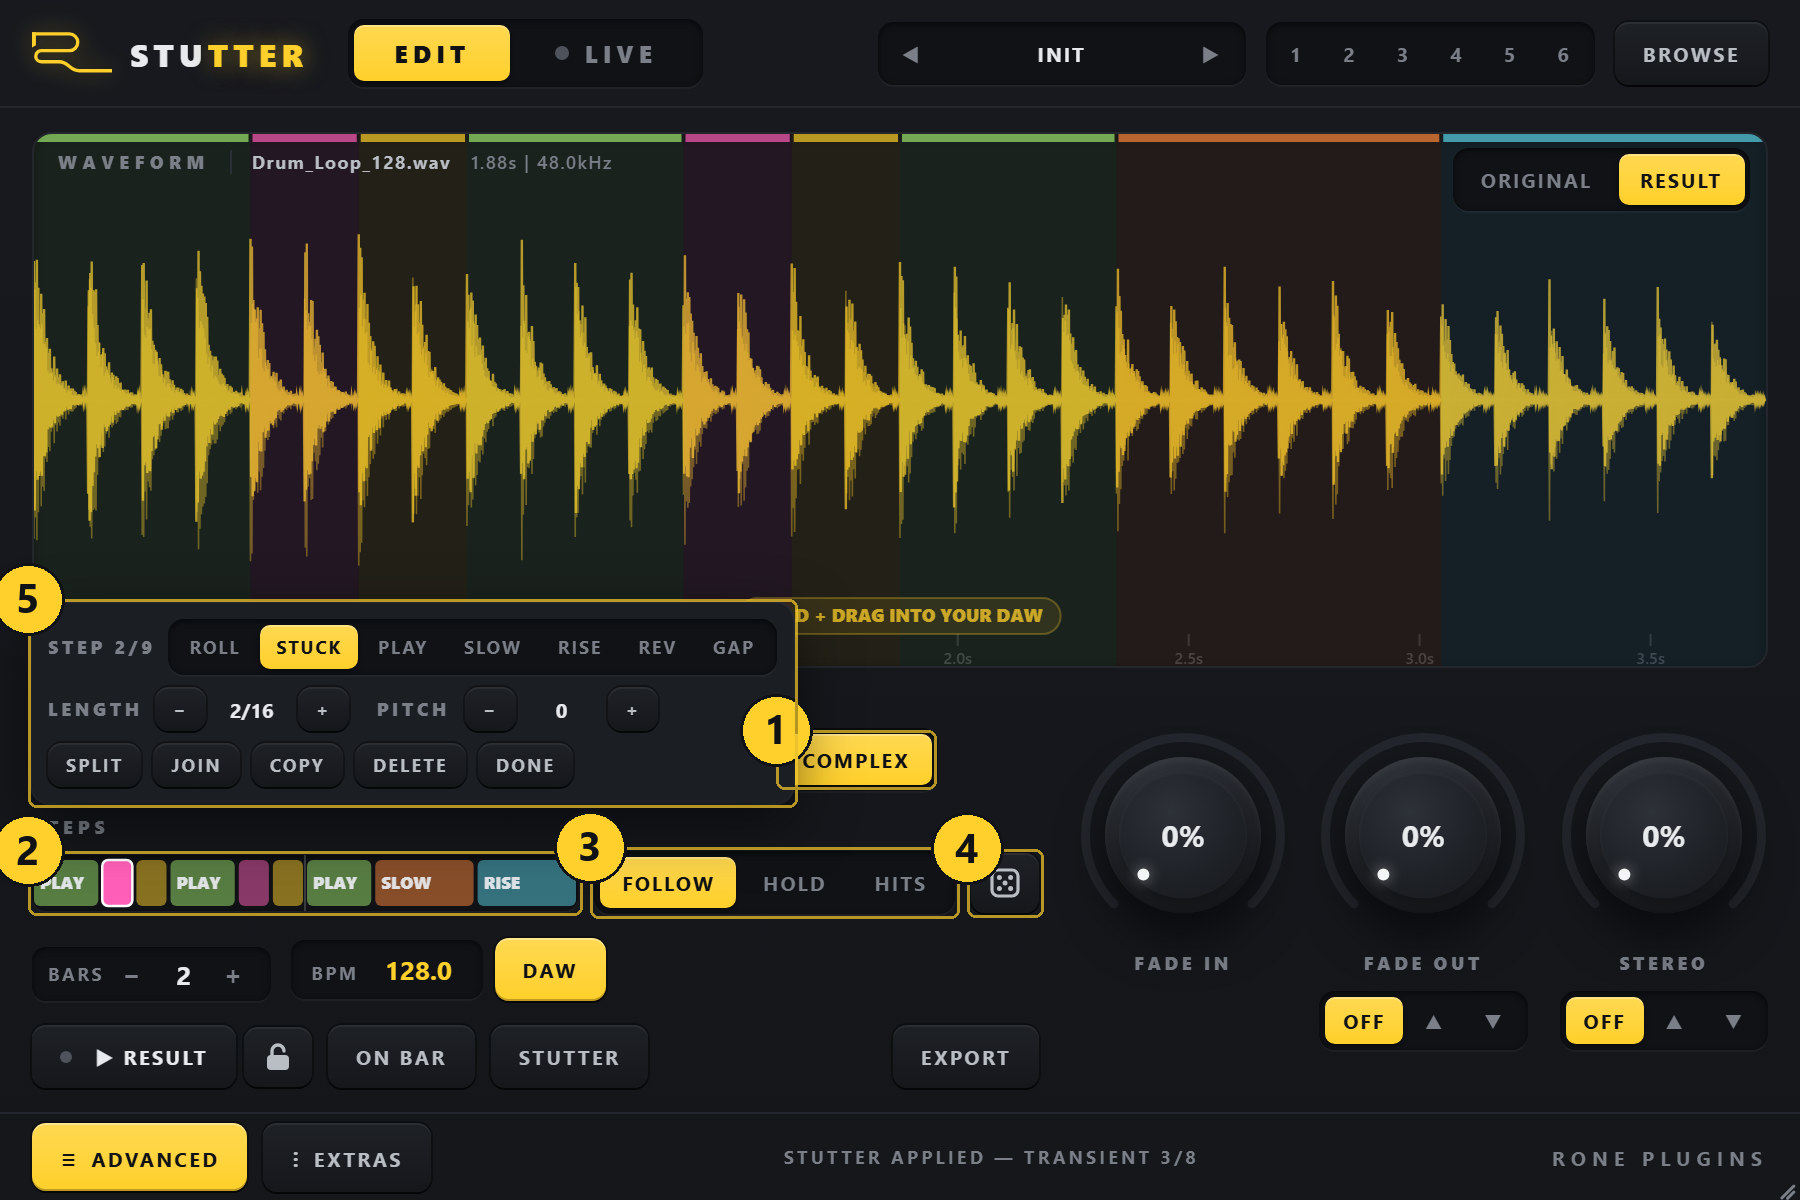
| Step | What it does |
|---|---|
| ROLL | a stutter on its own grid: 1/4, 1/8, 1/12, 1/16, 1/24 or 1/32 |
| STUCK | a tiny 1/64 grain repeats: the catch |
| PLAY | the sample plays on |
| SLOW | a tape stop inside the step |
| RISE | the tape comes back up to speed |
| REV | the step backwards |
| GAP | silence |
The step editor
Click a step and the editor opens over the controls. The top row sets its type. LENGTH is in 16ths and PITCH in semitones (shift = an octave). SPLIT cuts the step in two, JOIN joins it with the next one, COPY repeats it after itself, DELETE removes it and DONE closes the editor.
Where each step reads the sample
| Mode | What it does |
|---|---|
| FOLLOW | PLAY, SLOW and RISE move on through the sample; ROLL and STUCK catch where it got to |
| HOLD | every step starts at the picked transient |
| HITS | every step jumps to the next transient after the picked one |
8LIVE
In LIVE, RONE Stutter works on whatever plays through its channel: no file, no latency, nothing to drag. Put it on a channel, switch to LIVE and press play. A fill sounds exactly as it does in EDIT, because it uses the same controls: every preset, GRID, RAMP TO, COMPLEX row, KEY, filter and fade. The waveform becomes a scrolling picture of the channel, with each caught fill marked CATCH.
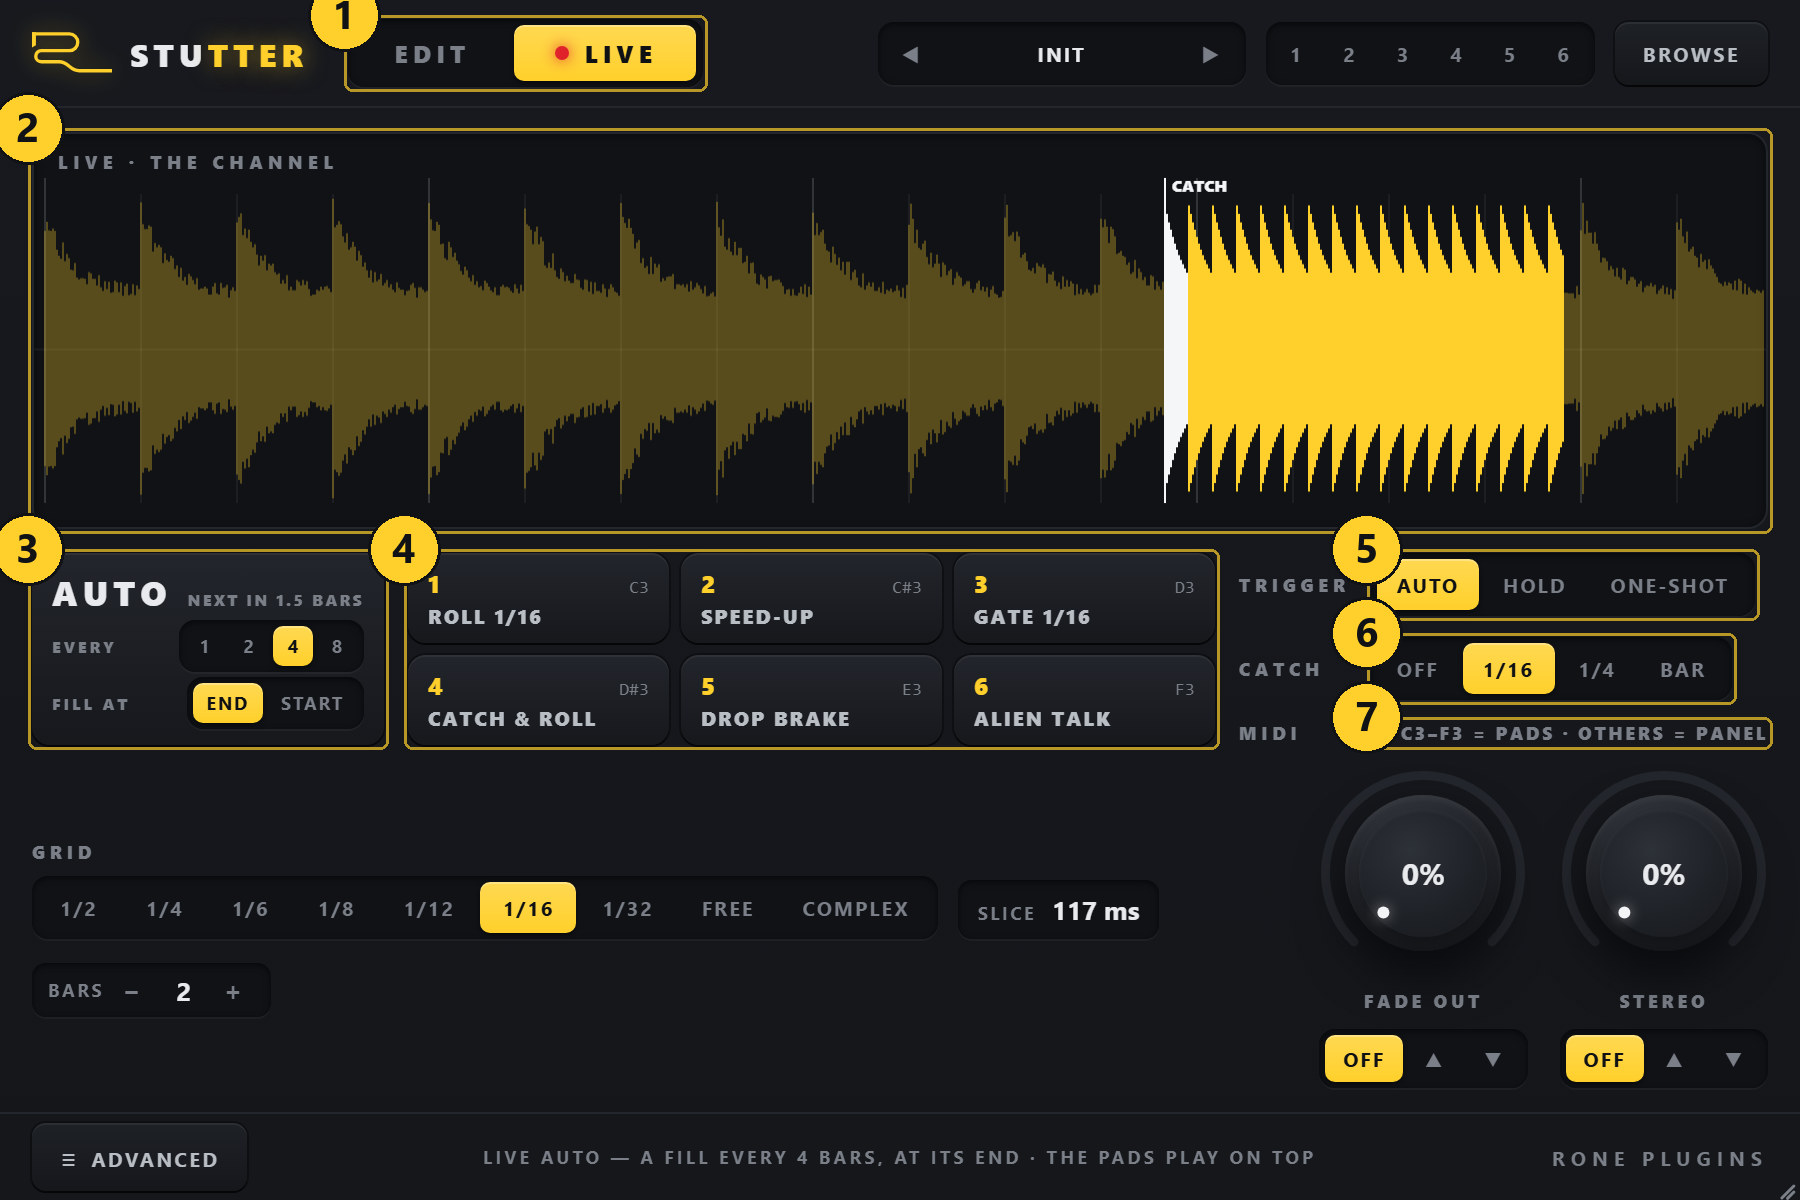
TRIGGER: three ways to play it
Play the song and the fills come by themselves, on its bars. EVERY is how often. Each fill is BARS long. On END it comes at the end of the phrase and lands on the next downbeat; on START it opens the phrase. With BARS as long as EVERY, or longer, it never stops. Nothing happens until the song plays: the deck says PLAY THE SONG, then counts down to the next fill. The pads play on top, and a pad you are holding wins over a fill that is due.
The channel stutters while you hold, with the sound on the panel. Let go and the channel is back.
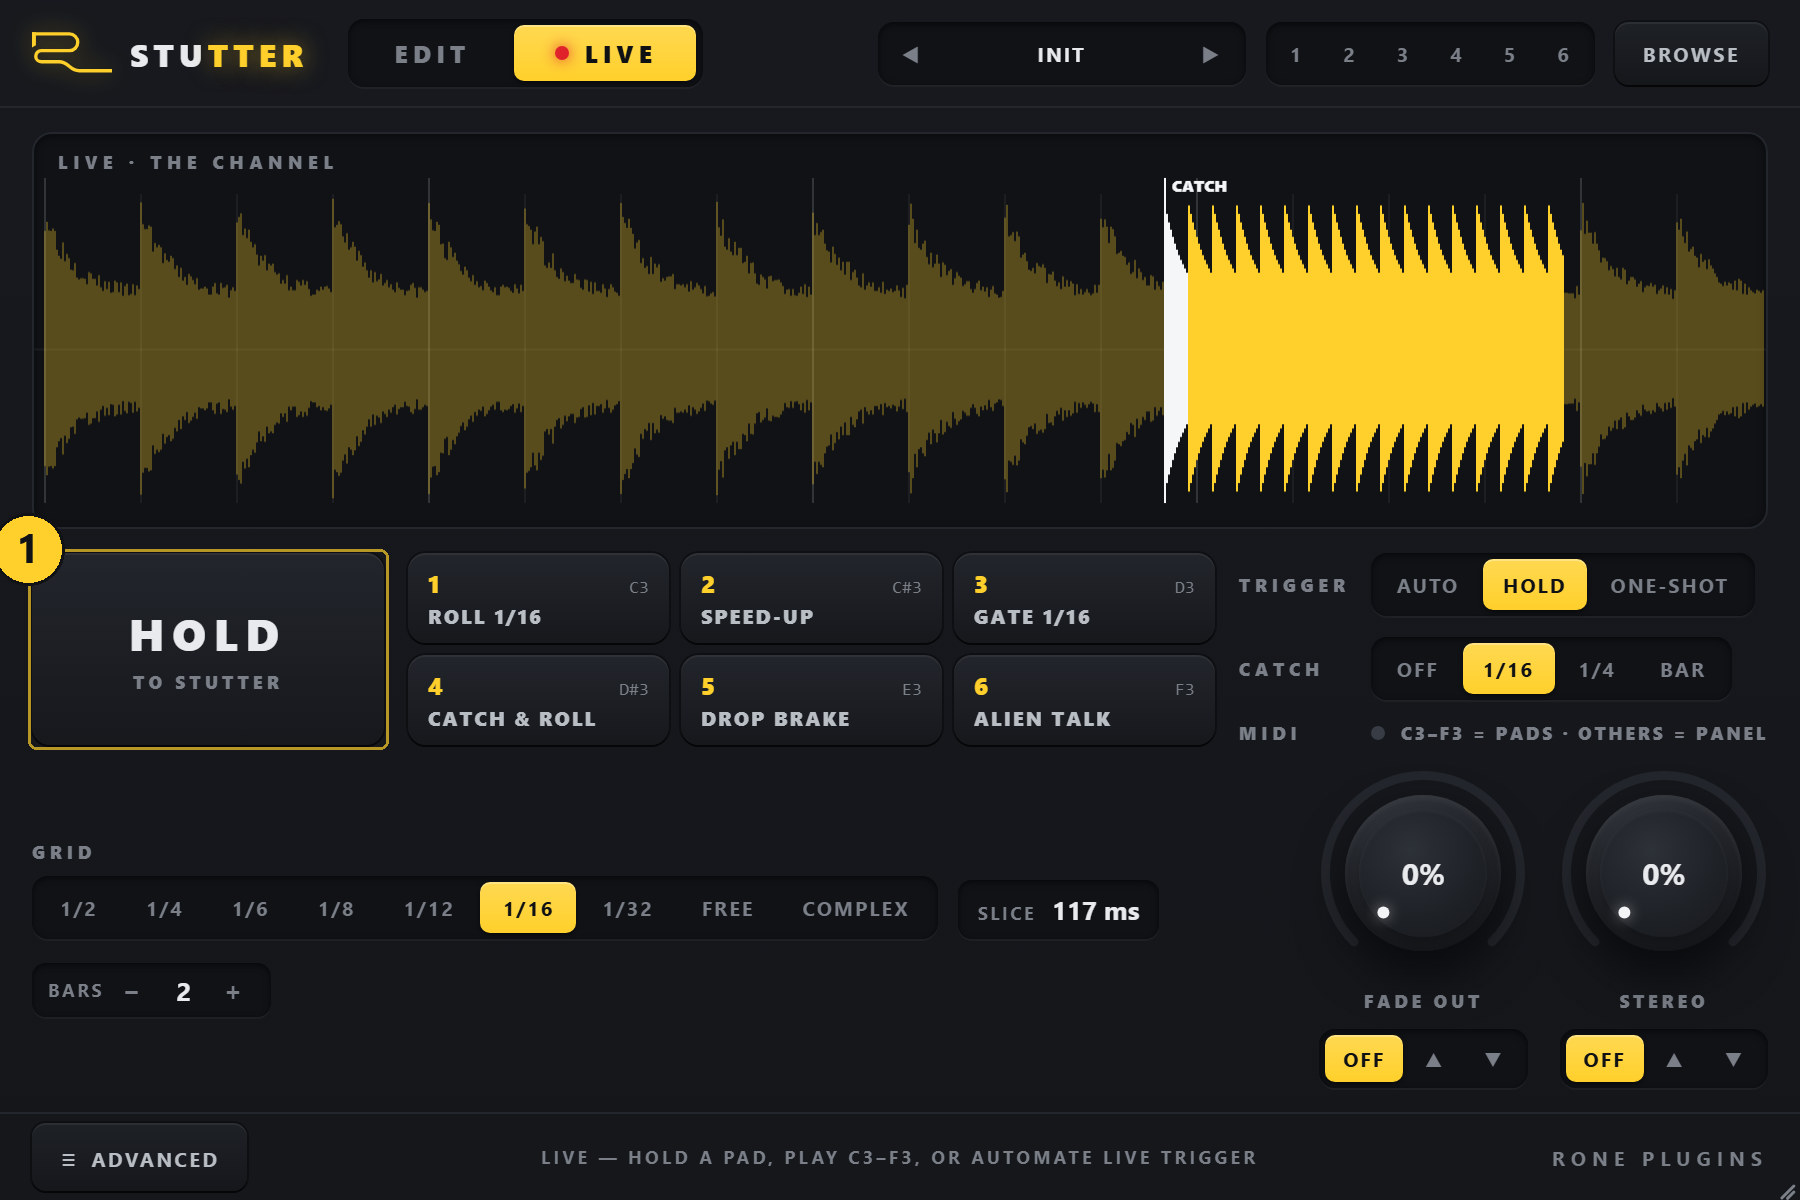
One press plays the whole BARS, however short the press was.
Pads
The six pads are your macro slots: pad 1 plays slot 1, and so on, the same slots as in the header. An empty slot plays a ready sound instead: Roll 1/16, Speed-Up, Gate 1/16, Catch & Roll, Drop Brake and Alien Talk. Store your own in a slot (hold its number in the header) and the pad shows its name. KEY and SCALE stay with the panel, because they belong to your track, not to the pad.
CATCH
While the song plays, a press waits for the next 1/16, beat or bar, so it always lands in time; the pad blinks while it waits. A press you let go before that line still plays, for one step of the catch. OFF starts at once, and with the song stopped there is nothing to wait for, so it starts at once too.
Playing it from the DAW
| From | What it does |
|---|---|
| MIDI, VST3 | route a MIDI track to RONE Stutter: C3 to F3 play pads 1 to 6, any other note plays the sound on the panel. The MIDI lamp lights on every note |
| AU, Logic Pro | the AU version takes no MIDI, so the pads do not answer notes. The pads on screen, AUTO and the automation all work |
| Automation | the Live Trigger parameter acts like a press on the panel's sound: on presses, off lets go. It works in every host |
LIVE's choices are host parameters too: Mode, Live Trigger Mode, Live Catch, Live Auto Every and Live Auto Place. They are saved with the project.
9Step-by-step workflows
Snare roll into a drop
- Bounce or drag the snare hit (or the whole loop) into Stutter.
- Select the snare transient with NEXT / PREV.
- GRID 1/8, RAMP TO 1/32, CURVE EXP, BARS 1, FADE OUT 50 %. Press STUTTER: one clip, 8ths into 16ths into 32nds.
- With ON BAR lit, press RESULT while the song plays into the drop to hear it in place.
- Drag the clip to the bar before the drop. Add a short reverse cymbal on top and you are done.
Vocal stutter build
- Load the vocal phrase and click the first syllable of the word you want (zoom in; a vowel start is usually cleaner than a consonant).
- GRID 1/8, BARS 2, FADE IN 10 %, FADE OUT 30 % so each repeat breathes.
- STEREO 40 % for movement. Press STUTTER.
- Set Global Fade In (host parameter) to 100 % if you want the two bars to rise from silence.
- Drag the result in, and send it to the same reverb as the lead vocal so it sits in the same space.
Glitch texture from a tiny slice
- Load any percussive or noisy source; select a very short, bright moment.
- GRID 1/32, BARS 4, FADE IN 0 %, FADE OUT 0 %, STEREO 100 %.
- Render. You get a pitched, buzzing texture that sits hard left / right on alternate repeats.
- Render again with STEREO 0 % and layer both; low-pass the mono one, high-pass the wide one.
A fill into every fourth bar, hands off
- Put Stutter on the channel and press LIVE. TRIGGER is already on AUTO.
- Pick a preset, or build the sound in EDIT first and switch over.
- EVERY 4, FILL AT END, BARS 1. Press play: the last bar of every four stutters into the next downbeat.
- Hold pad 5 (Drop Brake) when you want something else there: the pad wins over the fill.
Triplet edit
- Select a hi-hat or clap. GRID 1/12 (that is a 1/8 triplet) or 1/6 (1/4 triplet).
- BARS 0.5, FADE OUT 70 %. Render and place it on the last half bar of a phrase.
10Recommendations
Do
- Render at the project tempo and drop clips on bar lines; the timing will be perfect without nudging.
- Use small FADE IN values (5-10 %) whenever you hear a click at the start of the repeats.
- Keep a dedicated "Stutter" mixer channel. All previews play through it, so you can EQ and compress the auditions the same way you will treat the printed clip.
- Render variations rather than automating: 1/8 → 1/16 → 1/32 clips placed back to back is the fastest way to build a roll that accelerates.
- Exports are named for you (source, grid, bars, date) and collected in
Documents\RONE Plugins\Exports; back that folder up with your projects.
Avoid
- Selecting far ahead of the transient. Silence before the hit is repeated too, and the roll loses its punch.
- Very long source files. Stutter only needs the hit; long files just slow down loading and detection.
- STEREO at 100 % on low-frequency material; alternate-channel kicks cancel in mono.
- Forgetting to re-render after changing settings - the RESULT you hear is always the last render.
Sound tips
- Fade out plus fade in at similar values turns a stutter into a tremolo-like pulse; useful on pads and vocals.
- Pitch is length. At 1/32 and 1/64-equivalent lengths (high BPM) the repeat rate reaches the audible range and the roll takes on a pitch. That pitch follows the tempo, which is why it always sounds in tune with the track's rhythm, if not its key.
- Layer with the original. Keep the untouched hit on beat one and start the stutter on the "and"; the first hit keeps its weight.
11Interface conventions
All RONE plugins share the same graphite interface language, so once you know one, you know them all.
| Gesture | What it does |
|---|---|
| Drag a knob up/down | Changes the value. The lit arc shows where you are in the range; the value is printed inside the knob. |
| Hold Shift while dragging | Fine adjustment. |
| Double-click a knob | Resets it to the default value. |
| Right-click a control (VST3) | Opens your DAW's automation / parameter menu for that control (for example FL Studio's Create automation clip, Link to controller). RONE never shows a browser context menu. |
| Mouse wheel | Steps through segmented switches and lists where the plugin offers them. |
| Drag the triangle in the bottom-right corner | Resizes the window. The interface scales proportionally and keeps its aspect ratio. |
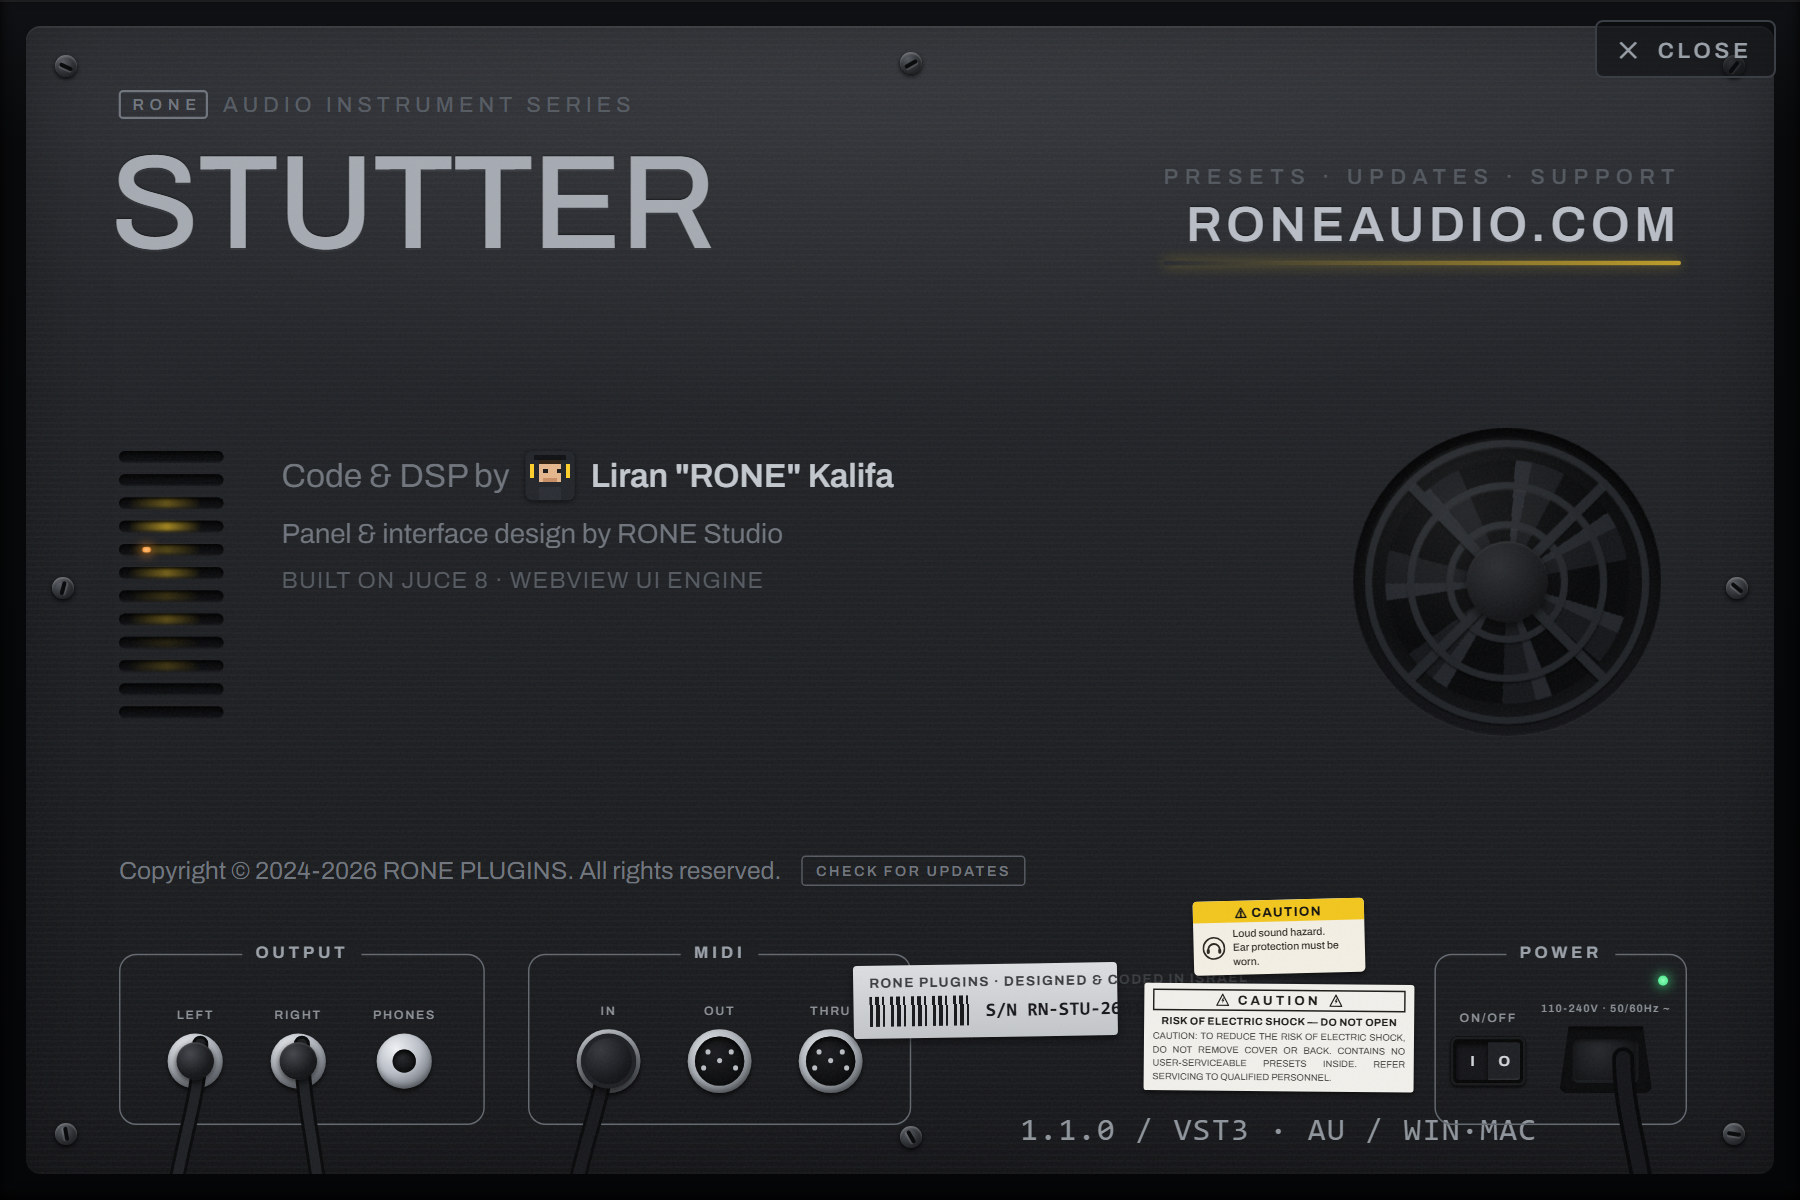
| Click the R logo / plugin name in the header | Flips the plugin over to its back panel: version, format, licence holder, a link to roneaudio.com and a DEACTIVATE button for this device. |
Automation
Every knob and switch is a host parameter. Automate it from the DAW's automation lane or by right-clicking the control inside the plugin (VST3). Values shown in the plugin always match the DAW's.
Presets and state
The plugin's full state is saved with your DAW project, so a project reopens exactly as you left it. Where the plugin has its own preset browser (the name field with ◀ ▶ arrows), factory presets are built in and your own presets are stored in your user folder.
Standalone version
The standalone app is the same plugin in its own window, useful for auditioning and exporting without a DAW. It uses your system's default audio device; when there is no DAW clock, tempo-synced controls follow the plugin's own BPM setting.
12Troubleshooting, specifications and support
Troubleshooting
| Symptom | What to do |
|---|---|
| I cannot find the STUTTER button | There is not one on the minimal page, because you do not need it: the file renders when it lands, and again after every change. Press ADVANCED in the footer to bring it back. |
| The roll is out of time in my DAW | Check the BPM chip. If it says MANUAL inside a DAW, the host is not sending tempo (some hosts only do so while playing); type the project tempo and render again. |
| Dragging out does nothing | Check you are on the RESULT view - ORIGINAL is not a drag source, so that clicking a transient stays instant - and that the press started on the lower part of the waveform. The top band belongs to the fades. |
| A fade moved when I meant to drag the clip out | The press started in the top 40 % of the waveform, which is the fades' band. Start lower down - the DRAG TO EXPORT badge sits in the area that drags. |
| LIVE does nothing on AUTO | AUTO only runs while the song plays. The deck says PLAY THE SONG until it does. |
| MIDI notes do nothing in LIVE | Route a MIDI track to the plugin (VST3). The AU version takes no MIDI: use the pads on screen, AUTO or the Live Trigger automation. |
| No transients are found | The material is too soft or sustained for the detector. Click the waveform to place the selection by hand; everything else works the same. |
| The DAW says a dropped clip is missing | Clips are saved to Documents\RONE Plugins\Exports\RONE Stutter; point the DAW there. Versions before 1.1.1 wrote to the temp folder, which Windows and macOS clean up - re-export those clips once. |
| The plugin does not appear in the DAW | Rescan plugins. On Windows the VST3 lives in C:\Program Files\Common Files\VST3\RONE; make sure that folder (or its parent) is in the DAW's VST3 search path. On macOS restart the DAW after installing; Logic and GarageBand may need a full AU rescan. |
| The window is blank or shows an error page (Windows) | The Microsoft WebView2 runtime is missing or damaged. Reinstall the RONE Plugins Center; it repairs WebView2. Also check that WebView2Loader.dll sits next to the standalone executable. |
| The window is white in Ableton Live but the standalone works (Windows) | Turn off Live's auto-scaling for this plugin: in Live's browser open Plug-Ins, right-click the plugin and untick Auto-Scale Plug-In Window, then delete the plugin from the track and insert it again. Seen with Windows display scaling at values such as 110 %. |
| A licence screen appears | Open the RONE Plugins Center, sign in, confirm your plan is active, then reopen the plugin. Check that you have not exceeded your device limit. |
| The plugin shows an older version than the Center | Close every DAW and standalone RONE app, then press UPDATE again. A running standalone keeps the old executable locked. |
| Crash | RONE plugins write a crash report to your user folder; the Center uploads it the next time it runs. Please also tell us what you did right before the crash. |
Specifications
| Product | RONE Stutter |
| Version | 2.0 (manual revised November 2026) |
| Formats | VST3 · AU · Standalone (Windows: VST3 + Standalone; macOS: VST3 + AU + Standalone) |
| Systems | Windows 10 / 11 (64-bit) · macOS 11 or newer (Intel and Apple silicon, universal) |
| Channels | Stereo in / stereo out |
| Sample rates | 44.1 kHz to 192 kHz |
| Latency | None (EDIT renders offline; LIVE adds none) |
| Engine | JUCE 8, WebView interface (WebView2 on Windows, WebKit on macOS) |
Support
Website, presets, updates and support: roneaudio.com. When writing to us, include the plugin version (shown on the back panel), your DAW and operating system, and the steps to reproduce.