
Draw the Duck, Lock the Sub, Make Room | RONE Sidechain Complete Guide · 4 min · Watch on YouTube
1Welcome to RONE Sidechain
RONE Sidechain goes on your bass and makes room for the kick in three ways, one page each.
- SIDECHAIN - you draw the shape of the duck. Every kick restarts the curve, and the bass is exactly silent at the kick's first sample: no leftover level under the kick, no tail and no click.
- PHASE - turns only the bass's sub so that, where the kick's tail hands over to the bass, the two add up instead of cancelling.
- SPACE - small dynamic bells that cut the bass only at the frequencies and moments where the kick and the bass really collide. Everything else passes untouched.
The kick can come from a sidechain route, from a kick sample you drop on the plugin (it plays silently on the host's beat), or from nothing at all - then the curve runs on the grid.
Where it shines
- Rolling psytrance and techno basslines - the kick's 16th closed, the bass back exactly on the next note.
- House pump - a slow, musical curve over the whole beat.
- 808s and sub basses - duck only the sub and keep the bass's top.
- Muddy low ends - PHASE and SPACE clean up the handover without an EQ that stays on.
The 10-second version
- Insert RONE Sidechain on the bass.
- Route the kick into its sidechain input - or drop a kick sample on it.
- Pick a preset for your genre.
- Shape the curve until the bass breathes with the kick.
2Installation with the RONE Plugins Center
Every RONE product is installed, updated and licensed through one application: the RONE Plugins Center. You never download individual installers by hand, and you never enter serial numbers into the plugin itself.
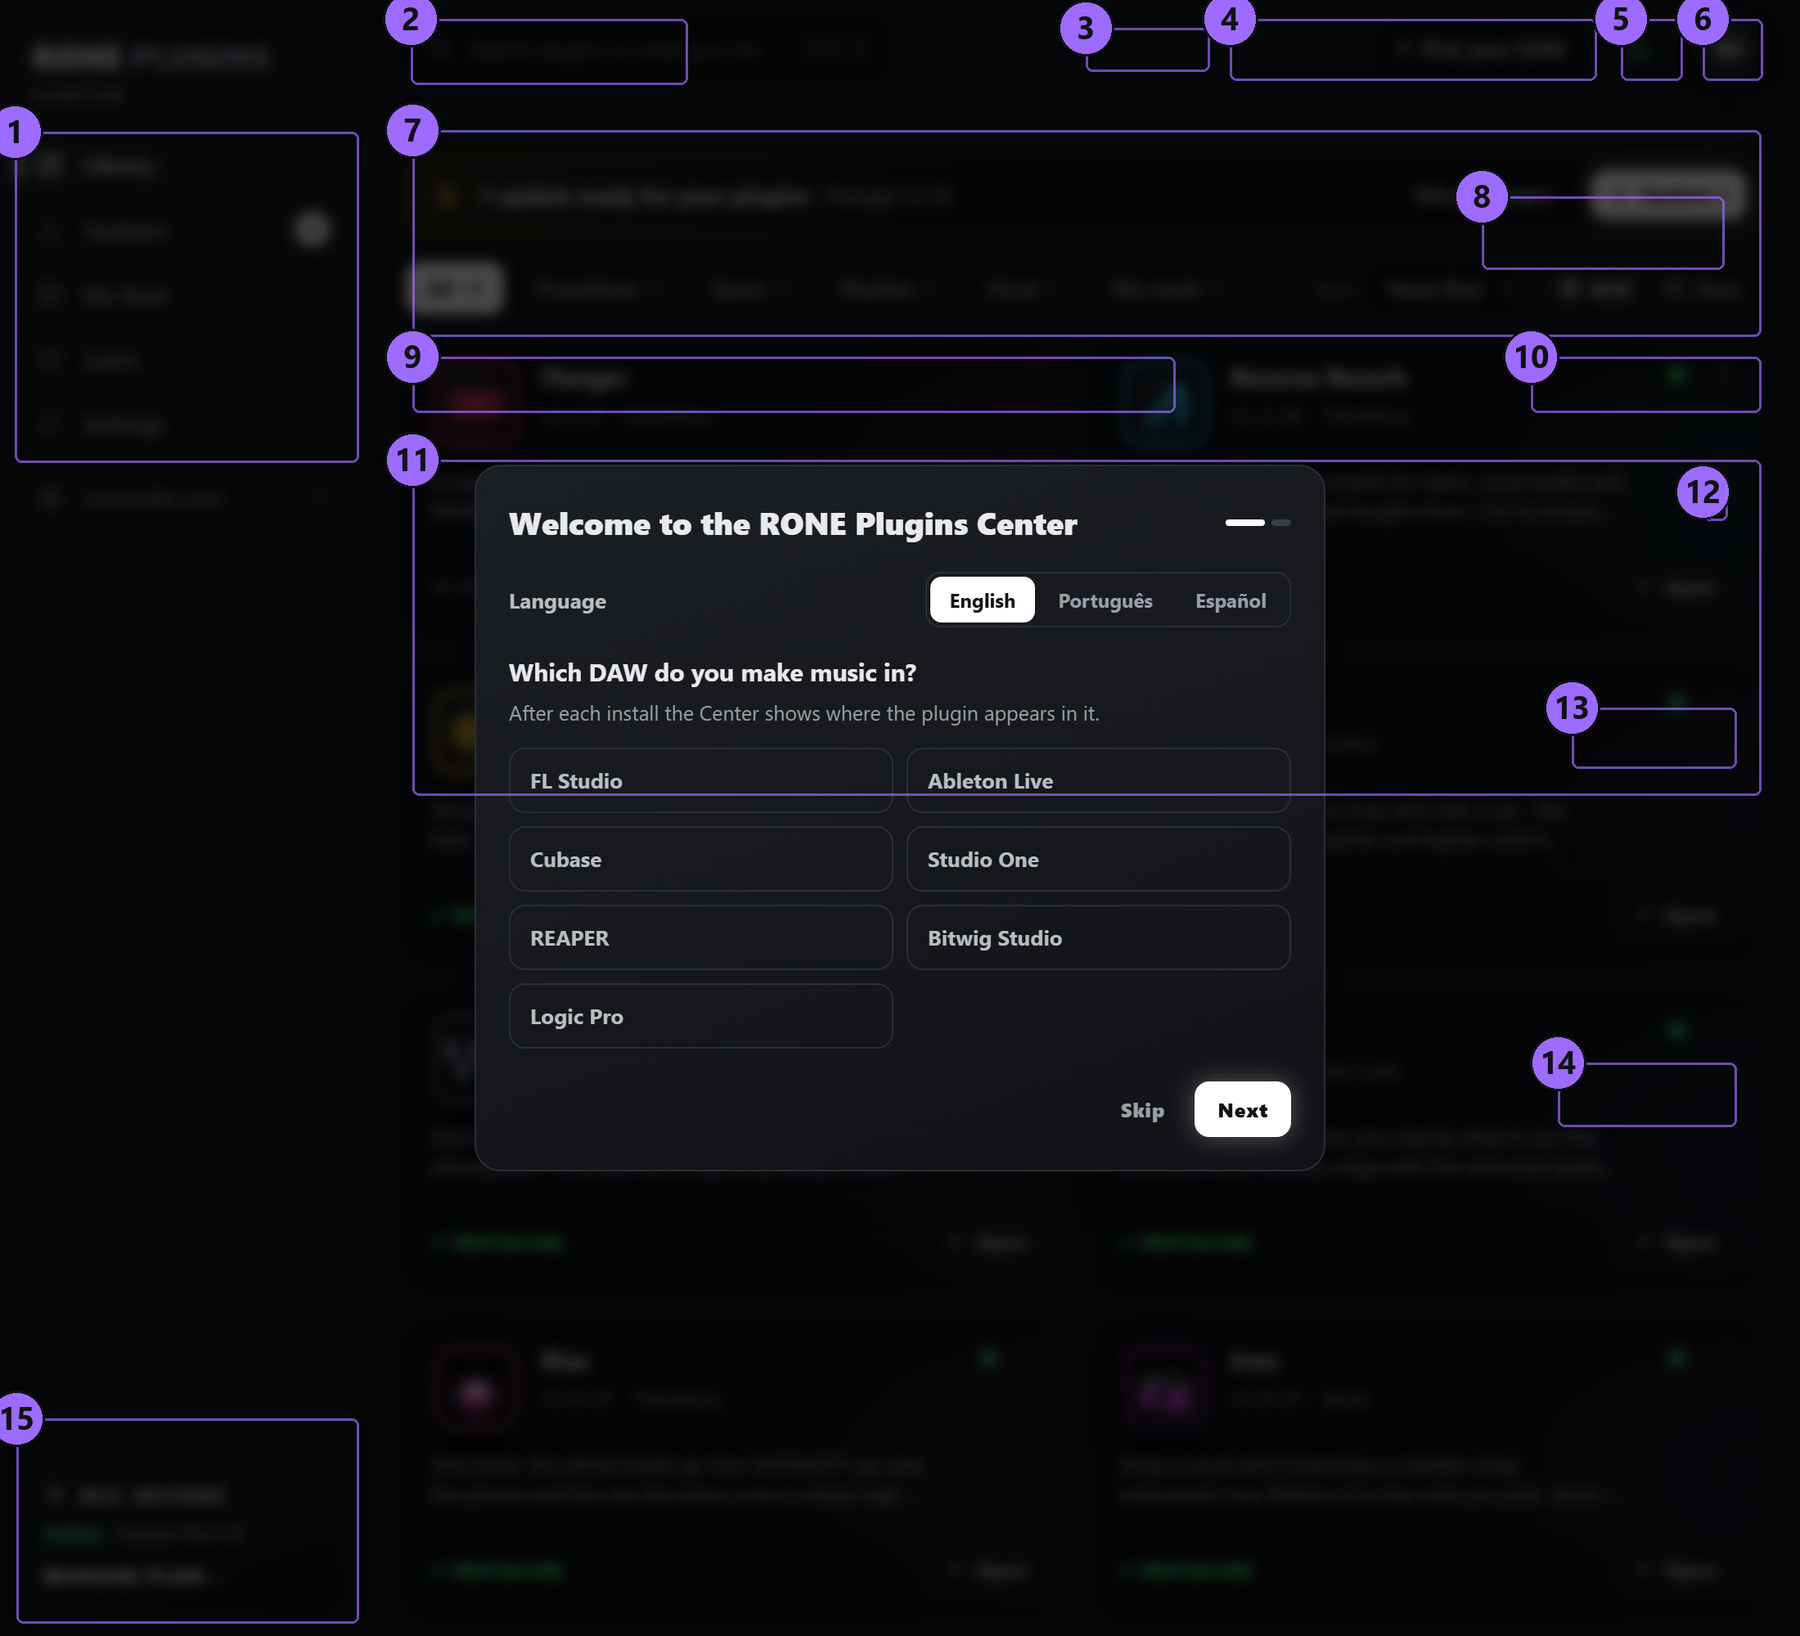
Step by step
- Download the Center from roneaudio.com and run the installer (Windows:
RONE_Plugins_Center_Installer.exe, macOS:RONE_Plugins_Center.dmg). On Windows the installer also adds the Microsoft WebView2 runtime if your PC does not have it yet; it is required for the plugin interfaces. On macOS (10.15 Catalina or later, Intel and Apple Silicon) open the .dmg and drag the Center onto Applications. It is signed and notarized by Apple, so macOS only asks once whether you want to open an app downloaded from the internet: press Open. - Open the Center and sign in with your roneaudio.com account (the same e-mail and password you used on the website). Your licences and device slots are checked automatically: an active ALL ACCESS plan unlocks every plugin, and a lifetime licence unlocks the plugin it was bought for — so RONE Sidechain opens either way.
- Find RONE Sidechain in the list and press INSTALL. The Center downloads the signed installer, verifies its checksum, installs it silently and registers the version.
- When the card shows INSTALLED, start (or restart) your DAW and rescan plugins if it does not pick up new plugins automatically. All RONE plugins appear next to each other in your plugin list because every name starts with RONE.
- Updates appear on the same card. Press UPDATE on one plugin or UPDATE ALL at the top. Close the standalone version of a plugin before updating it.
Where the files go
Windows
| File | Location |
|---|---|
| VST3 | C:\Program Files\Common Files\VST3\RONE\RONE Sidechain.vst3 |
| Standalone app | C:\Program Files\RONE Plugins\RONE Sidechain.exe |
| This manual | C:\Program Files\RONE Plugins\Manuals\ |
macOS
| File | Location |
|---|---|
| VST3 | /Library/Audio/Plug-Ins/VST3/RONE Sidechain.vst3 |
| Audio Unit | /Library/Audio/Plug-Ins/Components/RONE Sidechain.component |
| Standalone app | /Applications/RONE Sidechain.app |
| This manual | /Users/Shared/RONE Plugins/Manuals/ |
Licence and activation
Licensing is tied to your account, not to a key. The plugin checks the licence file that the Center writes when you sign in. There are two ways to own it: an ALL ACCESS plan, which unlocks every RONE plugin for as long as it is active, or a lifetime licence for this plugin alone, which never expires. Either one opens RONE Sidechain, and buying the lifetime licence later does not disturb a plan you already have.
If a plugin ever shows the Sign in to unlock RONE Sidechain screen, open the Center, make sure you are signed in and the plugin shows as licensed, then reopen it. Two devices can be signed in at the same time on either kind of licence; sign out on an old machine from the Center's Account page to free a slot. A lifetime licence keeps working offline for far longer than a plan does — there is nothing for it to expire against — but the Center still needs to reach the internet occasionally to confirm it.
Uninstalling
Windows: Settings → Apps → RONE Sidechain (RONE). macOS: delete the bundles listed above. Presets and settings in your user folder are kept.
3Quick start
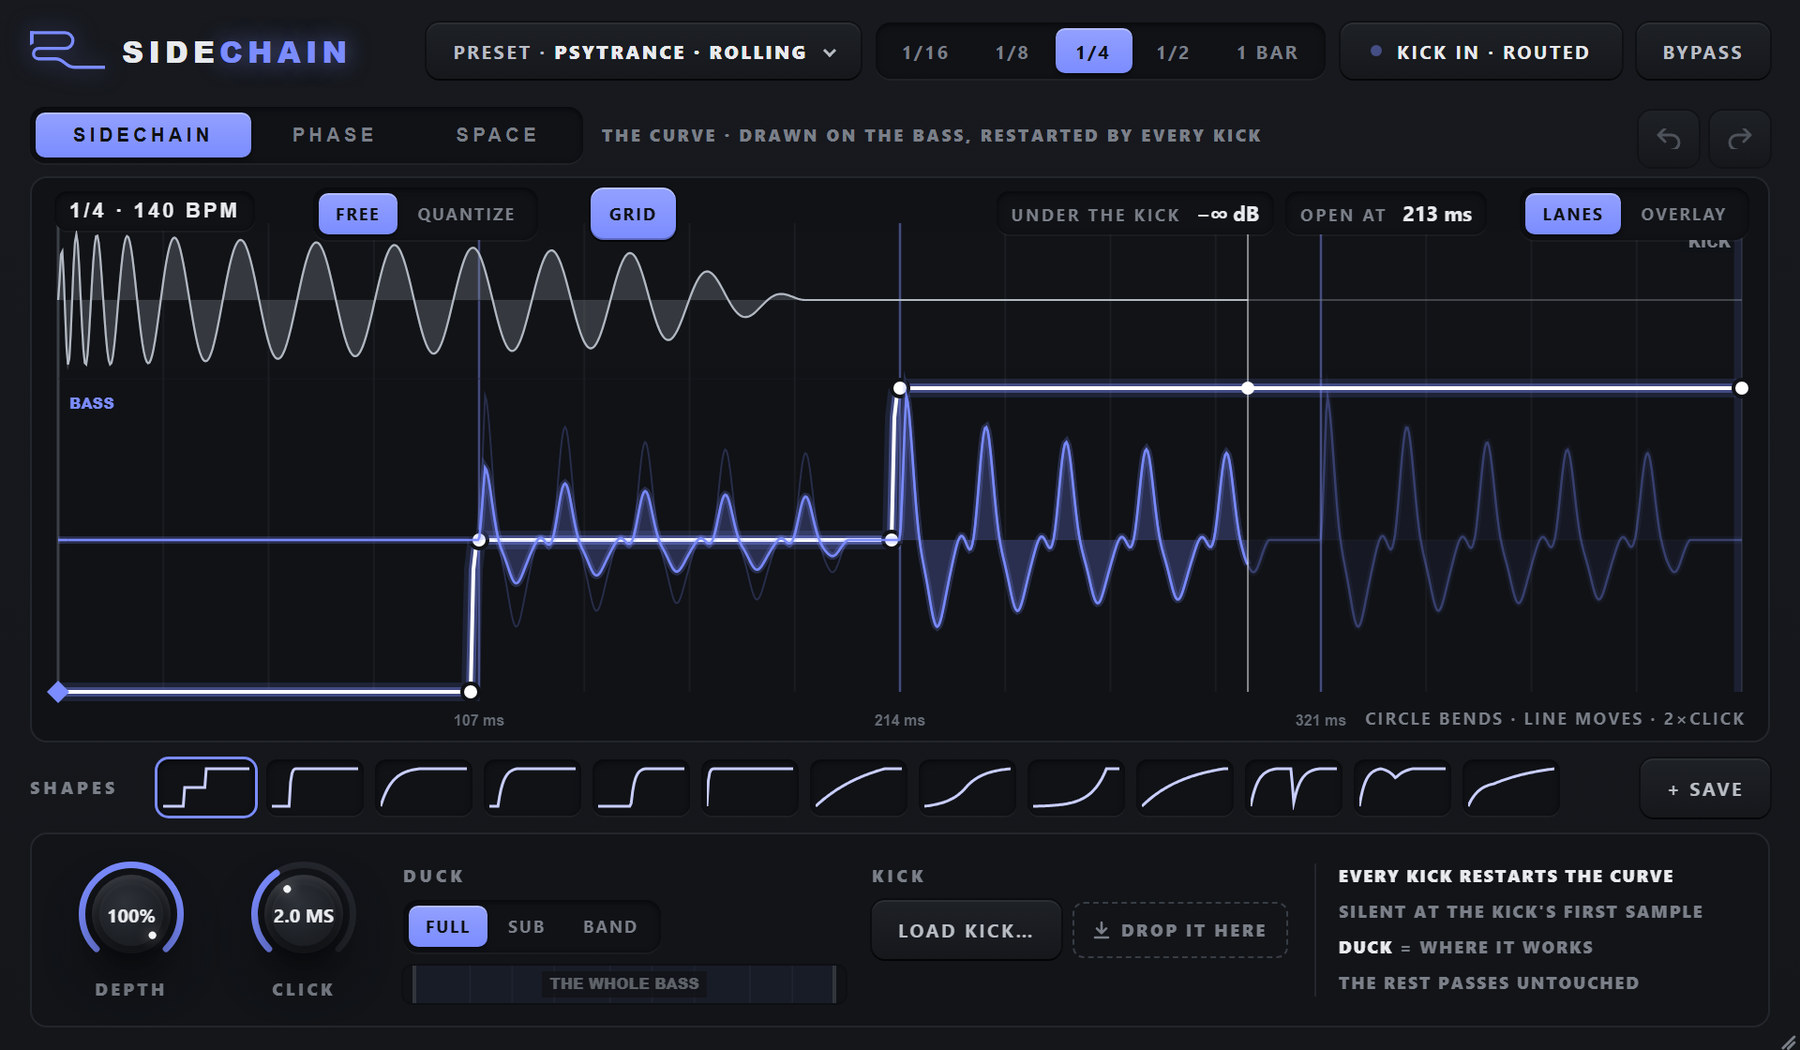
- Insert RONE Sidechain on the bass track (or the bass bus).
- Give it the kick. Route the kick track into the plugin's sidechain input - click the KICK chip in the header for the steps in your DAW - or drag a kick sample onto the plugin. The chip shows where the kick comes from.
- Pick a preset from PRESET - they are sorted by genre. PSYTRANCE · ROLLING is the opening setting.
- Press play. The kick draws in the top lane, the bass under it, ducked by the curve. The readout above the lanes tells you what is left of the bass under the kick and when it is fully open again.
- Shape it: pick another shape, drag a point or a line, set RATE to the length of your bass pattern and DEPTH to how far it closes.
- Optional: switch to the PHASE and SPACE pages. Both start working as soon as there is a kick; AUTO turns the sub by itself.
4Interface tour
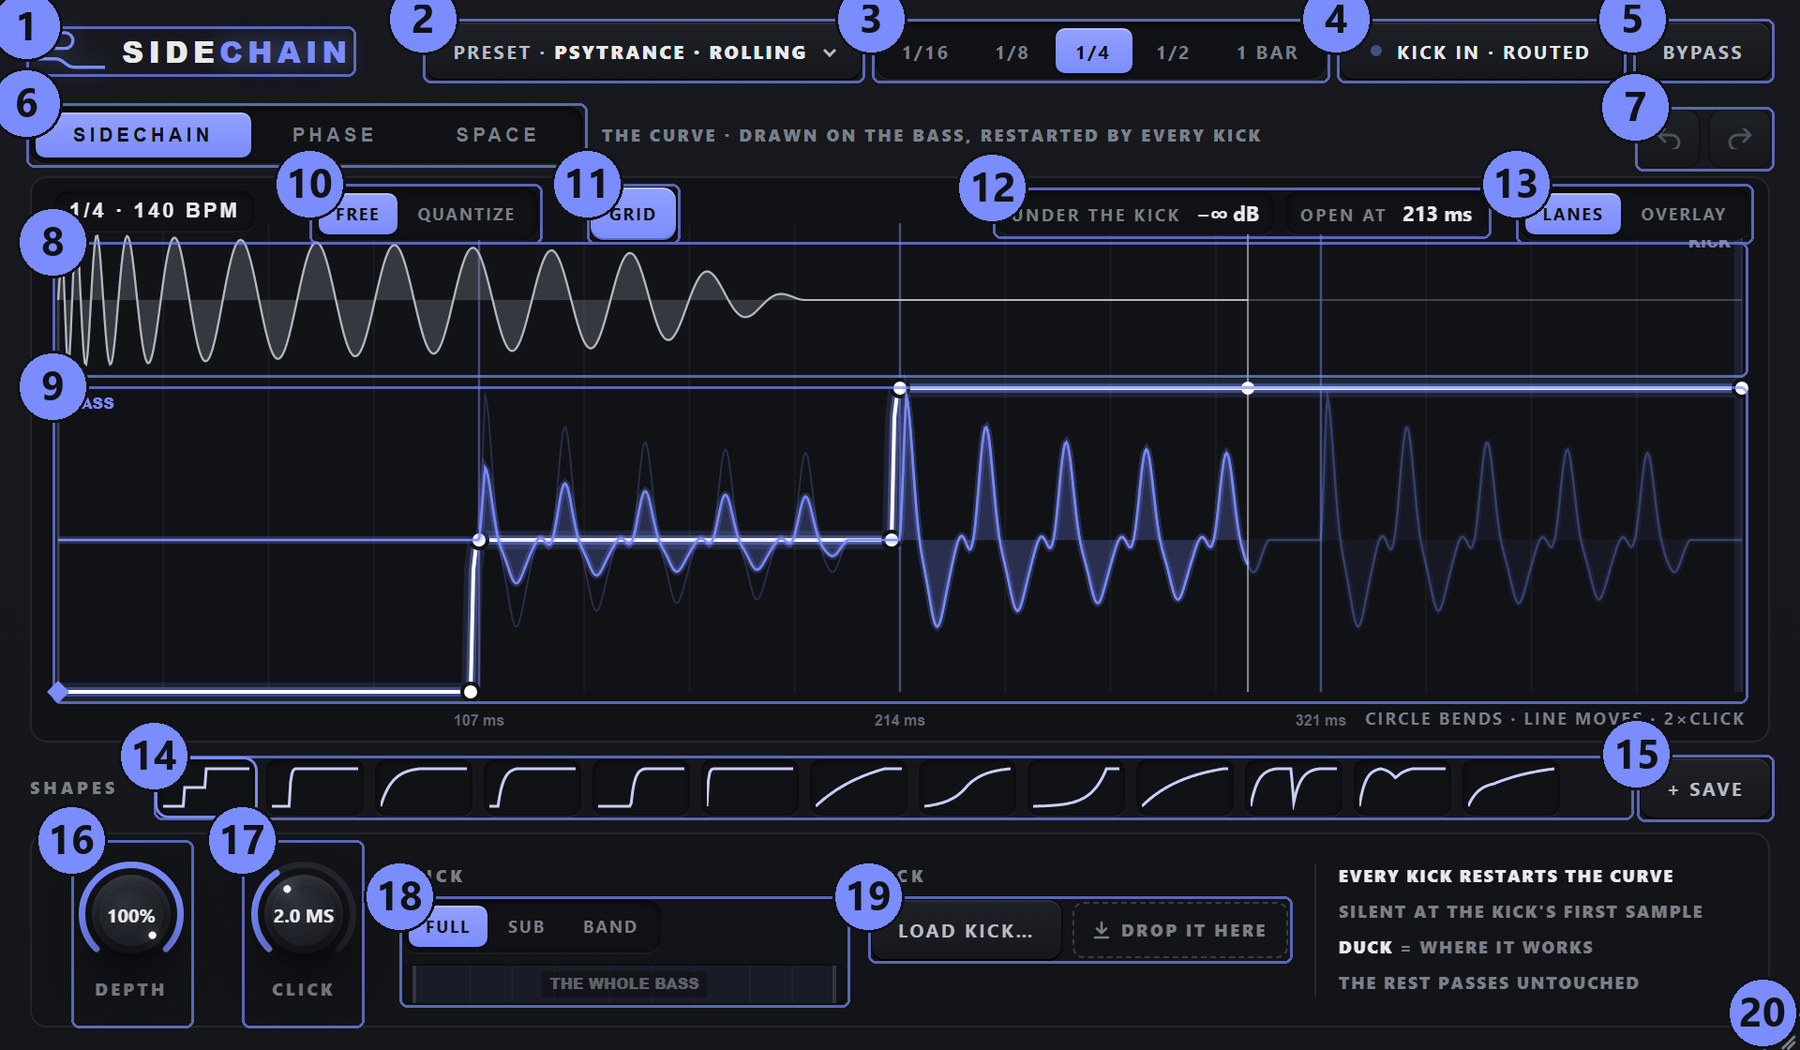
5The SIDECHAIN page
How the curve works
The curve is the bass's level over one cycle: at the bottom the bass is silent, at the top it plays at full level. Every kick restarts the curve from its left edge, so the duck always lines up with the real kick - whatever pattern you program, fills and offbeat kicks included. The first point, the diamond on the left, is the kick's point: it always sits at silence, and it is the kick's first sample.
That is the promise of the plugin: at the kick's first sample the bass is exactly silent (at DEPTH 100 %). To get there without a click, the bass fades out just before the kick. That fade is CLICK, and it is complete at the kick's first sample. Because the plugin works a little ahead of time (the latency below), it knows the kick is coming before it arrives.
Drawing the curve
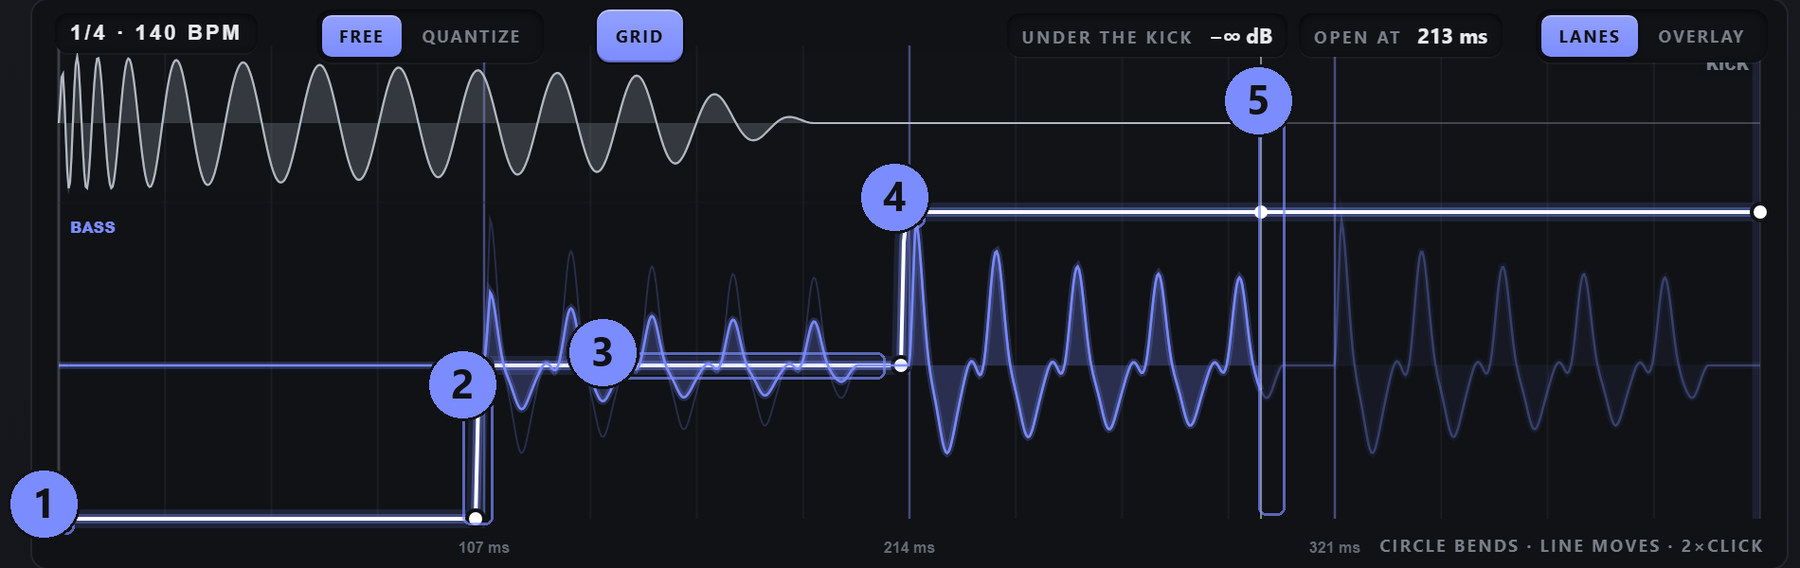
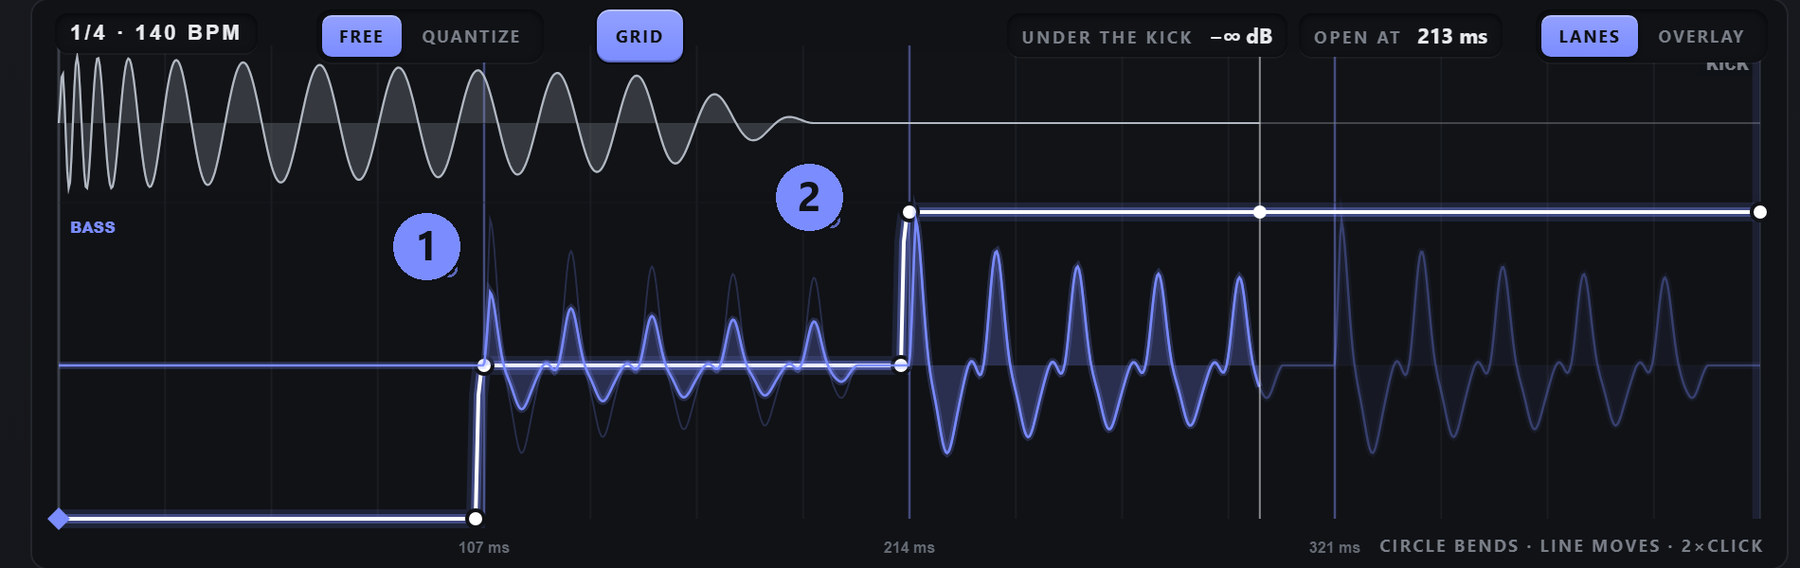
| Gesture | What it does |
|---|---|
| Drag a point | Moves it, in time and level. The last point always stays at the end of the cycle. |
| Drag a flat level or a vertical step | Moves the whole line. A step carries the flat levels on either side with it, so nothing tilts. |
| Drag the circle in the middle of a slope | Bends the slope - from a fast rise to a slow one. |
| Double-click the bass lane | Adds a point there. |
| Double-click a point | Removes it. |
| FREE / QUANTIZE | QUANTIZE snaps points, moved lines and new points to the grid: 16ths of the cycle and 5 % levels. FREE puts them exactly where you drag. |
| Hold Shift | Does the opposite of FREE / QUANTIZE for that one drag or double-click. |
| GRID | On by default and remembered. Draws the musical lines of the RATE clearly, so you see where you draw: 16ths at 1/4 and longer, with the beats stronger from 1/2; 32nds at 1/8 and 64ths at 1/16. QUANTIZE snaps to a finer grid that holds every one of these lines. |
The tag in the top-left corner of the view shows the current RATE and the host tempo (for example 1/4 · 140 BPM). Along the bottom of the view the grid is marked in milliseconds, and a white playhead runs along the cycle while the host plays.
The kick lane above is for looking only. In OVERLAY view the kick is drawn in grey on the bass's row and the whole box is yours to draw in.
Shapes
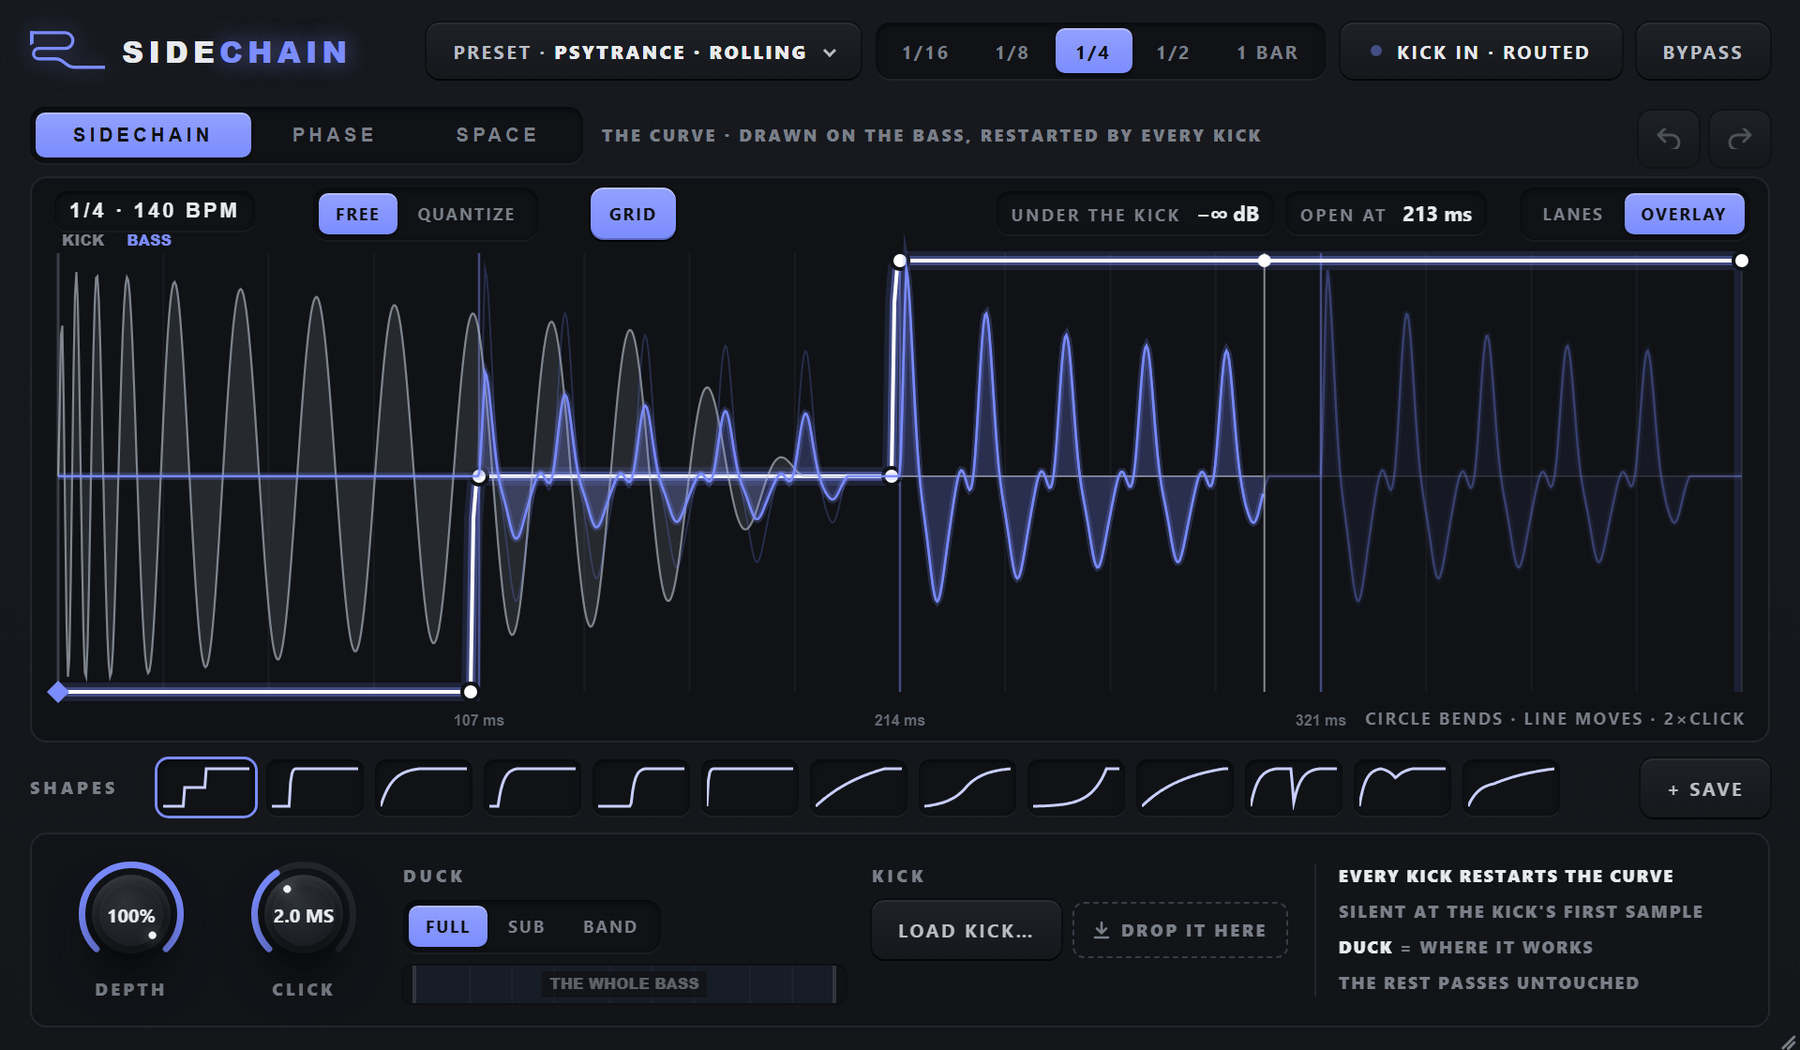
The SHAPES row starts with thirteen factory curves - STEP, ROLL, CLASSIC, TIGHT, HOLD, SNAP, PUMP, SOFT, LATE, SWELL, DOUBLE, BOUNCE and GENTLE (hover a tile to read its name). Click one to load it, then edit it freely.

- + SAVE adds the current curve to the end of the row as MY 1, MY 2 and so on - up to 16 of your own; the oldest goes when you save a 17th.
- Drag a tile left or right to move it in the row; a click still just loads it.
- The x that appears when you hover a tile deletes it.
- Right-click the row → RESTORE FACTORY SHAPES brings back any factory shape you deleted, so none is ever lost for good.
The row is remembered on this computer, for every instance of RONE Sidechain and every project. Changes to it can be undone like any other edit.
The controls
How long one cycle of the curve is, synced to the host tempo. 1/4 = one beat, the usual four-on-the-floor kick. A kick that comes before the cycle is over restarts it there.
How far the curve closes. At 100 % the bottom of the curve is silence; at 50 % the bass never drops below half its level.
The fade before the kick that keeps the cut from clicking. It is complete at the kick's first sample, so the bass is silent when the kick starts however long you set it. Shorter = a tighter cut; longer = softer on low, sustained basses.
Where in the spectrum the duck works - the rest passes untouched.
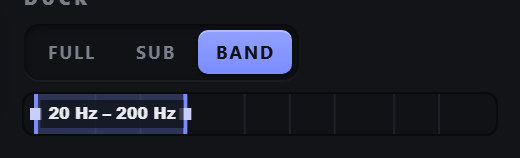
FULL ducks the whole bass. SUB ducks only its sub, below SPLIT (set on the PHASE page). BAND ducks only between the two handles of the strip under the switch: drag a handle and the switch goes to BAND; double-click the strip for FULL. The bands are split linear-phase, so the part that is not ducked passes exactly as it came.
6The kick: routed, dropped or the grid
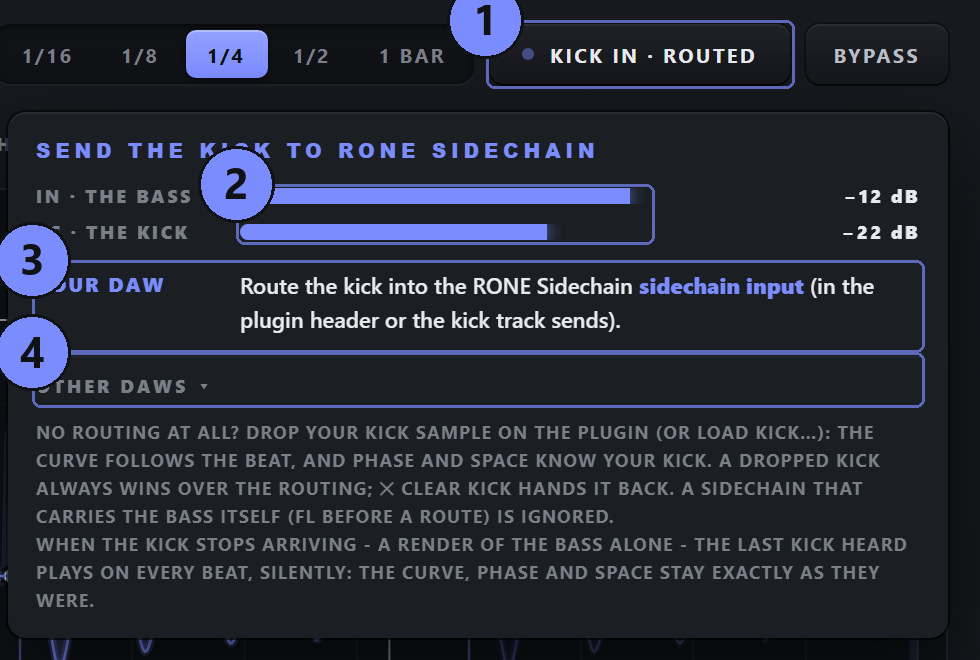
The KICK chip in the header always shows what the curve is following:
| Chip | What it means |
|---|---|
| KICK IN · ROUTED | A kick arrives on the sidechain input. Every hit restarts the curve, whatever the pattern. |
| SAMPLE · name | You dropped or loaded a kick sample. It plays silently on the host's beat and restarts the curve there. |
| LAST KICK · ON THE BEAT | The routed kick stopped arriving. The last clean kick heard plays on, silently, on every beat. |
| GRID · NO KICK | No kick at all. The curve restarts on its own at every RATE. PHASE and SPACE wait for a kick. |
Routing the kick (sidechain input)
Click the KICK chip to open SEND THE KICK TO RONE SIDECHAIN. It shows the steps for the DAW you are in, and two meters: IN (the bass on the plugin's input) and SC (the kick on the sidechain input). When the routing is right, the SC meter moves on every kick. OTHER DAWS lists the steps for the others.
FL Studio
- In the Mixer, select the kick track, then right-click the arrow at the bottom of the bass track → Sidechain to this track.
- In RONE Sidechain's wrapper: ⚙ → Processing → Connections - set the sidechain input to the kick track.
- The SC meter in the popover now moves on every kick.
| DAW | Routing |
|---|---|
| Ableton Live | Open the RONE Sidechain device I/O (▸) → Sidechain on → Audio From = the kick track. |
| Cubase | Turn on Side-Chain in the RONE Sidechain header; kick track → Sends → RONE Sidechain - Side-Chain. |
| Logic Pro | RONE Sidechain header → Side Chain = the kick track. |
| Studio One | RONE Sidechain header → Side-Chain on; kick track → Sends → RONE Sidechain. |
| Bitwig | RONE Sidechain device → Sidechain input = the kick track. |
| REAPER | Kick track → Route: send to the bass track on channels 3/4; RONE Sidechain pin connector: sidechain = 3/4. |
Dropping a kick sample
No routing at all? Drag a kick file (WAV, AIFF, MP3 or FLAC) from your browser or the desktop and drop it anywhere on the plugin - the page shows DROP YOUR KICK - or press LOAD KICK…. The sample plays silently on the host's beat: the curve follows the beat, and PHASE and SPACE know your kick's sound. It is saved with the project.
A dropped kick always wins over the routing. The button turns into ✕ CLEAR KICK; press it to hand control back to the routed kick.
Rendering the bass alone
When the kick stops arriving - you solo the bass, or render the bass track on its own - the last kick heard plays on every beat, silently. The curve, PHASE and SPACE stay exactly as they were, so a render of the bass sounds like the bass in the mix. The remembered kick is saved with the project.
The standalone
The standalone app has no sidechain input: the curve follows its own clock (GRID). Drop a kick sample to give PHASE and SPACE a kick.
7The PHASE page
Where the kick's tail hands over to the bass, the two low ends overlap. If they are out of phase they cancel, and the low end gets thinner exactly where it should be strongest. PHASE turns only the bass's sub (below SPLIT) so the two add up. The turn is a linear-phase rotation: the bass's attack is not smeared and nothing above SPLIT moves.
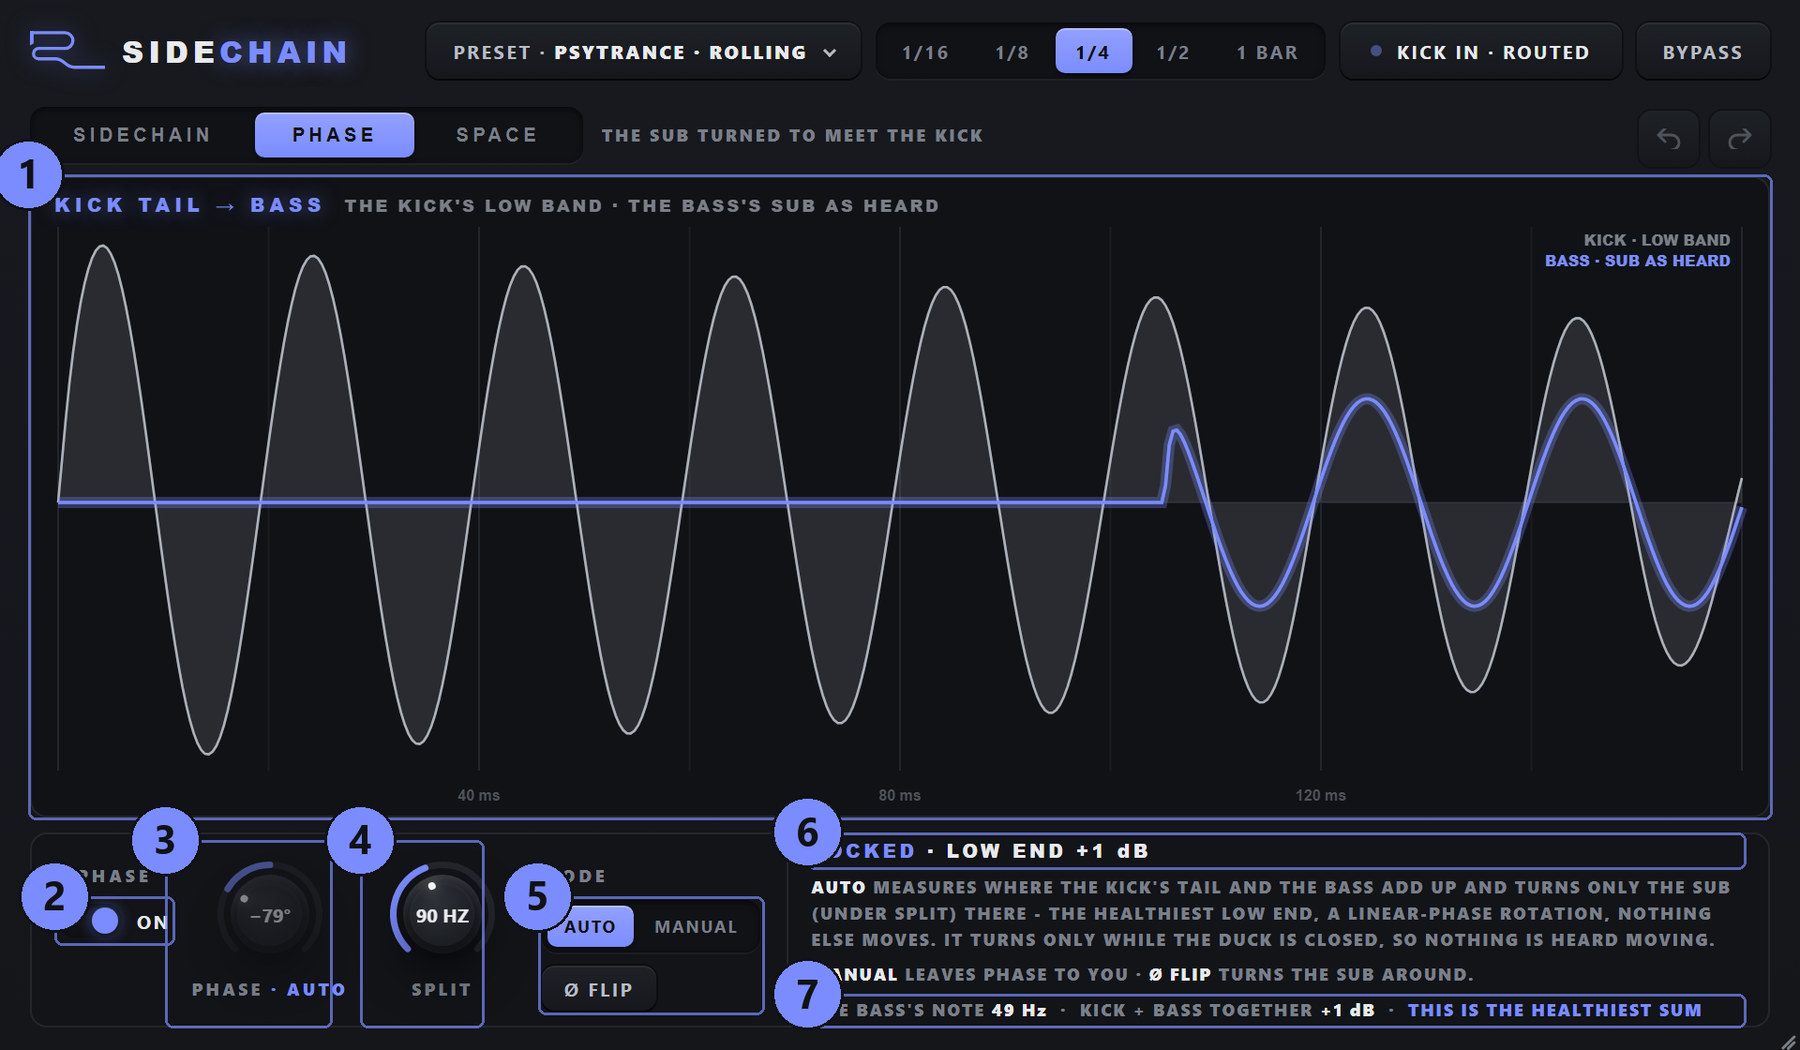
Off = the sub as it came. Use it to compare.
AUTO measures where the kick's tail and the bass add up and turns the sub there by itself. It turns only while the duck is closed, so you never hear it moving. In AUTO the PHASE knob shows the angle and is not yours to turn. MANUAL leaves PHASE to you; the status line tells you where AUTO would turn it and how much louder the low end would be.
How far the sub is turned against the kick. Set by AUTO, or by hand in MANUAL.
Where the sub ends. Everything below it is what PHASE turns and what DUCK = SUB ducks; everything above passes as it was.
Turns the sub's polarity around (+180° on top of PHASE).
8The SPACE page
A static EQ cut on the bass takes the low end away all the time. SPACE works like a dynamic EQ instead: up to 48 narrow bells that cut the bass only where the kick is loud and the bass has something at the same frequency, at the same moment. Between kicks, and at frequencies where they do not meet, the bass is untouched.
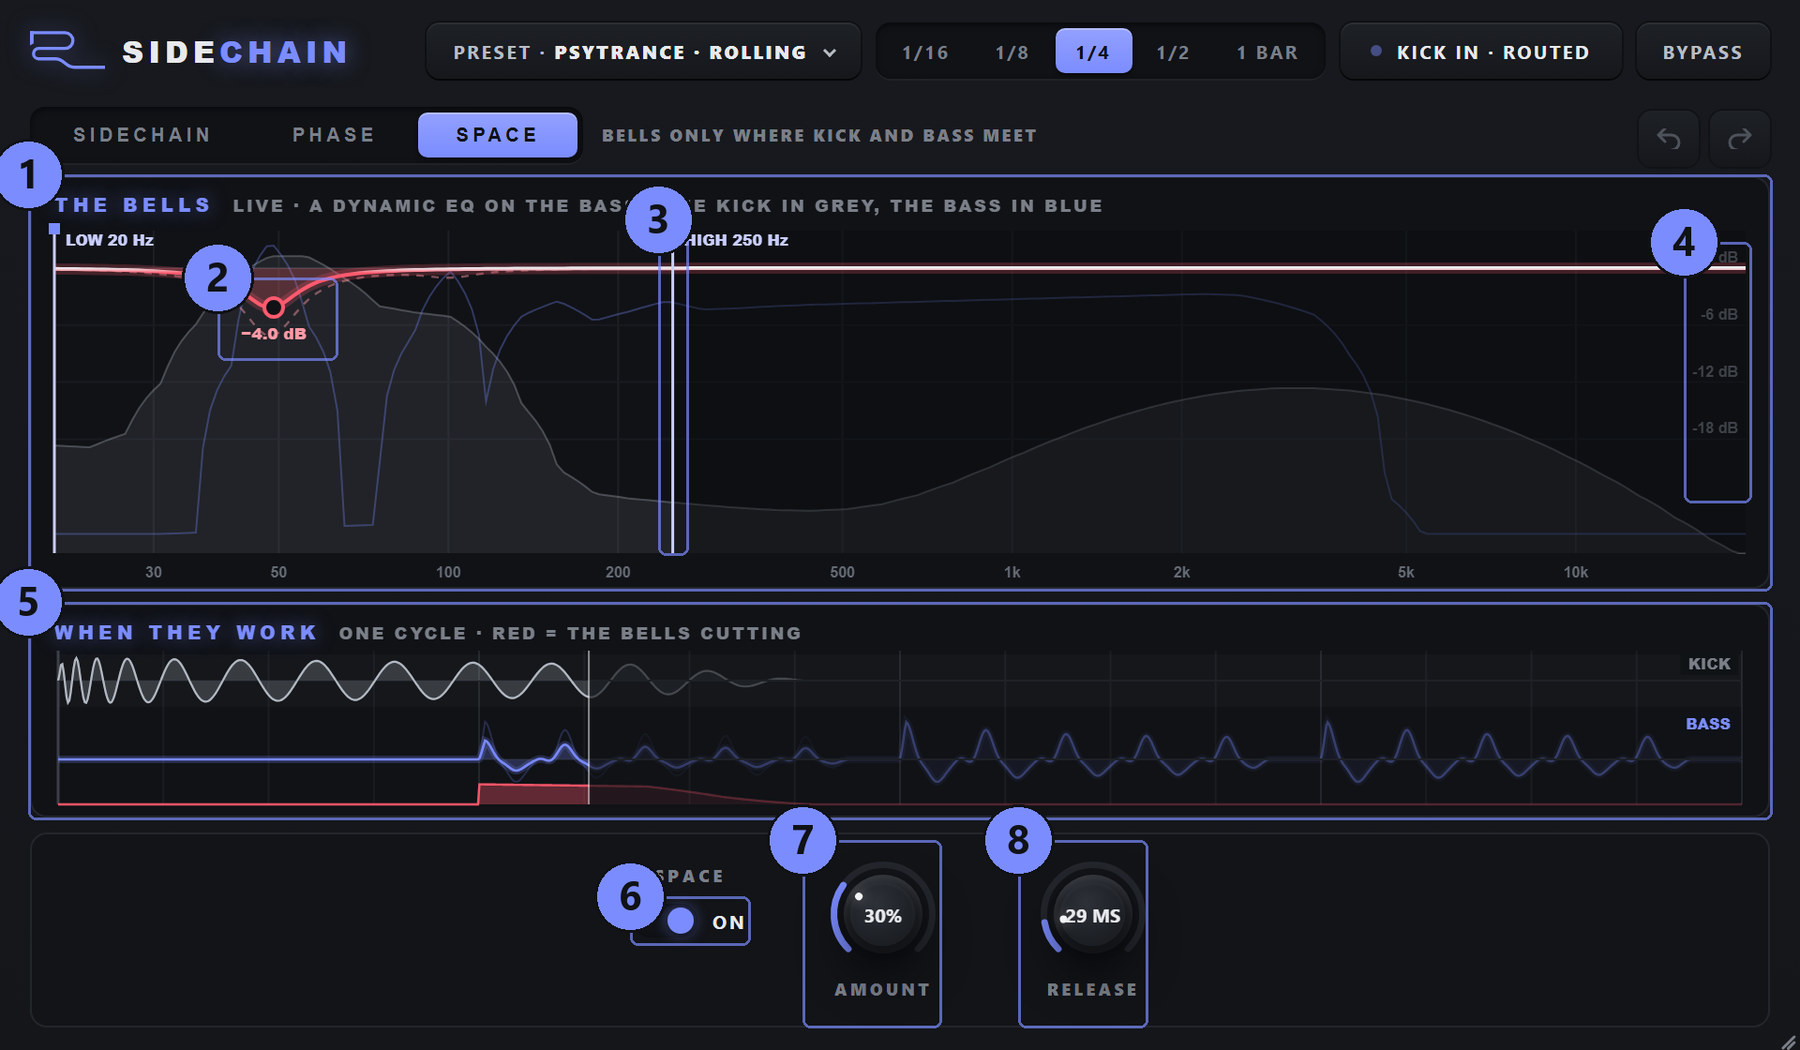
Off = no bells at all, so you hear the bass without them. The duck and PHASE stay as they are. The display then reads SPACE IS OFF.
How deep the bells cut where the kick and the bass collide - 100 % is up to 18 dB. At 0 SPACE does nothing.
How long a bell keeps following the kick after its hit. Short leaves the next bass note alone; longer keeps the room open through a long kick tail.
The range the bells may work in. Click or drag on the display and the nearer handle follows.
9Presets, undo, bypass and latency
Presets
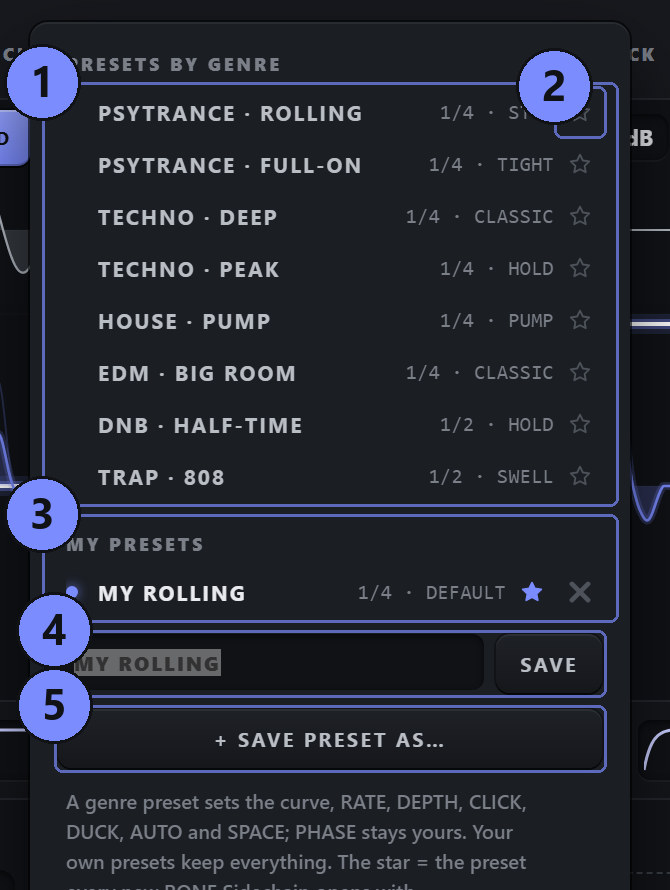
Click PRESET in the header. A genre preset sets the curve, RATE, DEPTH, CLICK, DUCK, AUTO and SPACE; PHASE stays yours. Change anything and the header shows CUSTOM.
| Preset | Rate · shape |
|---|---|
| PSYTRANCE · ROLLING | 1/4 · STEP |
| PSYTRANCE · FULL-ON | 1/4 · TIGHT |
| TECHNO · DEEP | 1/4 · CLASSIC |
| TECHNO · PEAK | 1/4 · HOLD |
| HOUSE · PUMP | 1/4 · PUMP |
| EDM · BIG ROOM | 1/4 · CLASSIC |
| DNB · HALF-TIME | 1/2 · HOLD |
| TRAP · 808 | 1/2 · SWELL |
+ SAVE PRESET AS… opens a name field: type a name and press SAVE. Your preset keeps everything except BYPASS - every control on all three pages, plus the curve - and appears under MY PRESETS; saving under an existing name updates it. The x next to one of your presets deletes it.
The star marks the default: the preset every new RONE Sidechain opens with. Click a star to make that preset the default; click the filled star again to go back to the factory default.
Undo and redo
The two arrows at the right of the tab row, on every page, step back and forward through your edits: Ctrl+Z undoes, Ctrl+Shift+Z or Ctrl+Y redoes. They cover the parameters, the curve and the SHAPES row. One drag is one step, however long it is. BYPASS, host automation and loading or clearing a kick sample are not undo steps.
BYPASS
Takes the whole plugin out of the path. The bypassed signal is delayed by the same latency as the processed one, so the host's compensation still lines up and nothing jumps in time when you switch.
Latency
RONE Sidechain works about 29 ms ahead: it is what lets the duck be silent at the kick's very first sample and what makes PHASE's linear-phase turn exact. The latency is constant and reported to the host, which compensates for it automatically. On a live input with monitoring you will hear it as a small delay.
10Step-by-step workflows
The rolling psytrance bass
- Preset PSYTRANCE · ROLLING (STEP, DEPTH 100 %, CLICK 2 ms).
- Route the kick, or drop it on the plugin.
- Check UNDER THE KICK reads -∞ dB, then drag the middle level so the first bass note sits where you want it.
- PHASE on AUTO; SPACE around 30 %.
A house pump
- Preset HOUSE · PUMP.
- Lower DEPTH until the pump sits in the groove (60-80 %).
- Bend the slope with its circle - a later rise pumps harder.
Duck only the sub
- DUCK = SUB, or BAND with the handles at 20 Hz and 120-200 Hz.
- Set SPLIT on the PHASE page to where your bass's sub ends.
- The top of the bass now plays straight through the kick.
Render the bass alone
- Play the project once with the kick going in, so the plugin hears it.
- Solo or render the bass: the chip shows LAST KICK · ON THE BEAT and the duck stays on the beat.
- Or drop the kick sample - it wins over the routing and is saved with the project.
11Interface conventions
All RONE plugins share the same graphite interface language, so once you know one, you know them all.
| Gesture | What it does |
|---|---|
| Drag a knob up/down | Changes the value. The lit arc shows where you are in the range; the value is printed inside the knob. |
| Hold Shift while dragging | Fine adjustment. |
| Double-click a knob | Resets it to the default value. |
| Right-click a control (VST3) | Opens your DAW's automation / parameter menu for that control (for example FL Studio's Create automation clip, Link to controller). RONE never shows a browser context menu. |
| Mouse wheel | Steps through segmented switches and lists where the plugin offers them. |
| Drag the triangle in the bottom-right corner | Resizes the window. The interface scales proportionally and keeps its aspect ratio. |
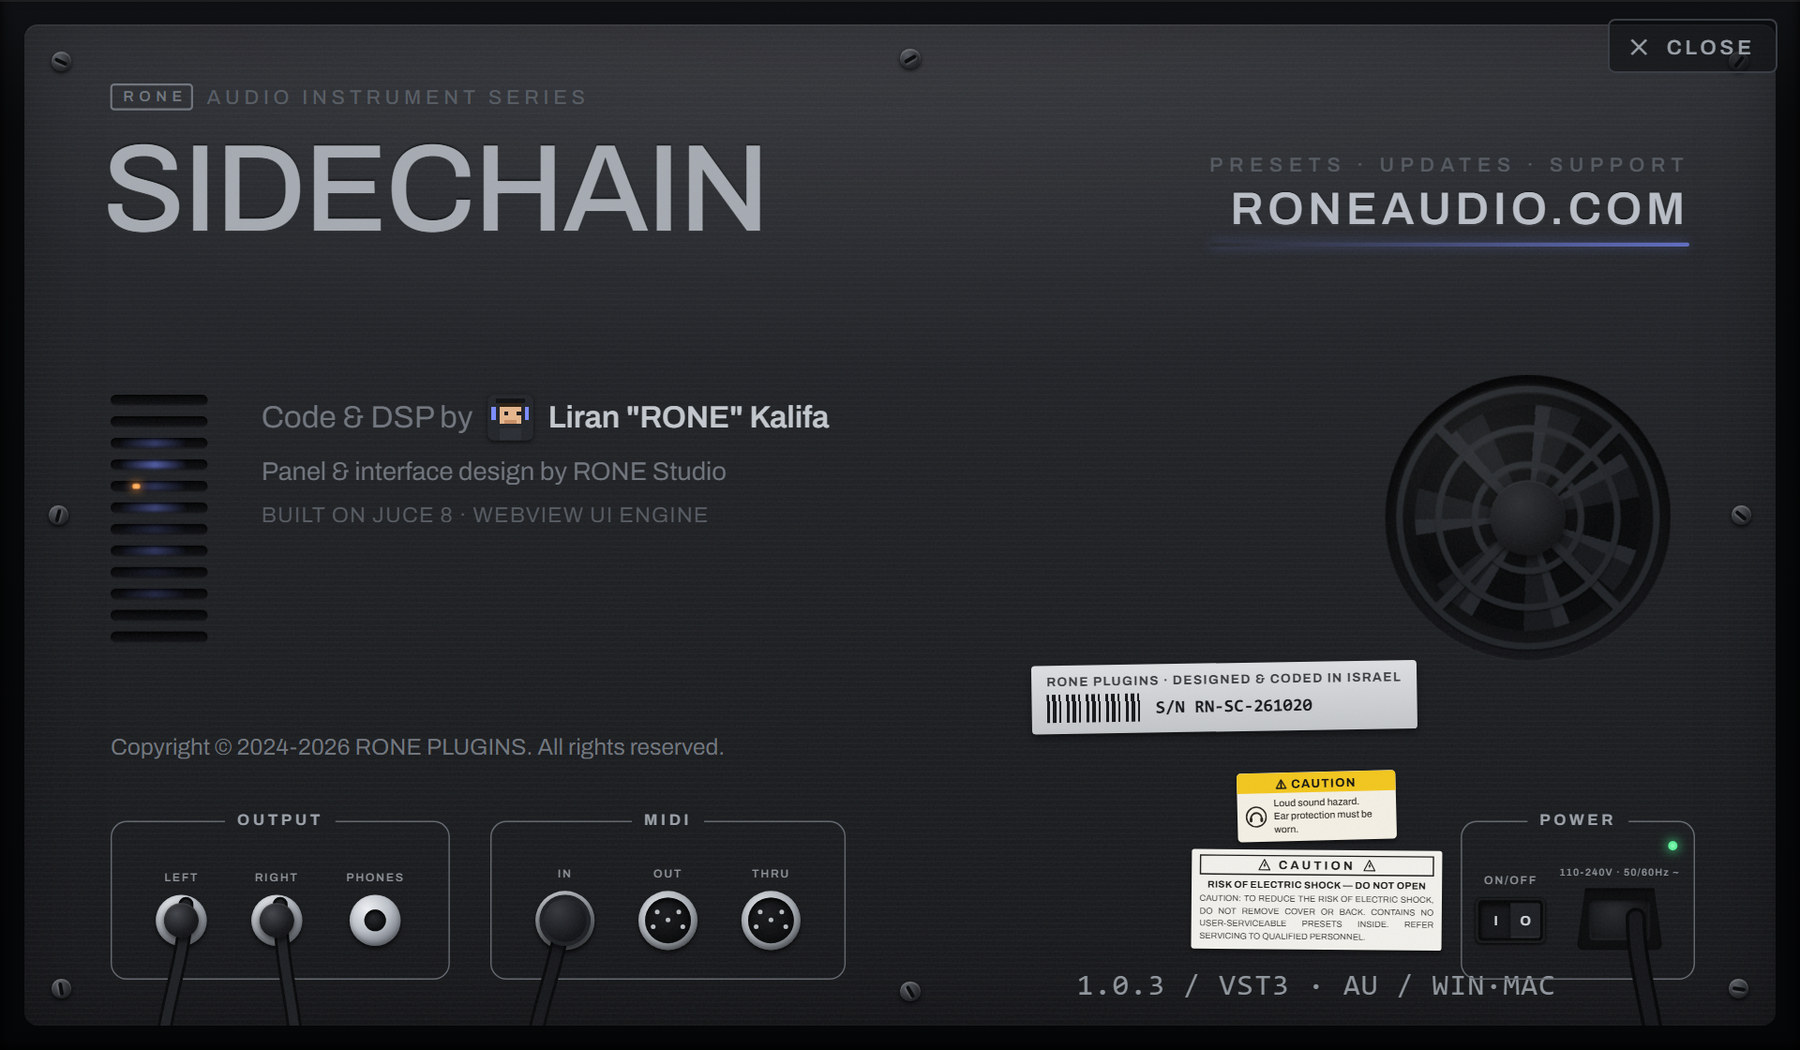
| Click the R logo / plugin name in the header | Flips the plugin over to its back panel: version, format, licence holder, a link to roneaudio.com and a DEACTIVATE button for this device. |
Automation
Every knob and switch is a host parameter. Automate it from the DAW's automation lane or by right-clicking the control inside the plugin (VST3). Values shown in the plugin always match the DAW's.
Presets and state
The plugin's full state is saved with your DAW project, so a project reopens exactly as you left it. Where the plugin has its own preset browser (the name field with ◀ ▶ arrows), factory presets are built in and your own presets are stored in your user folder.
Standalone version
The standalone app is the same plugin in its own window, useful for auditioning and exporting without a DAW. It uses your system's default audio device; when there is no DAW clock, tempo-synced controls follow the plugin's own BPM setting.
Pages and views
The page (SIDECHAIN, PHASE, SPACE), LANES / OVERLAY, FREE / QUANTIZE and GRID are remembered between sessions; they are view settings, not part of the sound.
12Troubleshooting, specifications and support
Troubleshooting
| Symptom | What to do |
|---|---|
| The chip says GRID · NO KICK | No kick reaches the sidechain input. Click the chip and follow your DAW's steps until the SC meter moves on every kick - or drop a kick sample. |
| The SC meter moves but the curve only follows the beat (FL Studio) | Before a route is made FL feeds the bass itself onto the sidechain bus; the plugin ignores it and follows the beat. Set the sidechain input to the kick under ⚙ → Processing → Connections. |
| Bass still audible under the kick | Check UNDER THE KICK: raise DEPTH to 100 % and pull the curve's first level down to silence. |
| A click at the kick | Raise CLICK a little, especially on low sustained basses. |
| A dropped kick does not follow my routed kick | A dropped sample always wins. Press ✕ CLEAR KICK to go back to the routed kick. |
| A factory shape is gone | Right-click the SHAPES row → RESTORE FACTORY SHAPES. |
| PHASE or SPACE do nothing | They need a kick (routed or dropped). SPACE must be ON; PHASE also needs the kick and the bass to overlap. |
| The plugin does not appear in the DAW | Rescan plugins. On Windows the VST3 lives in C:\Program Files\Common Files\VST3\RONE; make sure that folder (or its parent) is in the DAW's VST3 search path. On macOS restart the DAW after installing; Logic and GarageBand may need a full AU rescan. |
| The window is blank or shows an error page (Windows) | The Microsoft WebView2 runtime is missing or damaged. Reinstall the RONE Plugins Center; it repairs WebView2. Also check that WebView2Loader.dll sits next to the standalone executable. |
| The window is white in Ableton Live but the standalone works (Windows) | Turn off Live's auto-scaling for this plugin: in Live's browser open Plug-Ins, right-click the plugin and untick Auto-Scale Plug-In Window, then delete the plugin from the track and insert it again. Seen with Windows display scaling at values such as 110 %. |
| A licence screen appears | Open the RONE Plugins Center, sign in, confirm your plan is active, then reopen the plugin. Check that you have not exceeded your device limit. |
| The plugin shows an older version than the Center | Close every DAW and standalone RONE app, then press UPDATE again. A running standalone keeps the old executable locked. |
| Crash | RONE plugins write a crash report to your user folder; the Center uploads it the next time it runs. Please also tell us what you did right before the crash. |
Specifications
| Product | RONE Sidechain |
| Version | 1.0.7 (manual revised November 2026) |
| Formats | VST3 · AU · Standalone (Windows: VST3 + Standalone; macOS: VST3 + AU + Standalone) |
| Systems | Windows 10 / 11 (64-bit) · macOS 11 or newer (Intel and Apple silicon, universal) |
| Channels | Mono or stereo in / out, plus a mono or stereo sidechain input for the kick |
| Sample rates | 44.1 kHz to 192 kHz |
| Latency | About 29 ms, constant, reported to the host (compensated automatically) |
| Engine | JUCE 8, WebView interface (WebView2 on Windows, WebKit on macOS) |
Support
Website, presets, updates and support: roneaudio.com. When writing to us, include the plugin version (shown on the back panel), your DAW and operating system, and the steps to reproduce.