
RONE Iron - The Complete Guide (Metallic Vocal Chops) · 6 min · Watch on YouTube
1Welcome to RONE Iron
RONE Iron does in one step what usually takes four plugins and an afternoon: it flattens a vocal to a single note (the formants stay, so it still sounds like a voice), slices it into one-shot chops on its transients and lays them out on your MIDI keys, rings every chop through a comb tuned to that note so the voice turns to metal, and pans each chop to its own side so the hits jump from one speaker to the other.
The result is the chopped, metallic, left-right vocal you hear in psytrance and festival drops - in tune with your track, from any acapella, in seconds.
Where it shines
- Drop hooks - a rhythmic metal vocal on the note of your bassline.
- Build-ups - ride the macros CHOP and MOTION up into the drop.
- Leads from a voice - ARP turns the chops into a melody over a chord.
- Breaks and intros - long rings and soft pans for a hypnotic bed.
The 10-second version
- Insert Iron as an instrument on a MIDI track.
- Drag a vocal onto the plugin.
- Click the note of your track on the piano.
- Press GROOVE and play the song - or play the keys.
2Installation with the RONE Plugins Center
Every RONE product is installed, updated and licensed through one application: the RONE Plugins Center. You never download individual installers by hand, and you never enter serial numbers into the plugin itself.
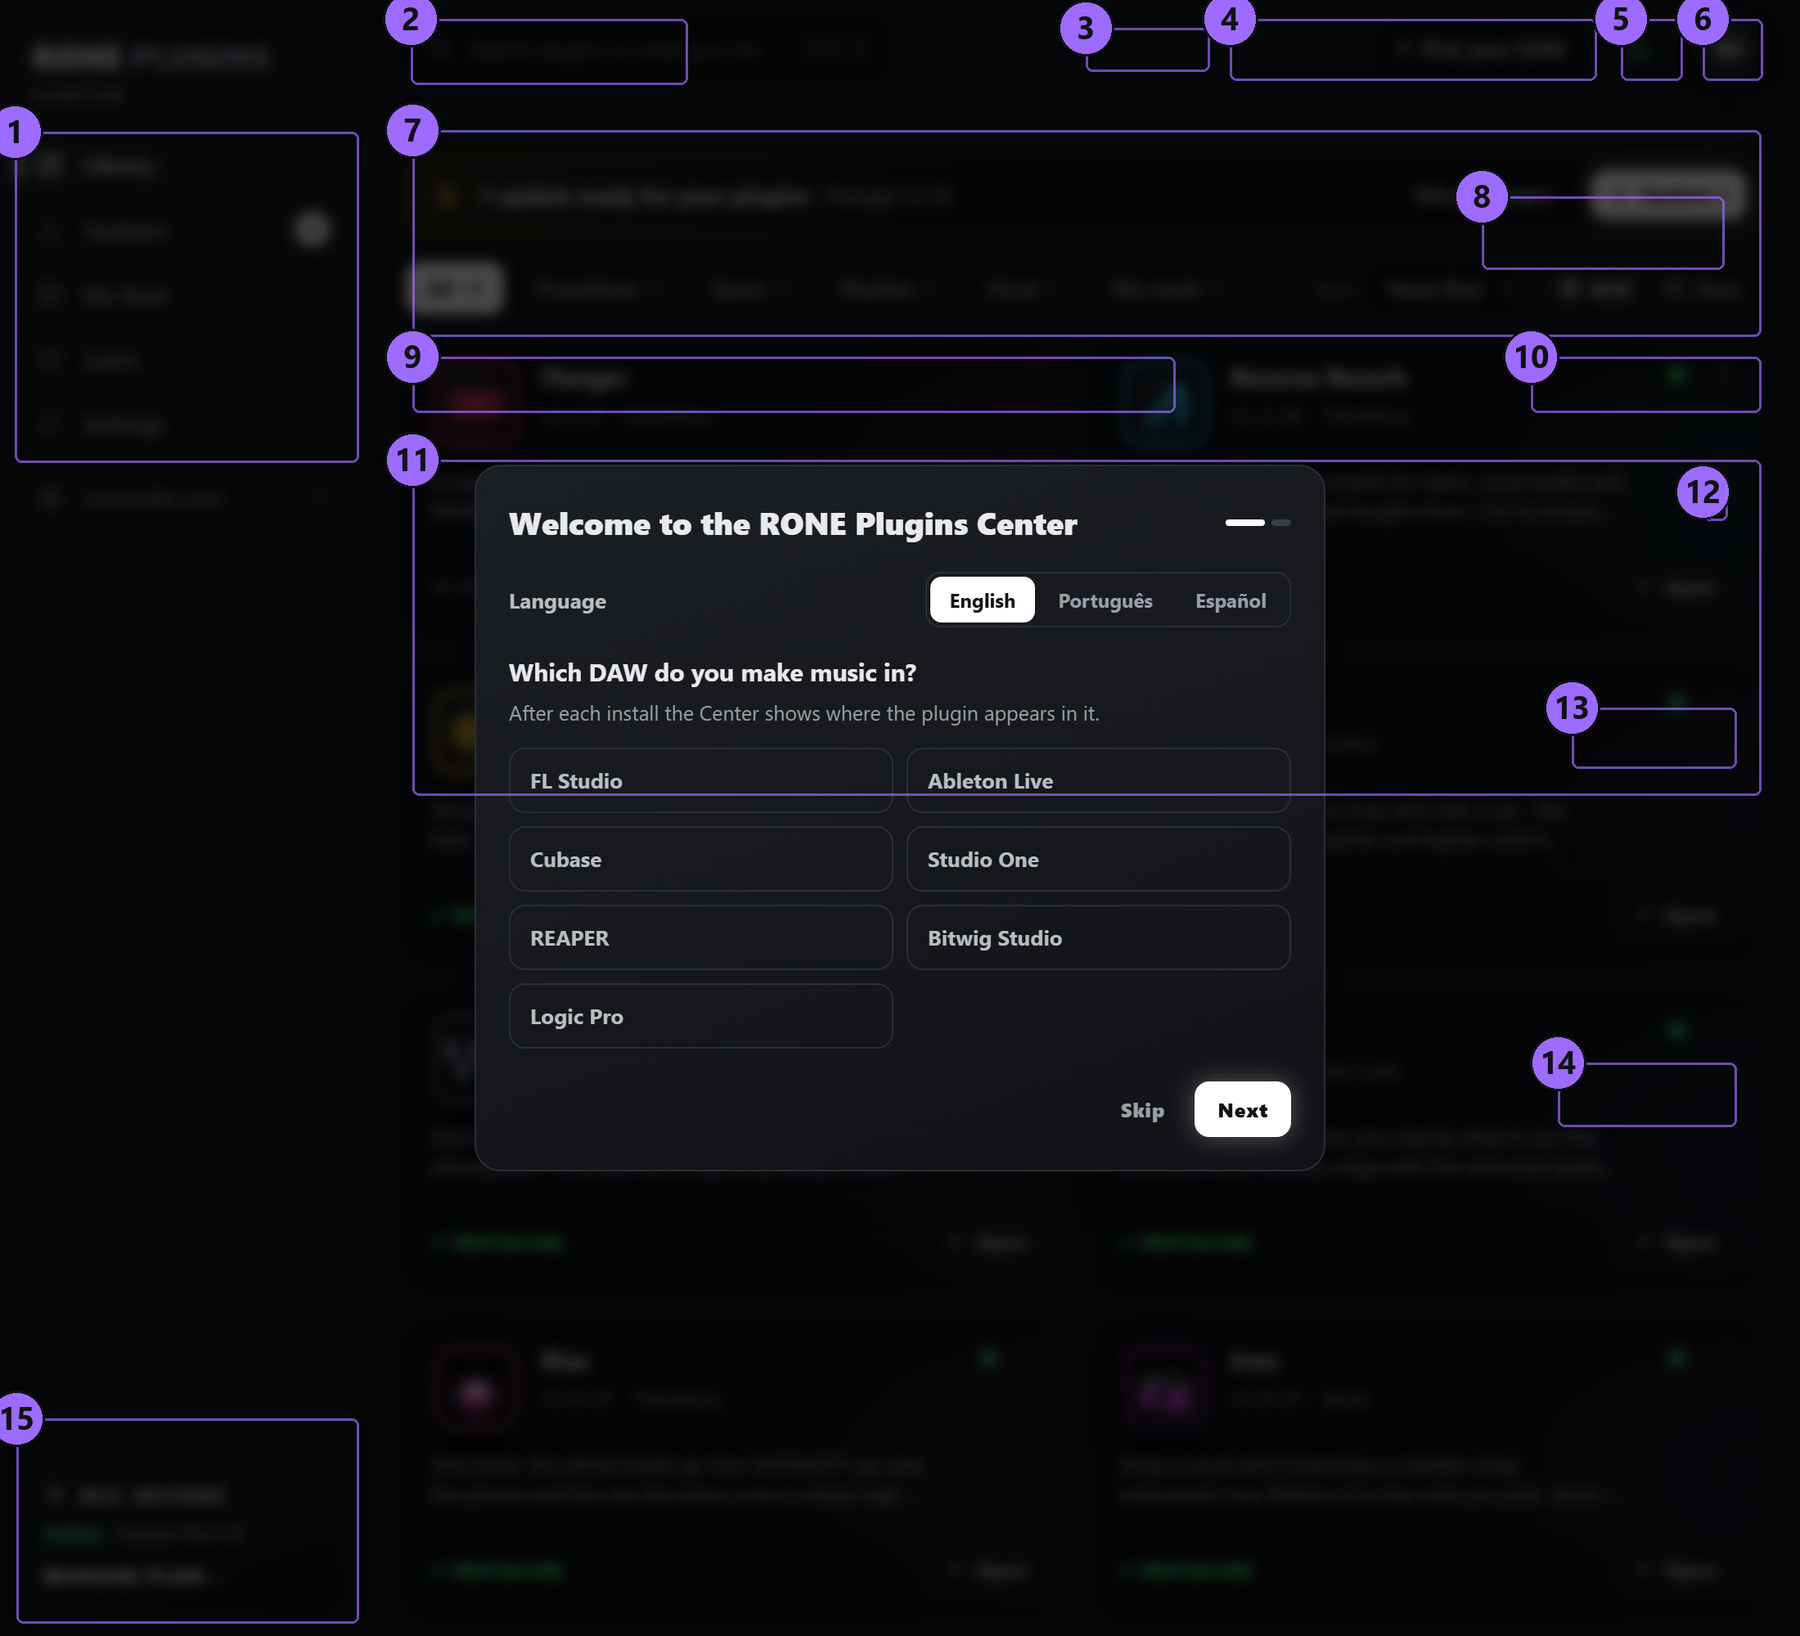
Step by step
- Download the Center from roneaudio.com and run the installer (Windows:
RONE_Plugins_Center_Installer.exe, macOS:RONE_Plugins_Center.dmg). On Windows the installer also adds the Microsoft WebView2 runtime if your PC does not have it yet; it is required for the plugin interfaces. On macOS (10.15 Catalina or later, Intel and Apple Silicon) open the .dmg and drag the Center onto Applications. It is signed and notarized by Apple, so macOS only asks once whether you want to open an app downloaded from the internet: press Open. - Open the Center and sign in with your roneaudio.com account (the same e-mail and password you used on the website). Your licences and device slots are checked automatically: an active ALL ACCESS plan unlocks every plugin, and a lifetime licence unlocks the plugin it was bought for — so RONE Iron opens either way.
- Find RONE Iron in the list and press INSTALL. The Center downloads the signed installer, verifies its checksum, installs it silently and registers the version.
- When the card shows INSTALLED, start (or restart) your DAW and rescan plugins if it does not pick up new plugins automatically. All RONE plugins appear next to each other in your plugin list because every name starts with RONE.
- Updates appear on the same card. Press UPDATE on one plugin or UPDATE ALL at the top. Close the standalone version of a plugin before updating it.
Where the files go
Windows
| File | Location |
|---|---|
| VST3 | C:\Program Files\Common Files\VST3\RONE\RONE Iron.vst3 |
| Standalone app | C:\Program Files\RONE Plugins\RONE Iron.exe |
| This manual | C:\Program Files\RONE Plugins\Manuals\ |
macOS
| File | Location |
|---|---|
| VST3 | /Library/Audio/Plug-Ins/VST3/RONE Iron.vst3 |
| Audio Unit | /Library/Audio/Plug-Ins/Components/RONE Iron.component |
| Standalone app | /Applications/RONE Iron.app |
| This manual | /Users/Shared/RONE Plugins/Manuals/ |
Licence and activation
Licensing is tied to your account, not to a key. The plugin checks the licence file that the Center writes when you sign in. There are two ways to own it: an ALL ACCESS plan, which unlocks every RONE plugin for as long as it is active, or a lifetime licence for this plugin alone, which never expires. Either one opens RONE Iron, and buying the lifetime licence later does not disturb a plan you already have.
If a plugin ever shows a RONE Bundle License Required screen, open the Center, make sure you are signed in and the plugin shows as licensed, then reopen it. Two devices can be signed in at the same time on either kind of licence; sign out on an old machine from the Center's Account page to free a slot. A lifetime licence keeps working offline for far longer than a plan does — there is nothing for it to expire against — but the Center still needs to reach the internet occasionally to confirm it.
Uninstalling
Windows: Settings → Apps → RONE Iron (RONE). macOS: delete the bundles listed above. Presets and settings in your user folder are kept.
3Quick start
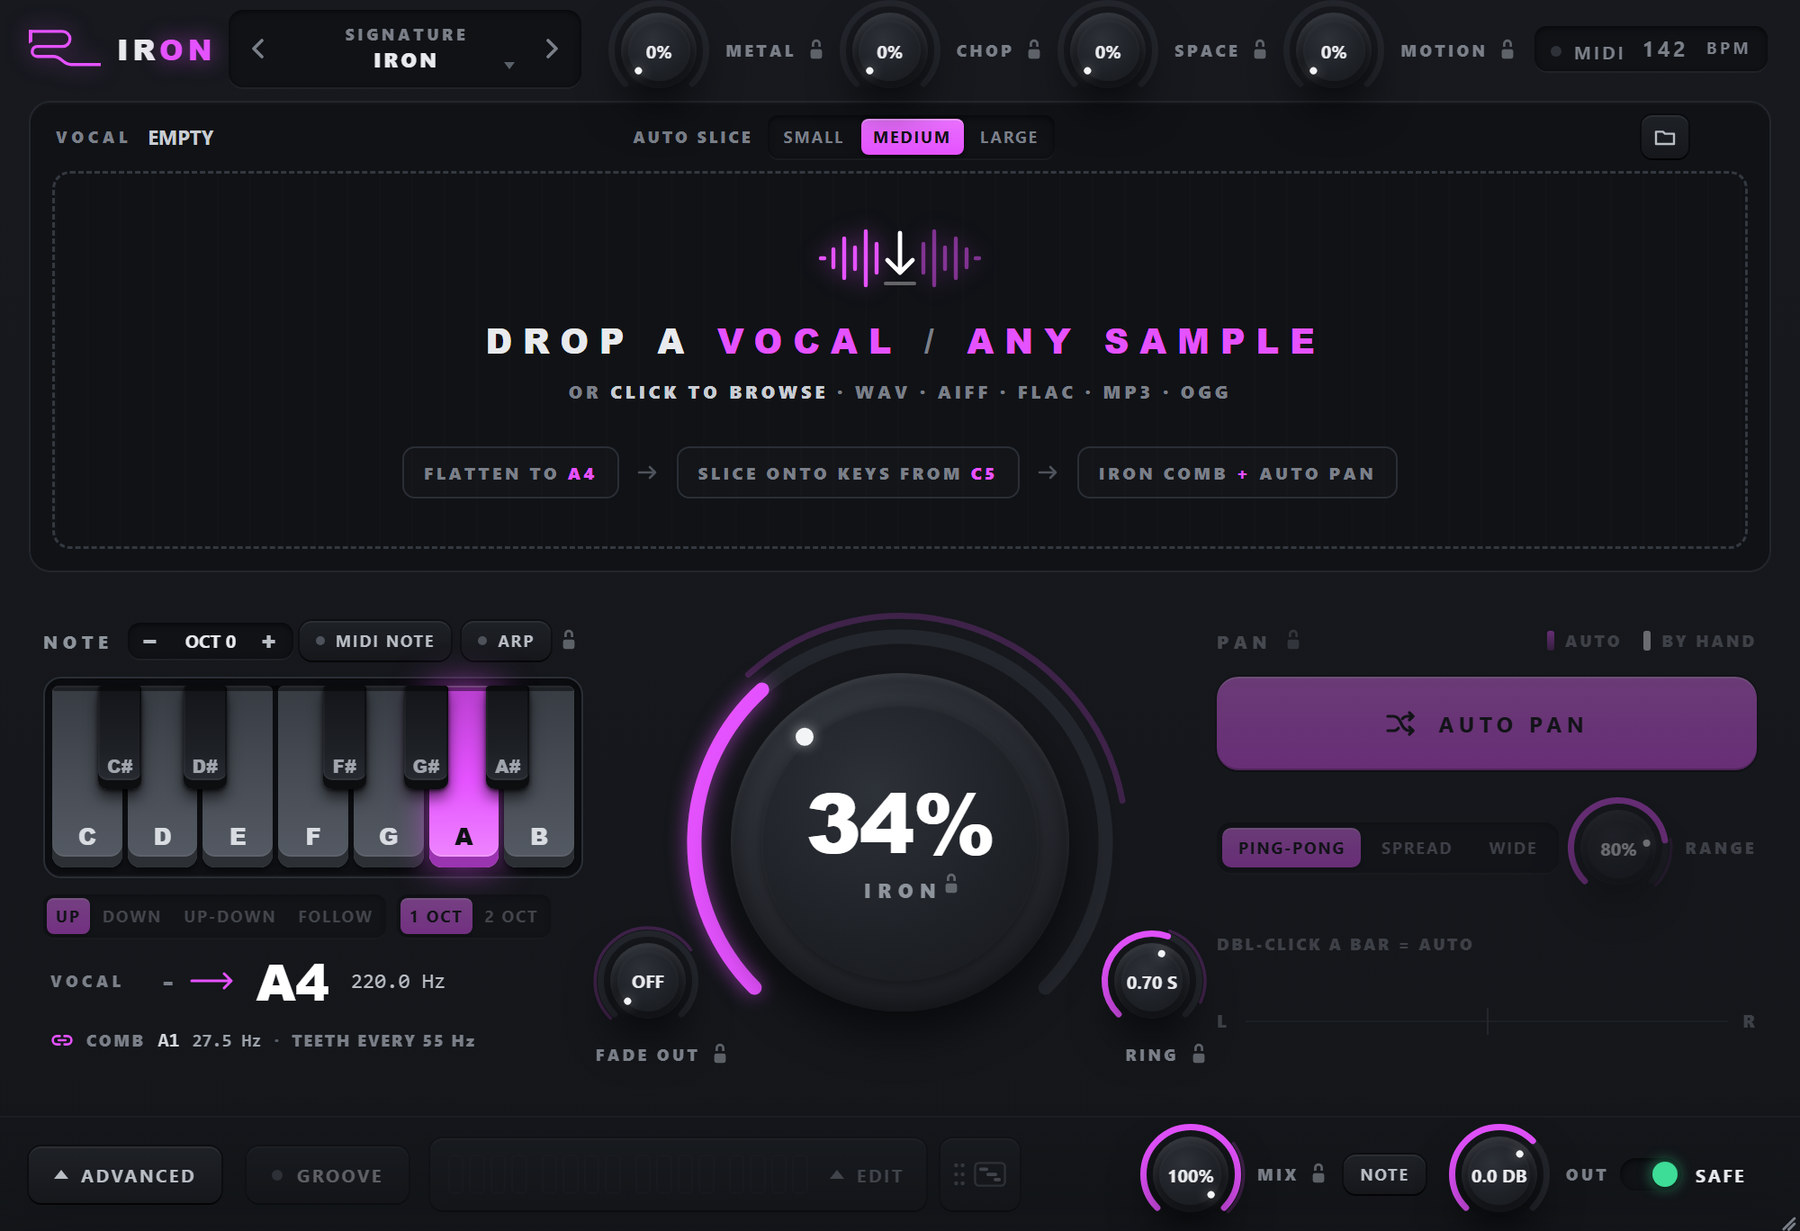
- Insert Iron on an instrument (MIDI) track. In FL Studio: Channel rack, + , RONE Iron.
- Drop a vocal - or any sample onto the card - WAV, AIFF, FLAC, MP3 or OGG, from your DAW's browser or from Explorer / Finder. The first 60 seconds are used. A few seconds later the chops are on the keys.
- Pick the note of your track on the piano (A by default). The whole vocal is flattened to the octave of that note nearest the voice, and the comb follows it.
- Play. Every chop has a key, starting at C5 (FL Studio's naming; middle C = C5). Click a chop on the screen to hear it.
- Or let it play itself: press GROOVE and start your song. Iron plays a 16th-note pattern of chops on the host tempo. DRAG MIDI drops that pattern into your piano roll as notes.
- Try the presets at the top and the four macros next to them. They change the whole sound, not one knob.
4Interface tour
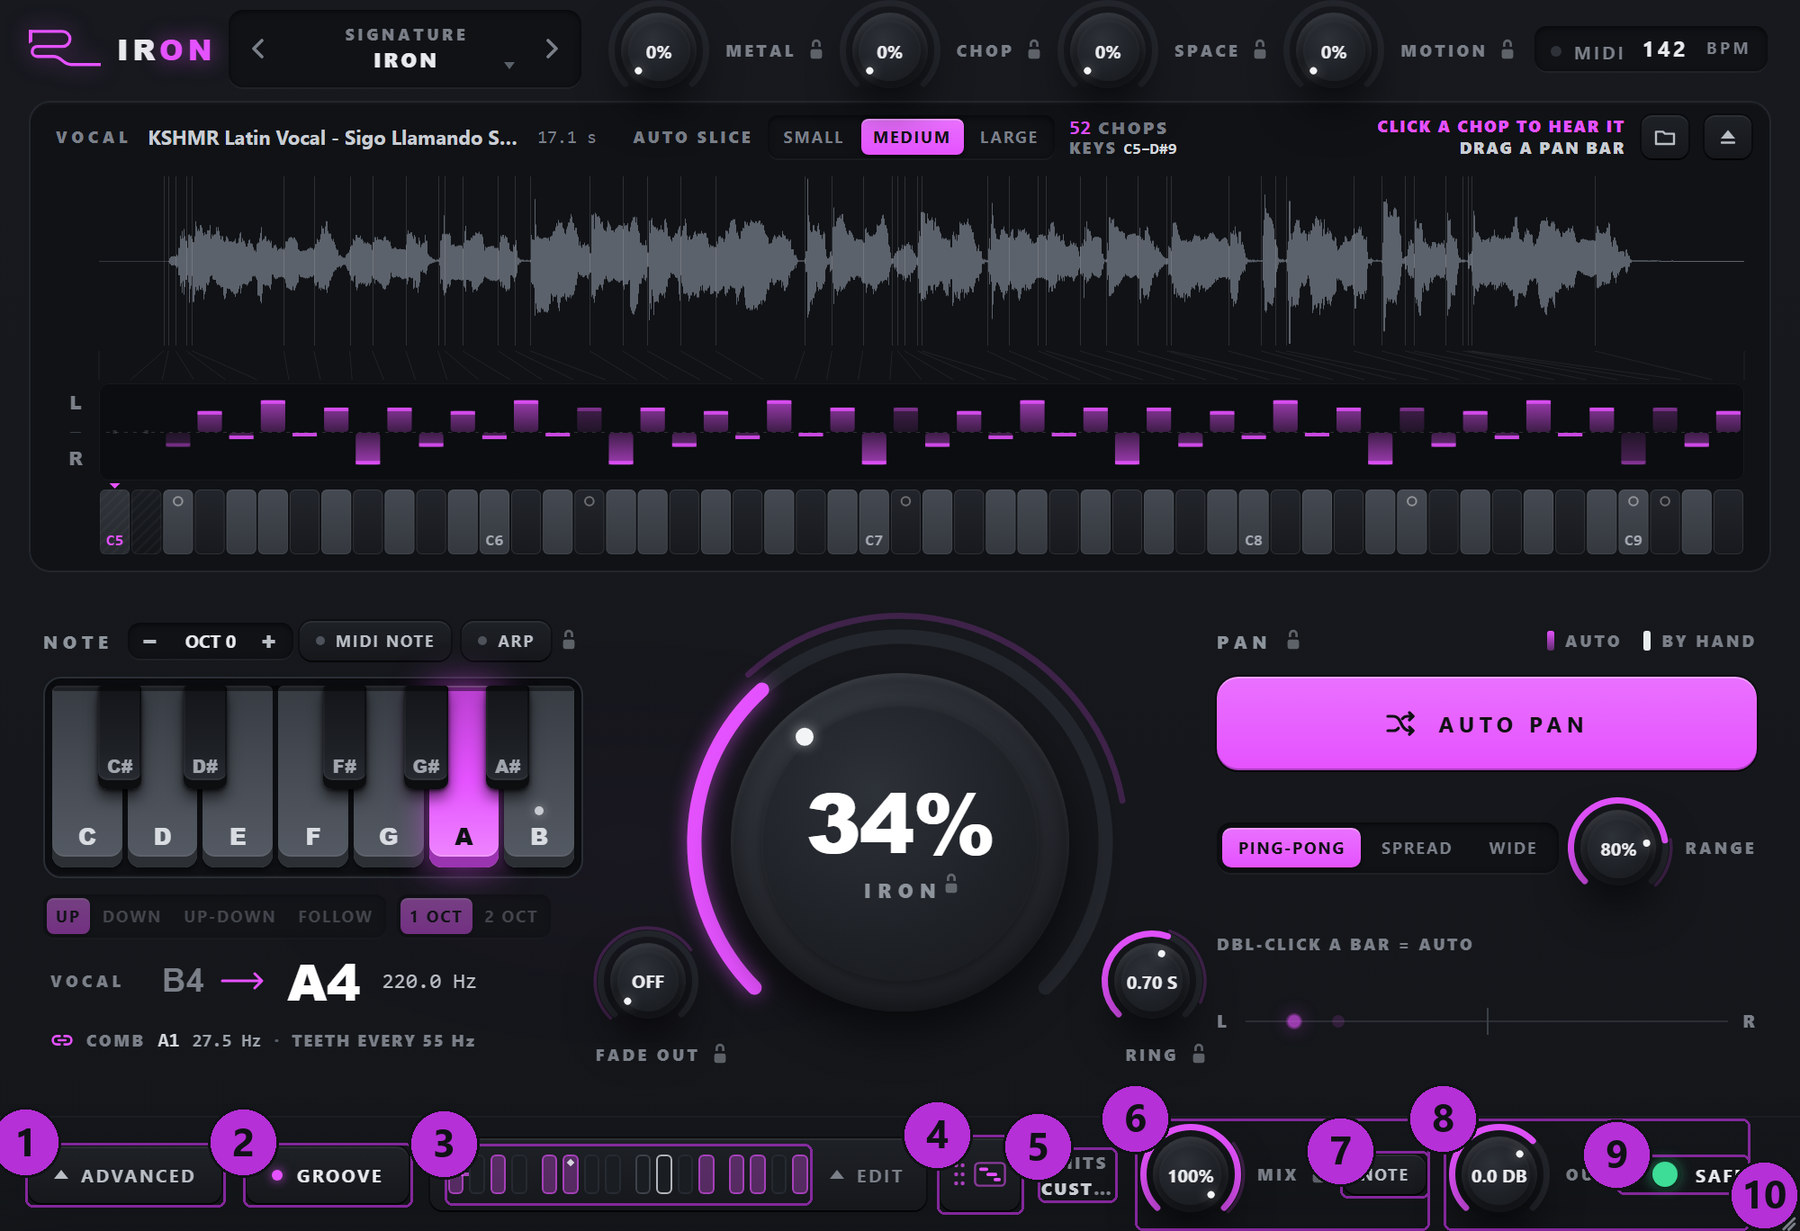
5The vocal, the note and the metal
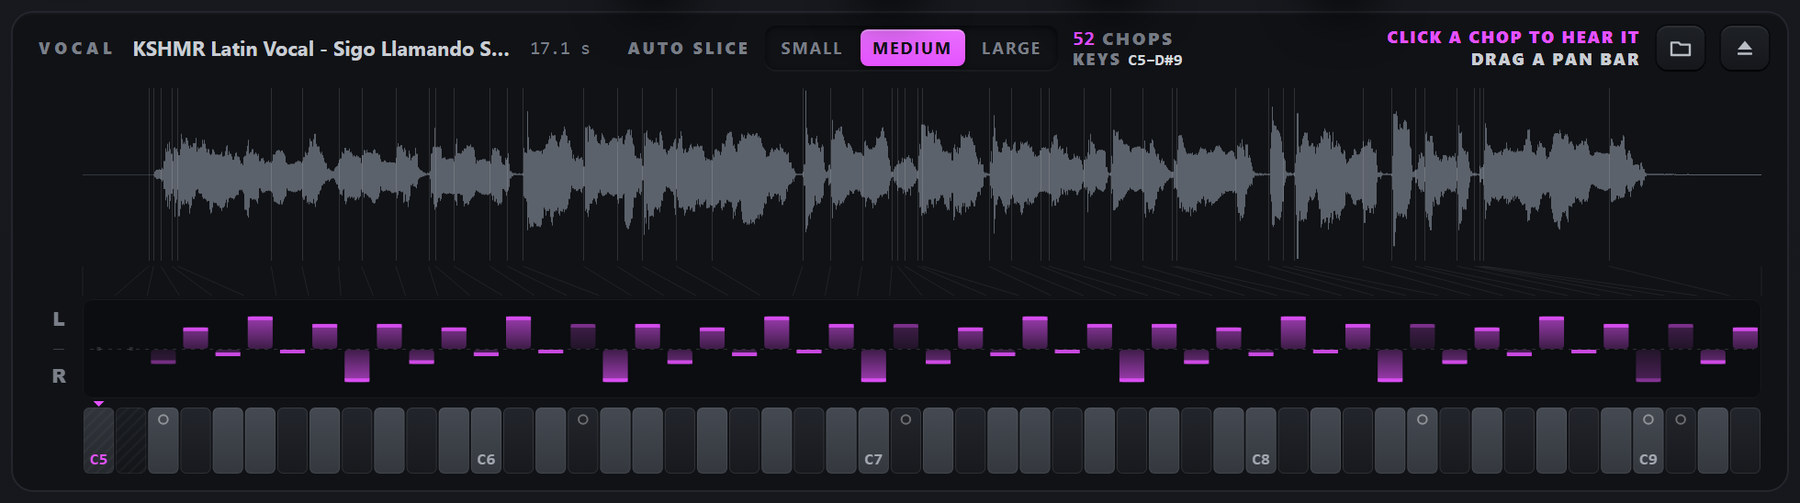
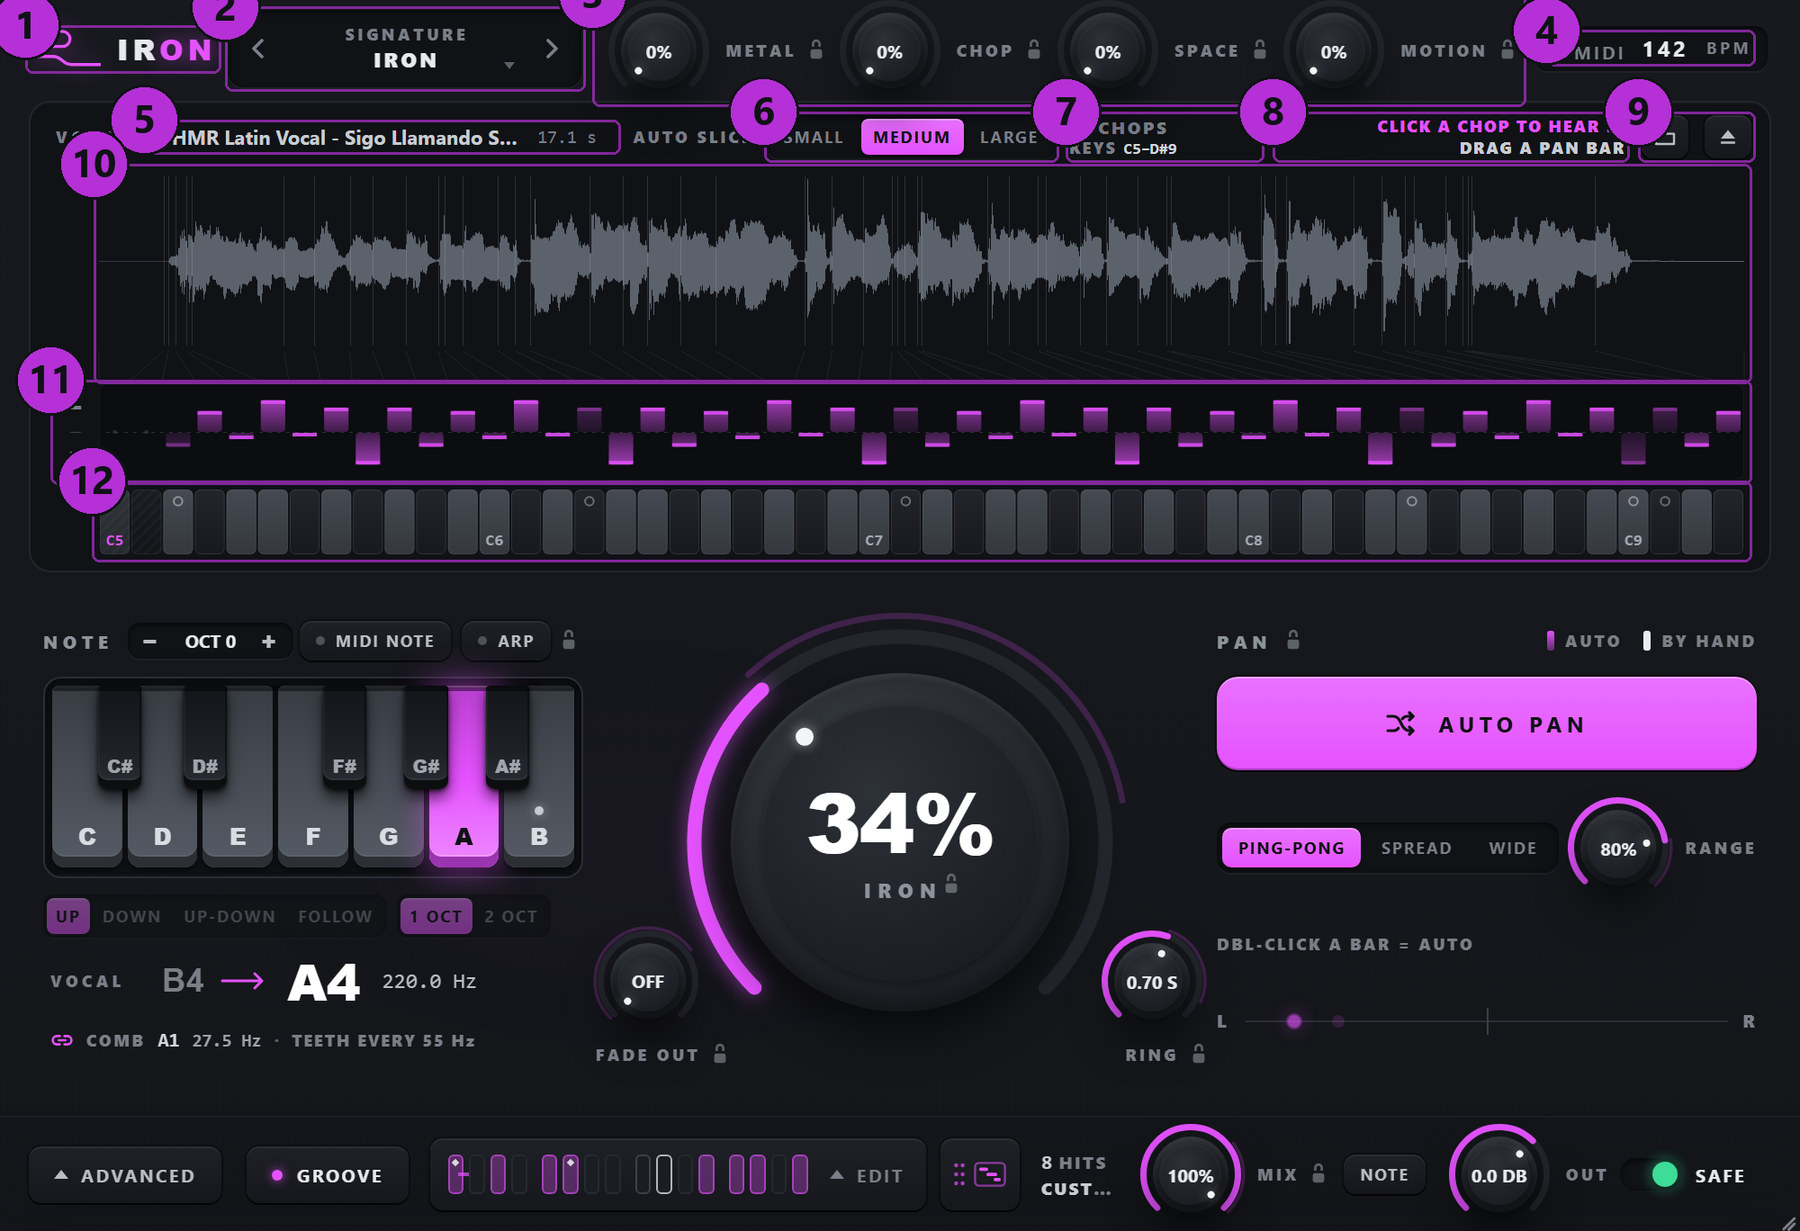
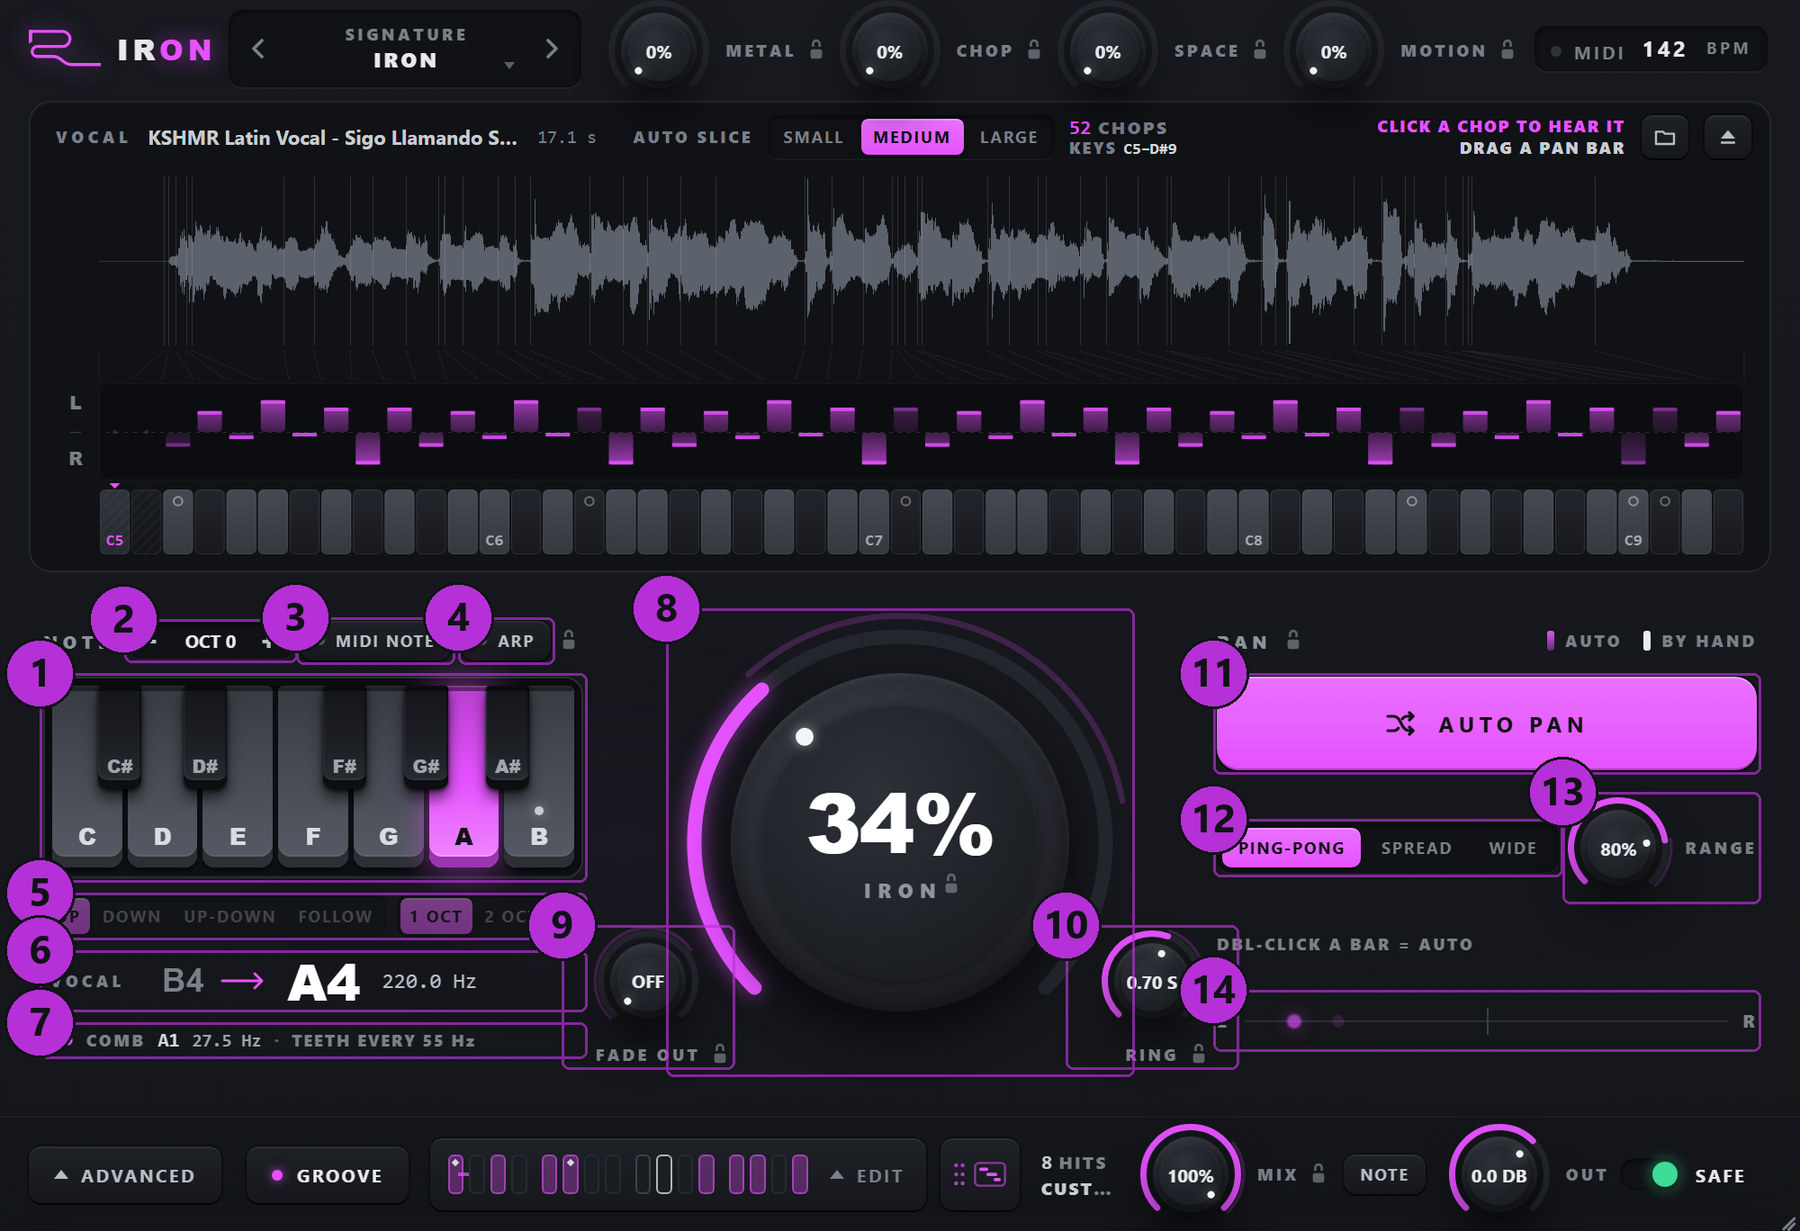
Drop a file on the card or press the folder button. Iron reads the first 60 seconds from the first sound, finds the vocal's pitch, flattens it to your note, finds the transients and builds the chops - usually in well under a second per ten seconds of audio. EJECT empties the plugin. Breaths, S sounds and other noises stay on the keys, but the GROOVE and the ARP never pick them.
How finely the vocal is cut. SMALL gives fewer, longer chops (whole words); LARGE gives many more short ones (syllables). DETAIL in ADVANCED fine-tunes it between the three. At most 128 chops; when there are more chops than keys above ROOT, the key map moves down to the highest C where every chop has a key.
The note the whole vocal is flattened to, in the octave nearest the voice. Pick the key of your track (the root of your bassline). Changing it re-renders the vocal in the background; the old chops keep playing until the new ones are ready.
Moves the target note whole octaves down or up from the octave nearest the vocal. Big jumps change the character - down is darker and more robotic.
With MIDI NOTE on, the twelve keys right below the first chop key (with the chops starting at C5, that is C4 to B4) choose the NOTE instead of playing chops. Hold a key with your left hand while the GROOVE runs and the whole vocal follows - you can play the groove like an instrument. The switch is instant: Iron prepares the other notes in the background.
The amount of metal. The comb sits on the note: its first notch is the note itself and its teeth repeat on the note's harmonics, so the ring is always in key. At 0 % you hear the flattened chops alone.
How long the comb rings after each chop - short for tight, clanking hits, long for a shimmering, bell-like tail.
Shortens every chop. At 0 each chop plays to its end; turning it up fades every chop out earlier, for tighter, more percussive hits. Automate it to open the chops up over a build.
Every chop has its own pan. AUTO PAN rolls a new set; chops you panned by hand keep theirs. PING-PONG alternates hard left and right in the order the hits play (the classic left-right explosion), SPREAD places them at random but never three in a row on one side, WIDE pushes them hard and wide. RANGE scales how far out they go.
MIX blends from the full effect (100 %) towards the plain chops: at 0 % you hear the untouched vocal chops, with the same slices, pans and fades. Turn on NOTE and MIX only takes the metal away - at 0 % you hear the vocal flattened to your note, without the comb. Use MIX to bring back more of the original voice.
OUT sets the level. SAFE is a ceiling at -0.3 dBFS on the output: it never touches normal levels and only catches the peaks that a long ring or many voices can pile up. The lamp next to OUT is green while SAFE is on.
6ARP
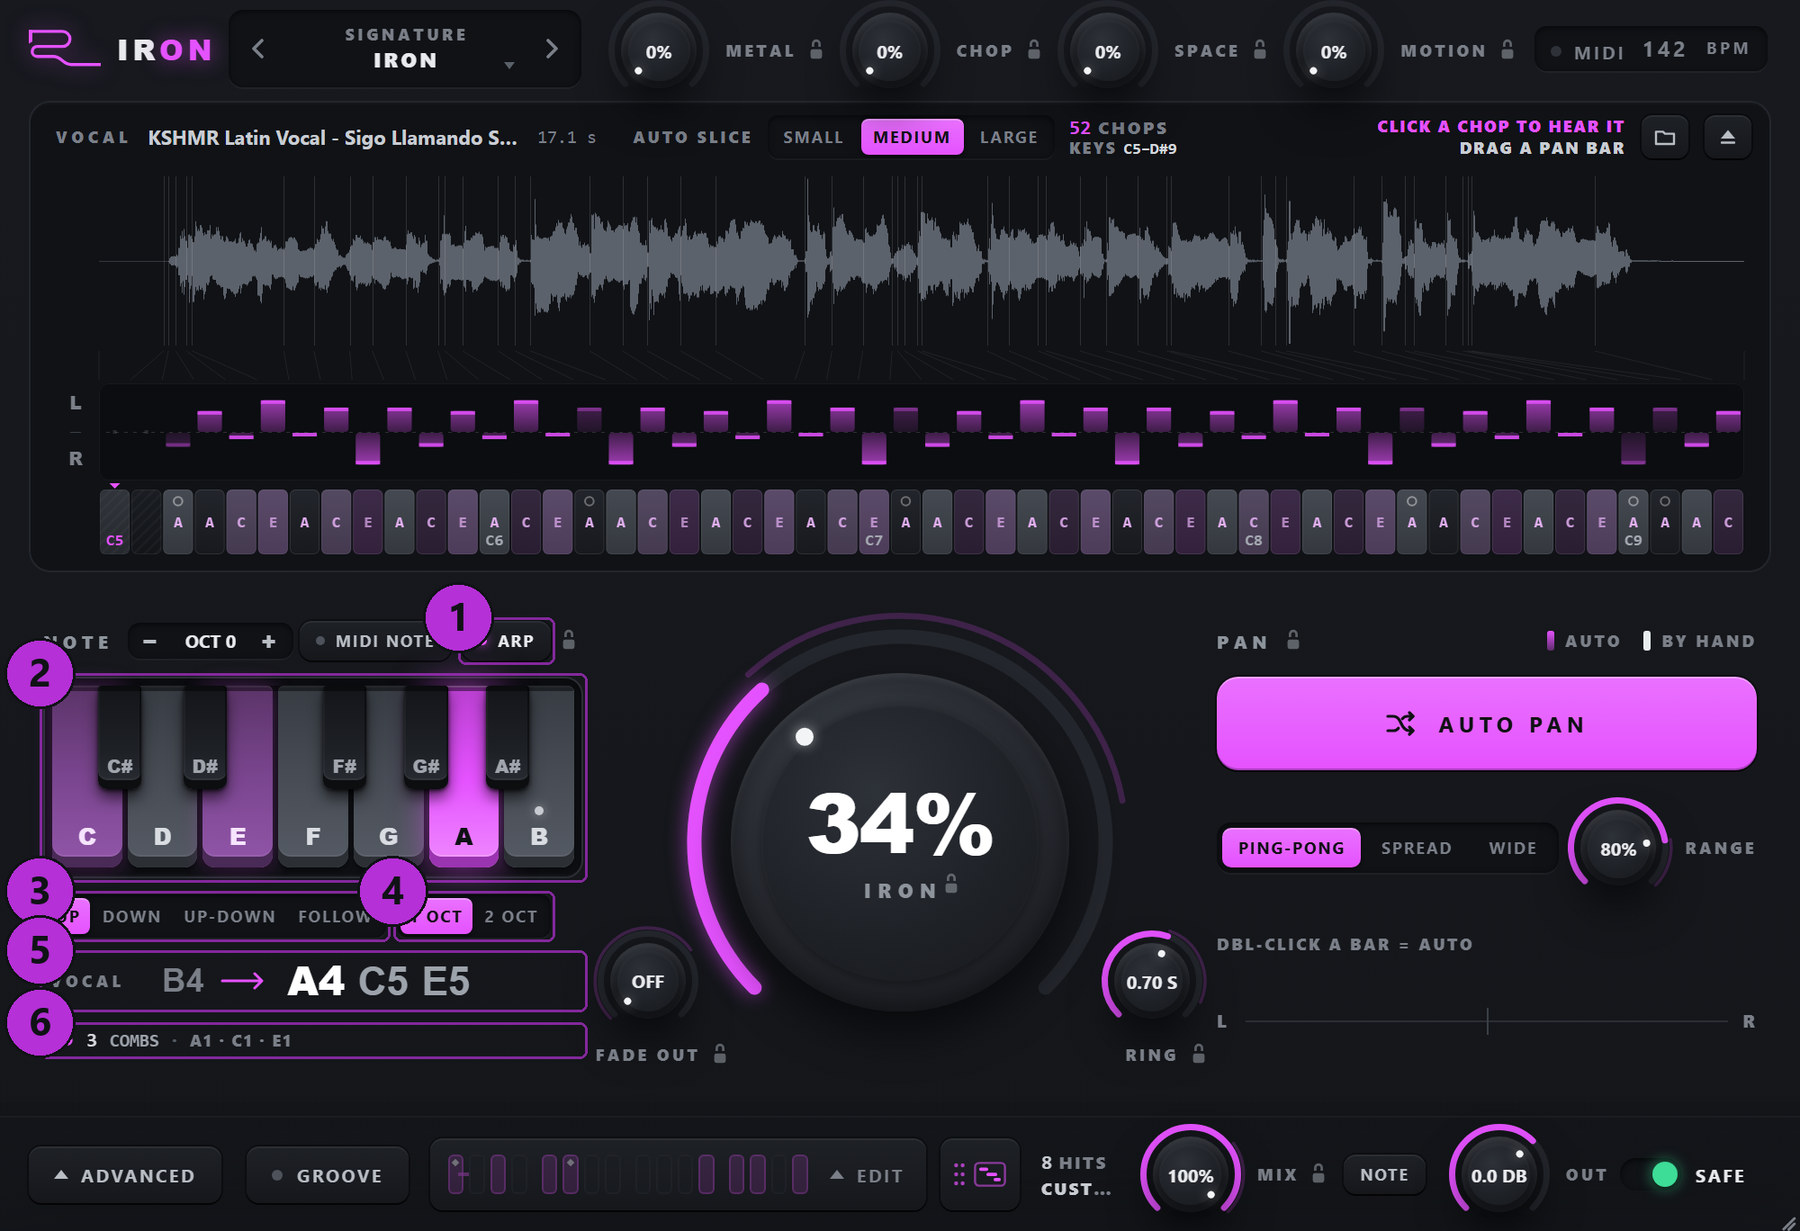
With ARP on, every chop takes one of the lit notes. In UP, DOWN and UP-DOWN the chops walk through the notes in order - chop 1 on the first note, chop 2 on the next and so on - so a GROOVE or a run of keys becomes an arpeggio. FOLLOW works differently: each chop goes to the lit note nearest its own pitch, so the vocal keeps its melody but snaps to your chord or scale. The x clears the extra notes. 2 OCT continues the order an octave higher (FOLLOW ignores it).
7GROOVE
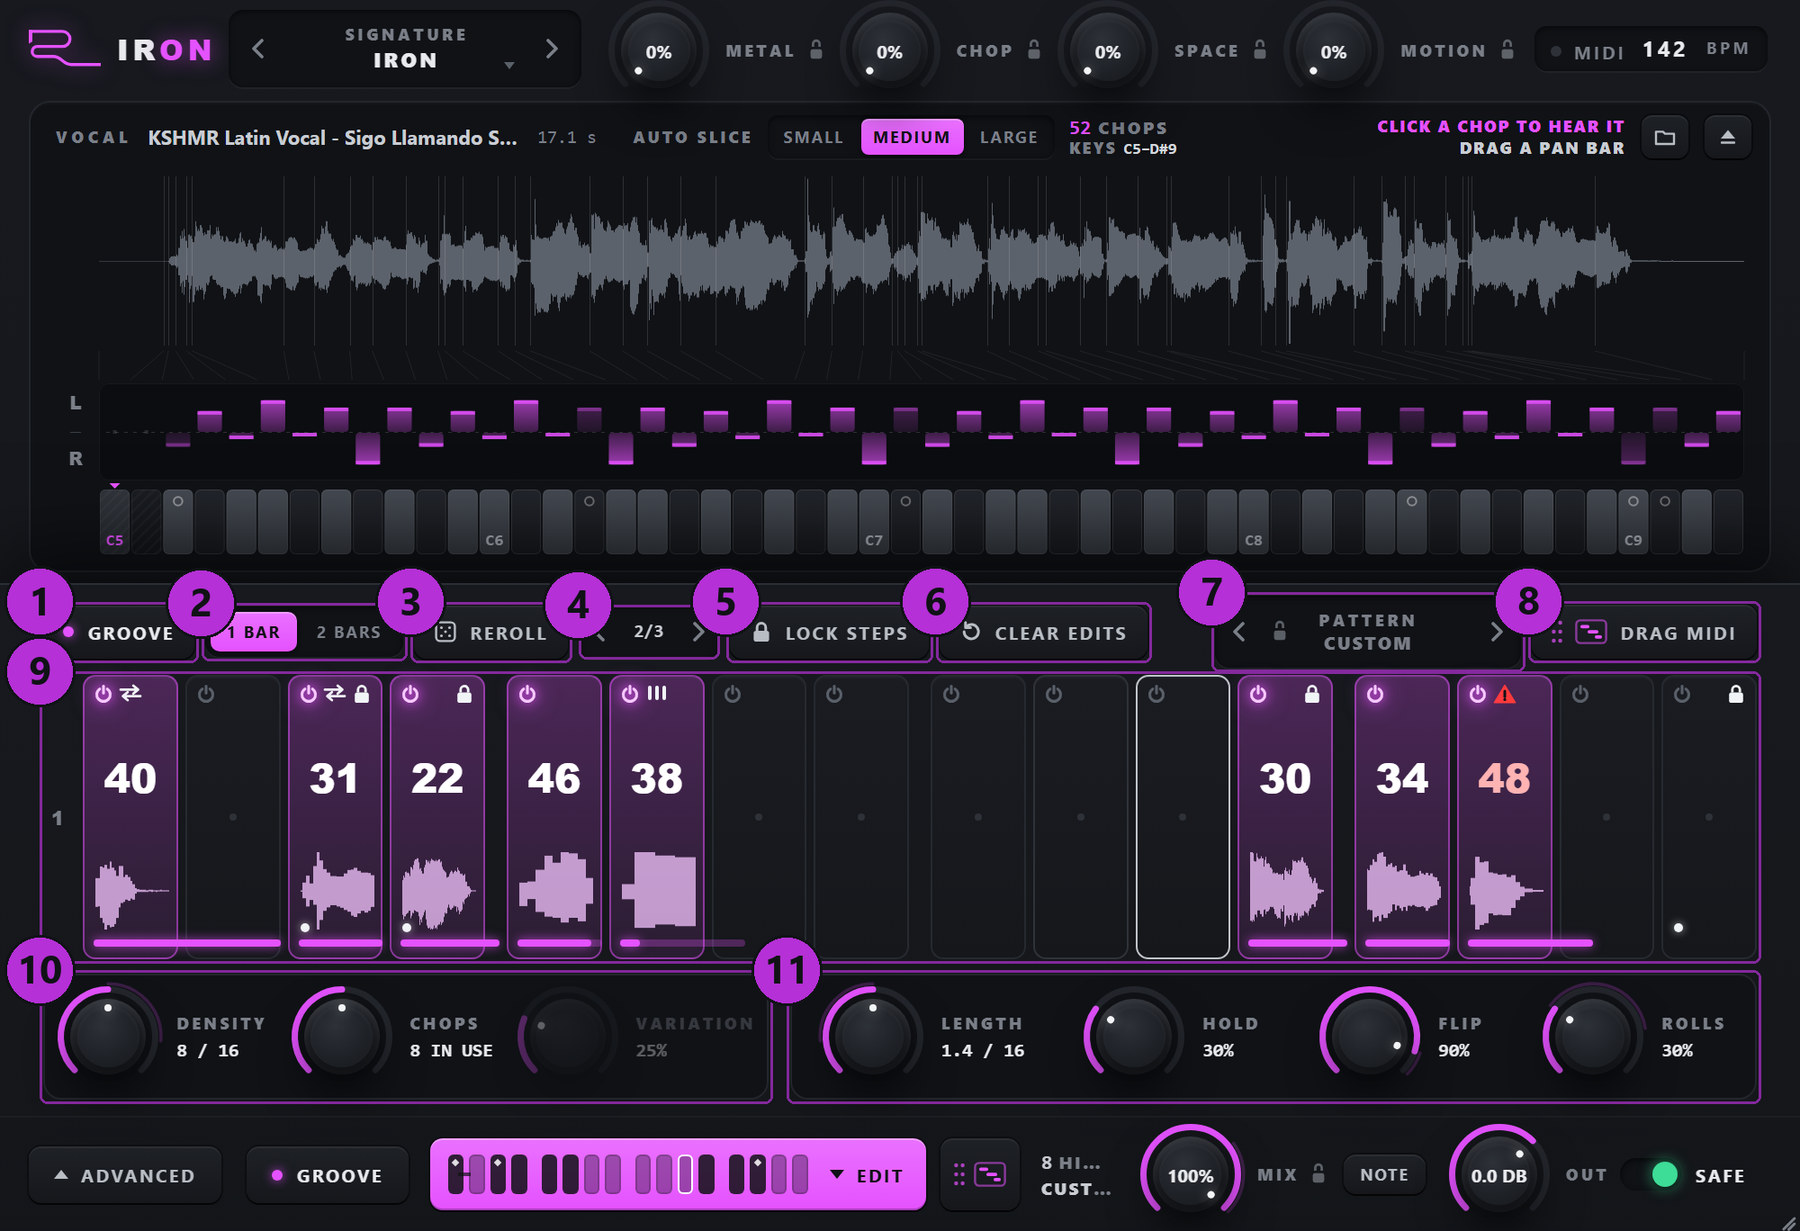
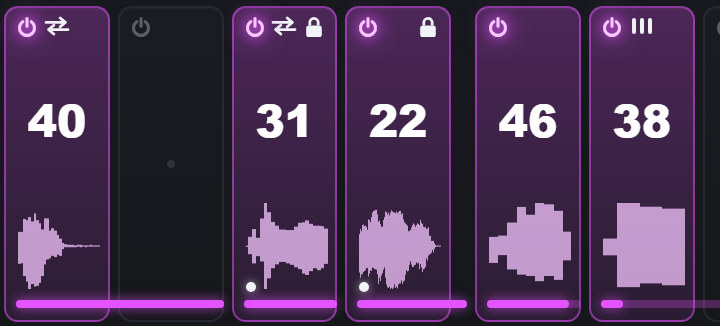
RONE, HOOK, GALLOP, SYLLABLES, ROLLING, OFFBEAT, BACKBEAT, PROG STAB, TRESILLO, DOTTED, FLIPSIDE, CALL ANSWER, RATCHET, BUILDUP, HALFTIME and BREAKDOWN - patterns built around the kick and bass grid of psytrance, progressive and techno. A pattern fixes the steps; the knobs and the chop choice still apply. Edit the steps or REROLL and it becomes CUSTOM.
How many of the 16 steps play (the readout counts them).
How many different chops the pattern uses - a few for a hypnotic loop, many for a talking line. The GROOVE only picks strong, tonal chops.
How much bar 2 differs from bar 1.
LENGTH is how long each hit lasts, in 16th notes. HOLD lets a share of the hits ring on to the next one.
FLIP sends some hits to the other side, on top of the chop's own pan. ROLLS turns some hits into quick 1/32 repeats (2 to 4 hits, each a little quieter).
DRAG MIDI (in the panel and in the footer) writes the pattern exactly as it plays, edits and rolls included, as a MIDI clip you drag into your piano roll. Turn GROOVE off and edit the notes like any other clip - Iron's keys play the same chops, so the clip sounds the same.
8Presets, macros, locks and slots
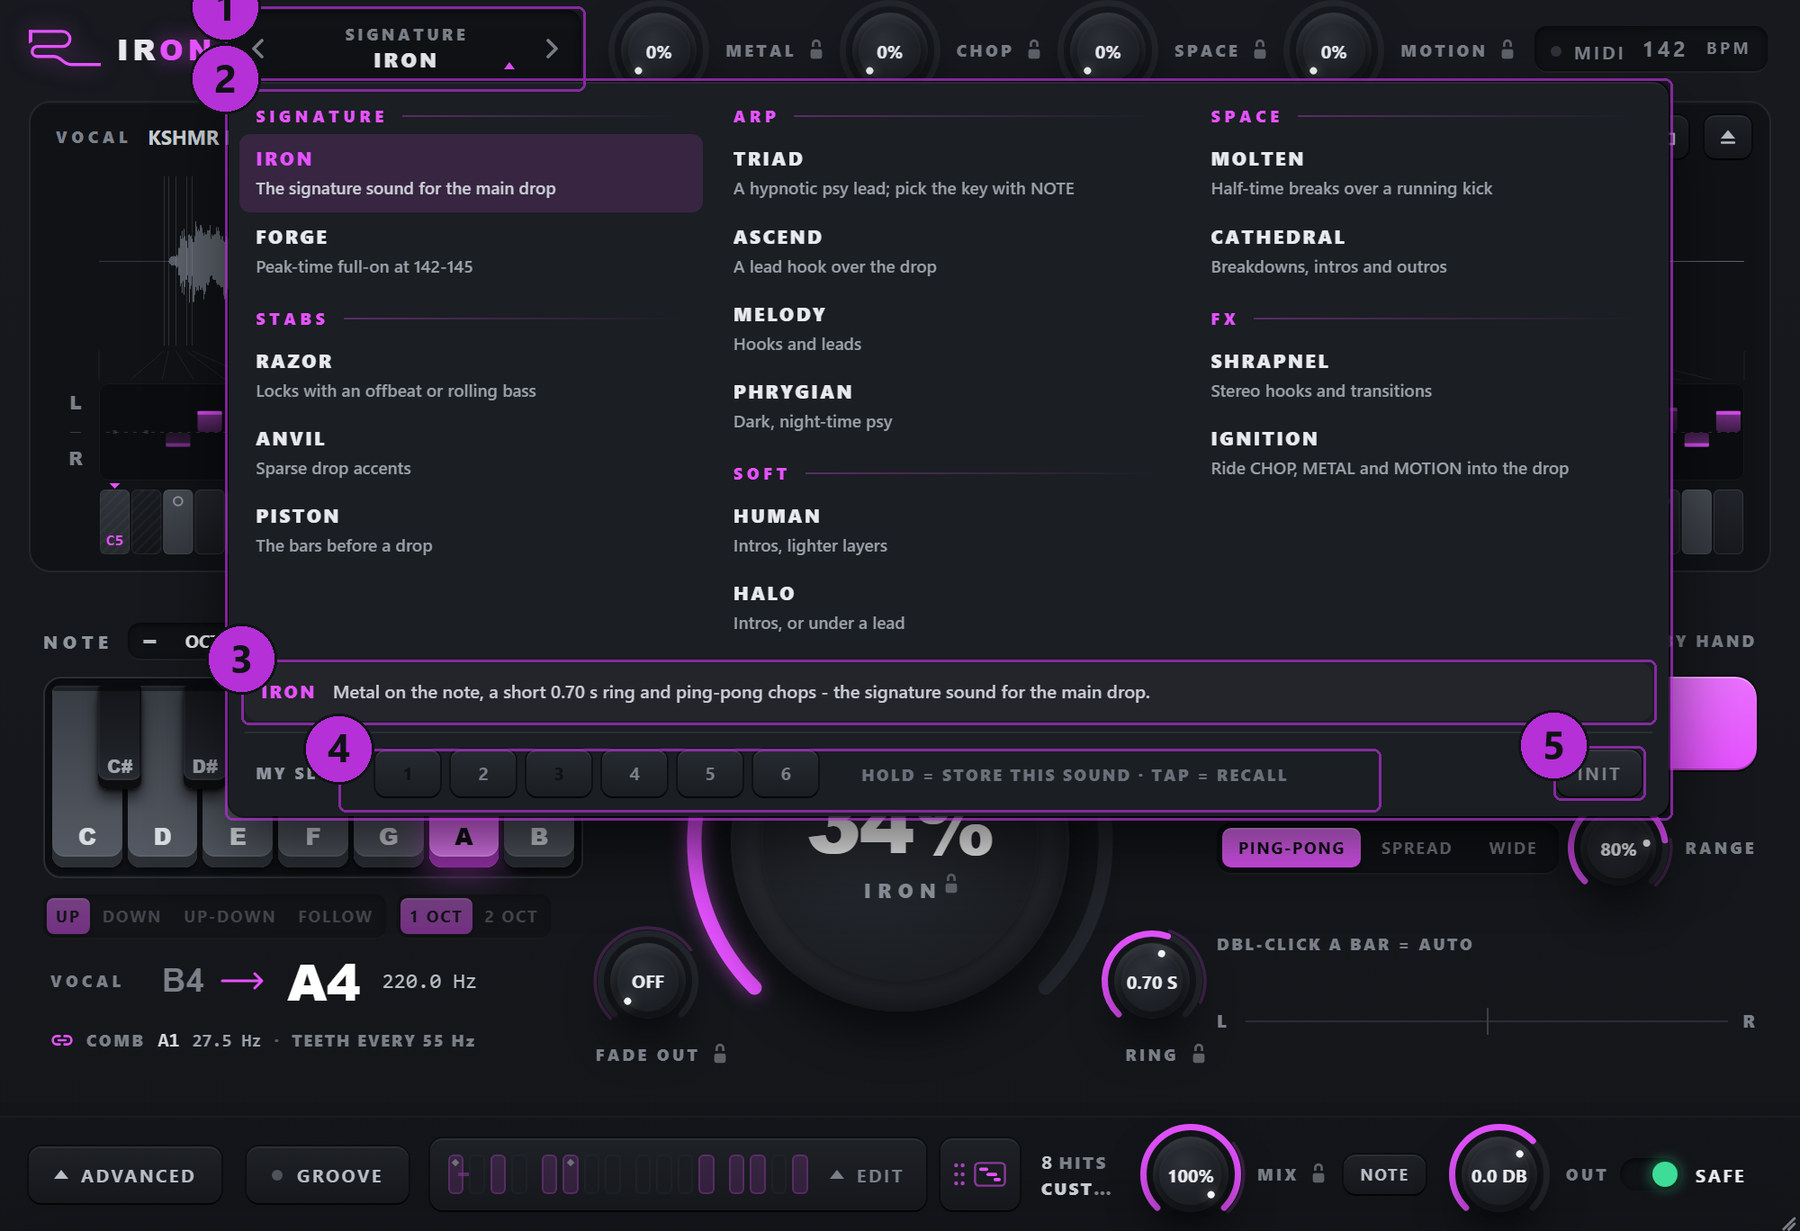
A preset sets the whole IRON sound: the metal, the fades, the pans, the ARP notes, the groove and what the four macros do. It never changes your vocal, your NOTE, OCTAVE or ROOT, or the pans you set by hand. SIGNATURE: IRON (the signature sound for the main drop) and FORGE (peak-time full-on). STABS: RAZOR, ANVIL, PISTON. ARP: TRIAD, ASCEND, MELODY, PHRYGIAN. SOFT: HUMAN, HALO. SPACE: MOLTEN, CATHEDRAL. FX: SHRAPNEL, IGNITION.
Each macro moves several controls at once, in the way the current preset defines: METAL adds metal and ring, CHOP tightens the hits, SPACE opens the rings and the stereo, MOTION adds pan movement, density and rolls. The macros never move the knobs themselves - the knobs show where a macro has taken them - so turning a macro back to 0 always returns exactly to the preset. Automate them into a drop.
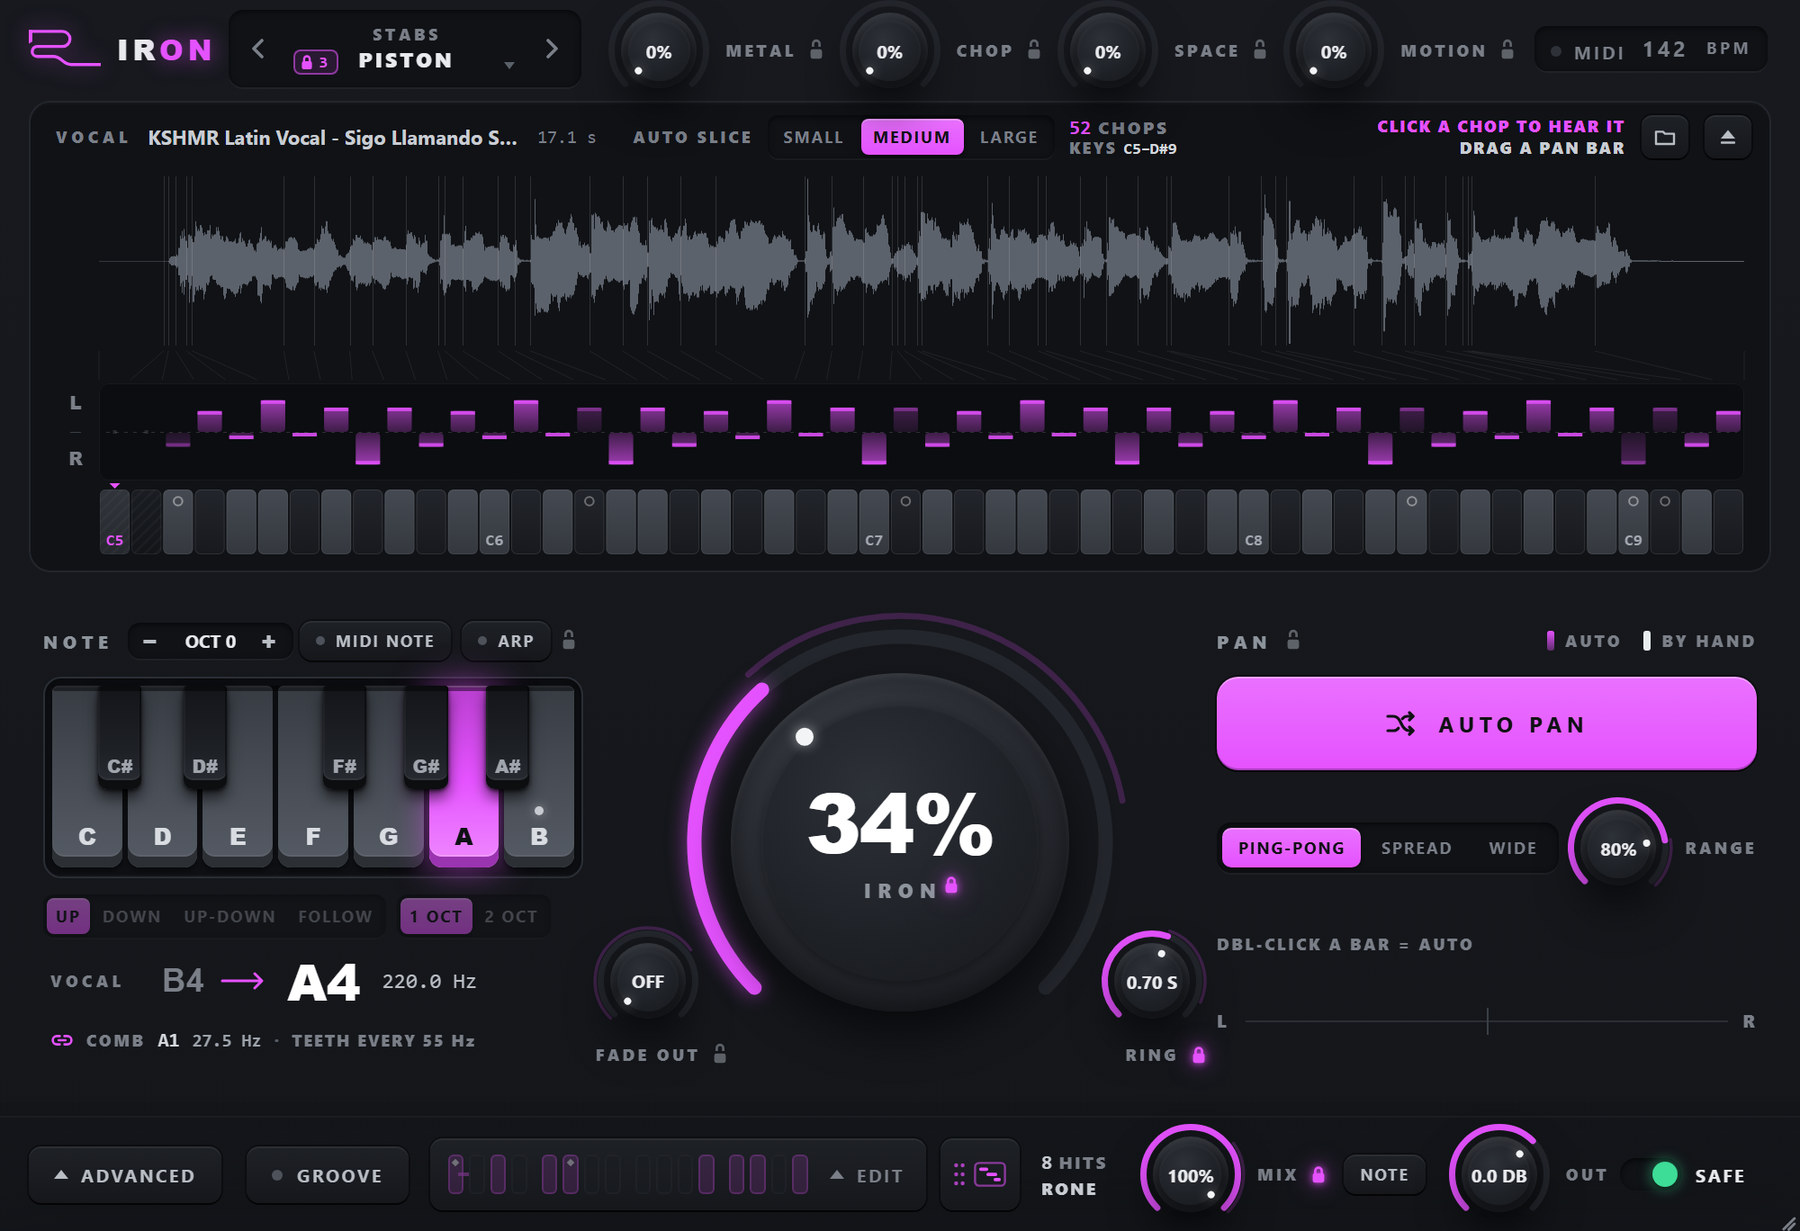
Every lockable control has a small lock next to it, grey while it is open; click it to lock and it lights up. A locked control stays where it is when you switch presets, so you can audition presets around a metal amount or a groove you like. Lockable: IRON, RING, FADE OUT, MIX, LIFE, the pans, the ARP notes, the GROOVE and each of the four macros.
Hold a slot button to store the current sound in it, tap it to recall. Slots are kept on your computer, so they are there in every project and every instance.
9ADVANCED
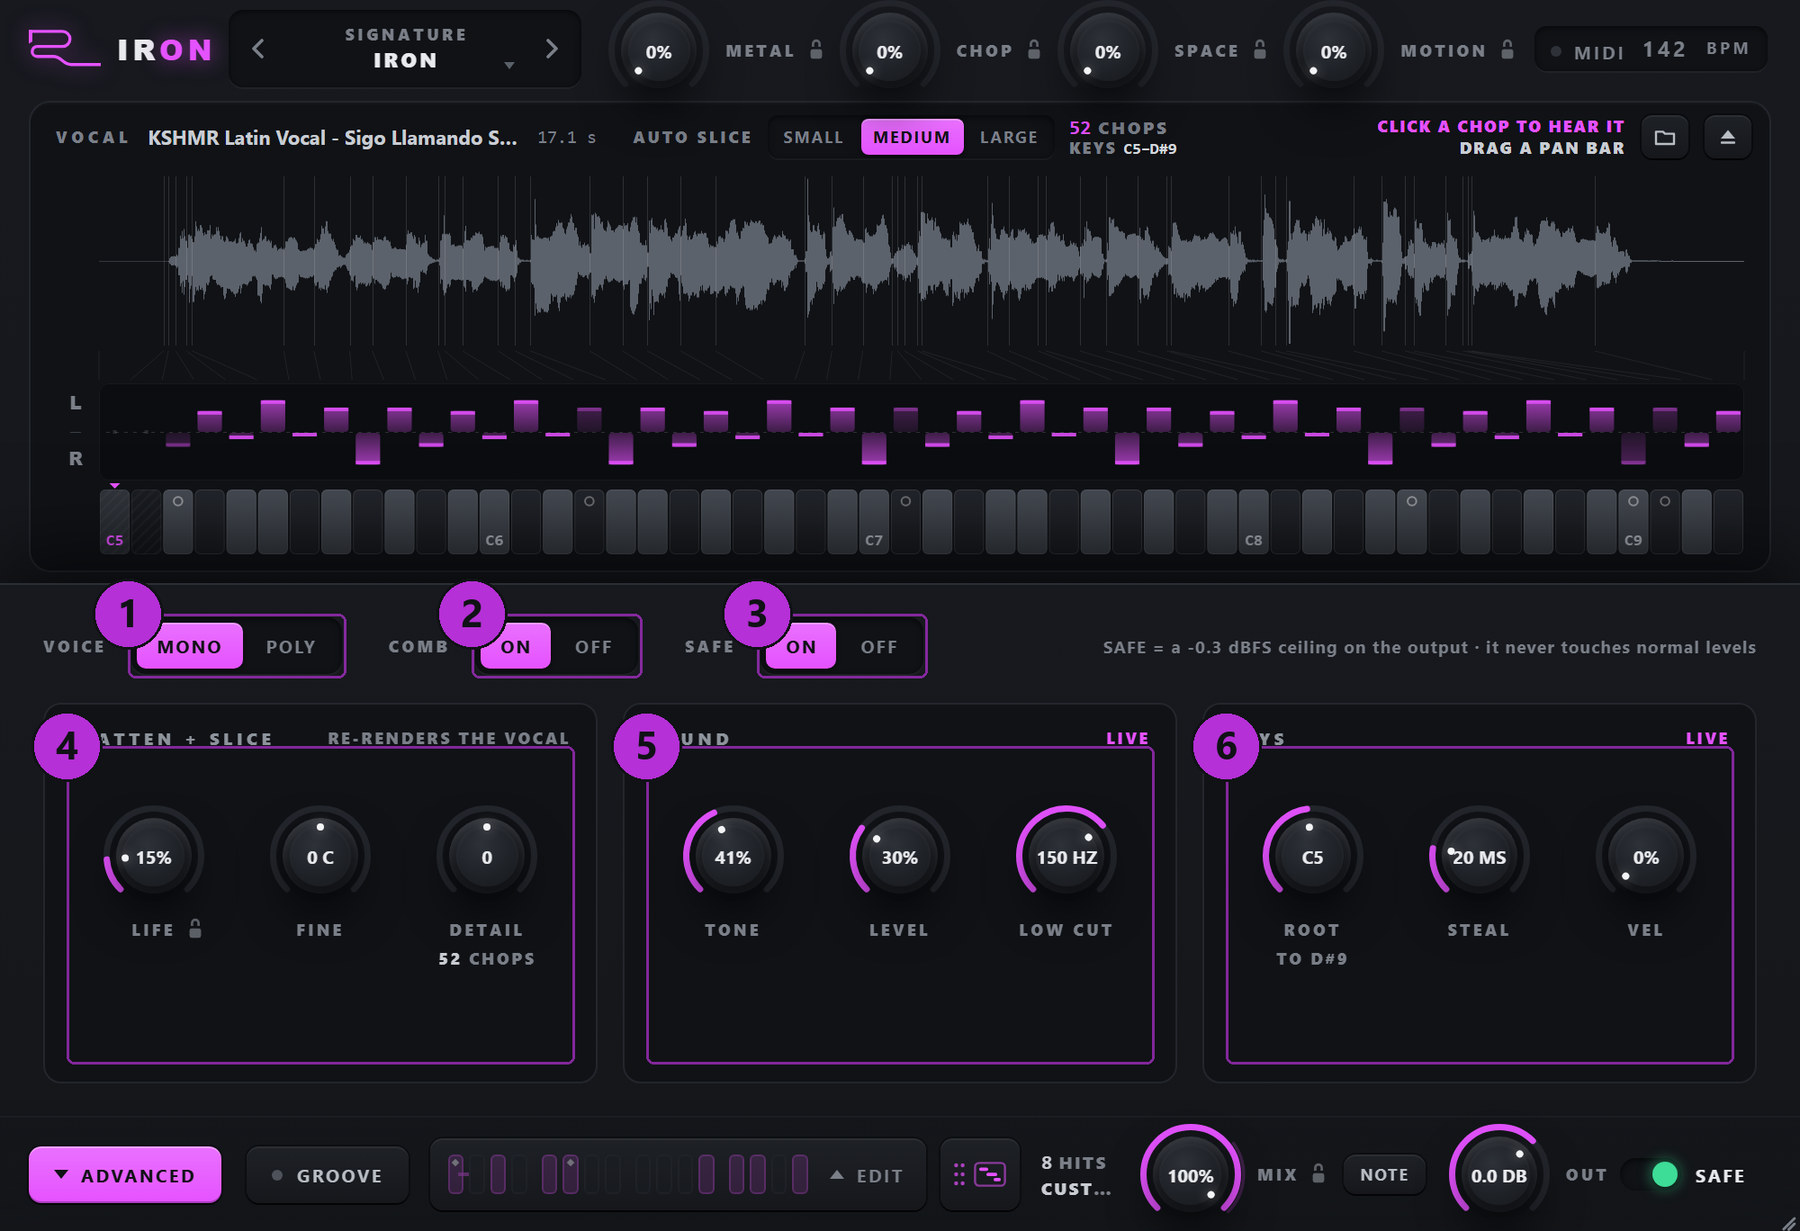
How much of the vocal's own pitch movement survives the flattening. 0 % is a dead-straight robot note; more keeps the scoops and vibrato of the singer around the note.
Tunes the target note in cents, for tracks that are not at A = 440 Hz.
Fine control over the slicing between the AUTO SLICE steps: right = more chops, left = fewer. The readout shows the new count.
Darkens the metal: higher values damp the comb's upper teeth, for a softer, warmer ring.
Evens out the chops' levels, so quiet syllables hit as hard as loud ones.
A high-pass on the output - useful when the vocal is flattened low (OCTAVE -1 or -2) and starts to fight the bass.
The key of the first chop. The others follow upward, one chop per key, black keys included.
In MONO, how quickly a chop fades when the next one cuts it. Shorter is choppier; longer is smoother.
How much the MIDI velocity sets each chop's level. At 0 every note plays at full level.
10Step-by-step workflows
The classic metal drop hook
- Drop an acapella and pick the root note of your bassline.
- Preset IRON. Press GROOVE and play the drop.
- REROLL until the pattern talks; lock the steps you love and REROLL the rest.
- DRAG MIDI the pattern into the piano roll if you want to edit it as notes.
Play it over a chord progression
- Turn on GROOVE and MIDI NOTE.
- With the chops from C5, the keys C4 to B4 choose the note: hold the root of each chord while the groove runs.
- Record that left hand into the piano roll with the rest of the part.
A lead from a vocal
- Turn on ARP and light the notes of your scale (or a triad).
- FOLLOW keeps the singer's melody snapped to your notes; UP or UP-DOWN turns the chops into an arpeggio.
- Try the ARP presets: TRIAD, ASCEND, MELODY, PHRYGIAN.
Build-up into the drop
- Preset IGNITION, or any preset you like.
- Automate CHOP and MOTION from 0 up over the last 8 bars, METAL up in the last two.
- Snap them back to 0 on the drop: the sound returns exactly to the preset.
11Tips, tricks and troubleshooting
Tips
- Clean acapellas work best. A dry vocal with little reverb slices into clearer chops and flattens more cleanly.
- Every vocal sounding alike? One note and one comb bring vocals closer together by design. Use ARP FOLLOW, pull MIX down a little, or raise LIFE.
- Too low and muddy? OCTAVE +1, or LOW CUT in ADVANCED.
- Tighter hits: FADE OUT and a shorter RING; MONO with a short STEAL.
- Bigger stereo: PAN STYLE WIDE, RANGE 100 %, FLIP up in the GROOVE.
Troubleshooting
| Symptom | Cause | Fix |
|---|---|---|
| No sound from the keys | No vocal loaded, or you play below the first chop key | Drop a vocal; play from the ROOT key (C5 by default) upward |
| Some low keys change the note instead of playing | MIDI NOTE is on: the octave under the chops chooses the note | Turn MIDI NOTE off, or play the chops from the ROOT key up |
| The GROOVE is silent | GROOVE is off, or the DAW's stop ended it | Switch GROOVE on, press play in your DAW, or click STOPPED · RUN in the footer |
| Only the first part of my file is used | Iron loads up to 60 seconds | Trim the vocal to the part you want before dropping it |
| The file is refused | Not an audio file Iron can read, or no audio in it | Use WAV, AIFF, FLAC, MP3 or OGG |
| A short wait after changing NOTE, LIFE or the slicing | The vocal is re-rendered for the new setting | The old chops play until the new ones are ready |
| It sounds too much like a robot | LIFE is low and MIX is at 100 % | Raise LIFE, or pull MIX down (NOTE on keeps the note) |
| Peaks sound squashed | SAFE is catching overs (many voices, long rings) | Lower OUT, IRON or RING, or switch POLY to MONO |
| The window is white in Ableton Live, the standalone works (Windows) | Live's Auto-Scale Plug-In Window (seen with Windows display scaling such as 110 %) | In Live's browser open Plug-Ins, right-click the plugin and untick Auto-Scale Plug-In Window, then delete the plugin from the track and insert it again |